Great Planes Giant Aeromaster Kit - GPMA0502 User Manual
Page 20
mounting plates. Note: The mounting plates are angled at
one end. Be sure to to make a left and a right cabane
mounting plate assembly.
D 4. Drill a #10 (13/64") hole through each of the cabane
mounting plate assemblies using the previously drilled
1/8" hole as a guide.
with thin CA. Glue the cabane mounting plate assembly to
ribs R-3 and R-4 with medium CA. After the CA has cured,
apply thick CA to make a fillet for added strength.
D D 4. Insert the 1/4" x 1/4" x 36" balsa aft spars in the
notches in the aft slot in the ribs. The end of the spar
should be flush with the outside face of rib R-6 and with
the edges of the ribs. As you're gluing the spars to the ribs
with thin CA. check that the building tabs are touching and
perpendicular to the building board.
Start by building the right top wing panel, upside down,
over the left wing panel plan.
D D 1. Use the cross-pinning technique to pin a 3/16" x
1/2" x 36" hardwood main spar over the wing plan. The
spar should be flush with the outside face of rib R-6.
Mark and cut the main spar at the splice as shown on the
plan. From a second 3/16" x 1/2" x 36" hardwood main
spar, cut the 3/16" x 1/2" x 7" hardwood main center
spar. Save the excess for the other main spars. Glue the
two spars together with 6-minute epoxy. After the epoxy
has cured, remove the spar and splice the second spar
together over the plan. Don't forget to cover the plans
with wax paper.
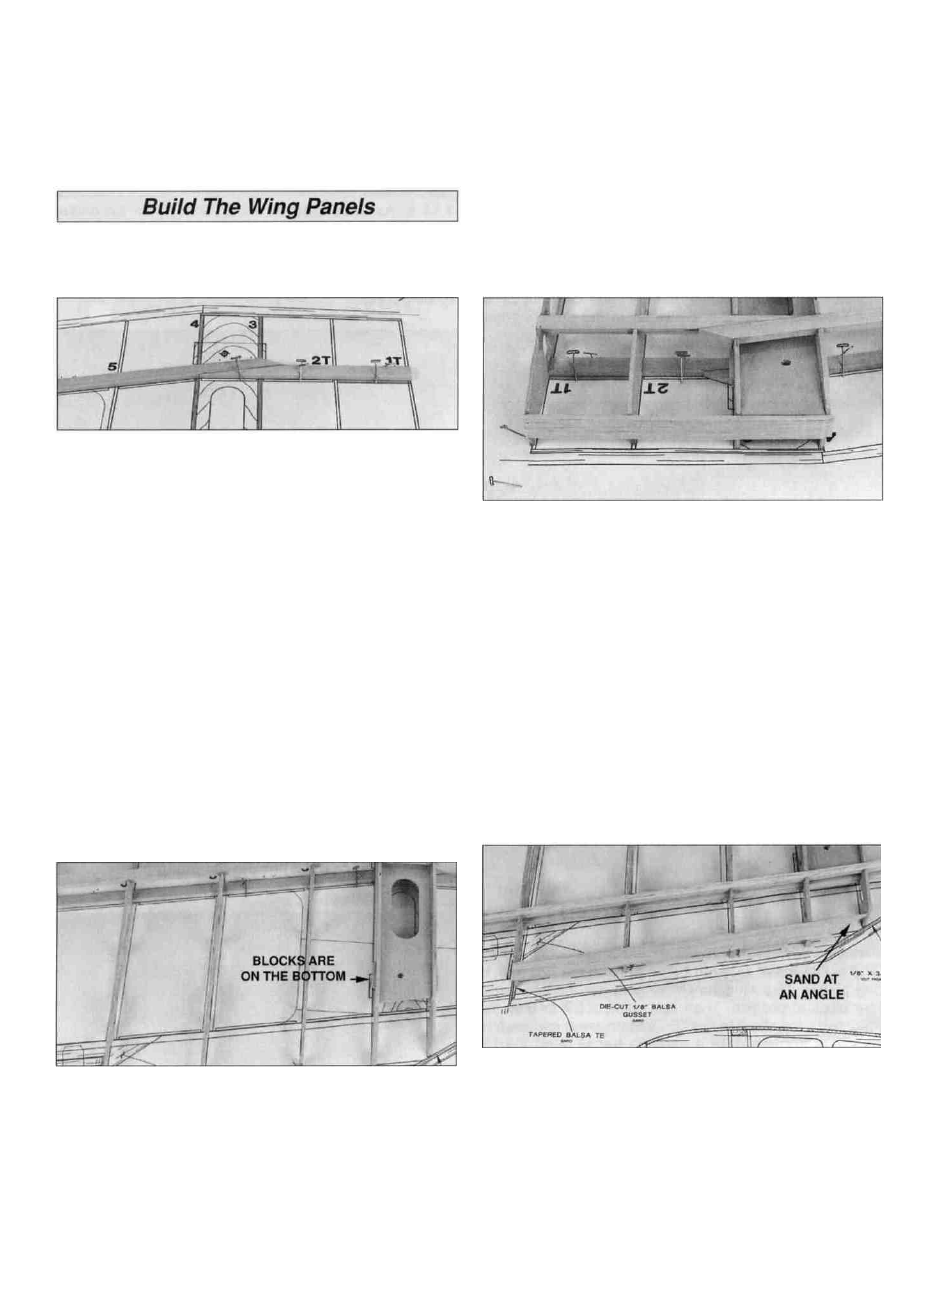
D D 2. Fit the cabane mounting plate assembly into the
slots in ribs R-3 and R-4. Place the die-cut wing ribs R-1T,
R-2T, R-3, R-4, R-5, R-5A, R-5T, R-PT and R-6 on the top
of the spar, over their locations on the plan.
Note: The jig tabs should be contacting the plan. Use
small T-pins to pin the forward and aft jig tabs to the
building board over their location on the plan. On the aft
jig tabs, insert the T-pins at an angle from the rear so they
can be removed after the TE and sheeting are glued
in position.
D D 5. From the 1/8" x 3/4" x 8" balsa stick, make a sub
LE to fit between ribs R-1T and R-4. Center the sub LE
on the front of the ribs and glue with thin CA. Use a
sanding bar with 220-grit sandpaper to sand the top of the
sub LE flush with the ribs. Use a sanding bar to sand an
angle on the sub LE at rib R-4 for the LE to attach to.
D D 6. Position the 30" shaped balsa leading edge (LE)
on the front of the ribs. The LE should be centered on ribs
R-4 through R-6 and the tip end should extend past rib
R-6 by at least 1-5/8". Make sure all the jig tabs are
contacting the building board. Then use thin CA to glue
the LE to the front of the ribs.
D D 3. Place the second 3/16" x 1/2" x 36" hardwood
main spar in the notches of the ribs. The end of the spar
should be flush with the outside face of rib R-6 and with
the top of the ribs. With the ribs perpendicular to the
building board, glue the ribs to the top and bottom spars
D D 7. Cut the 36" balsa trailing edge (TE) 12" long. Use
thin CA to glue the TE to the ends of ribs R-4 and R-5 so
that 1/16" extends past rib R-5 into the aileron bay. Use a
sanding bar to sand the end of the TE flush with rib R-5.
Sand the other end of the TE at the angle shown on
the plan.
20