Loading liquid fertilizer (option), System inspection, Tank loading – Great Plains YP825AR Operator Manual User Manual
Page 43
Great Plains Manufacturing, Inc.
Operating Instructions
39
2014-06-17
401-923M
Loading Liquid Fertilizer (Option)
If liquid fertilizer will not be applied, lock-up the fertilizer
ground drive (page 21), or disengage the chain on the
pump drive.
System Inspection
1.
Wear protective equipment suitable for the material
presently in or previously dispensed from the tank(s).
2.
Remove the lid on each tank and inspect for:
- residual fertilizer incompatible with next use
- contaminants
- debris that might clog filters
- trapped animals lost tools, etc.
3.
If it is necessary to flush a tank, or remove debris too
large to flush, see “Tank Clean-Out” on page 98.
4.
Re-secure each lid.
5.
At first use each season, and after extended use,
check the strainer mounted under the pump. Perform
any cleaning before loading fertilizer.
6.
The standard screen size is 80 (Blue). Some orifice
selections (step 9) require changing the strainer.
Tank Loading
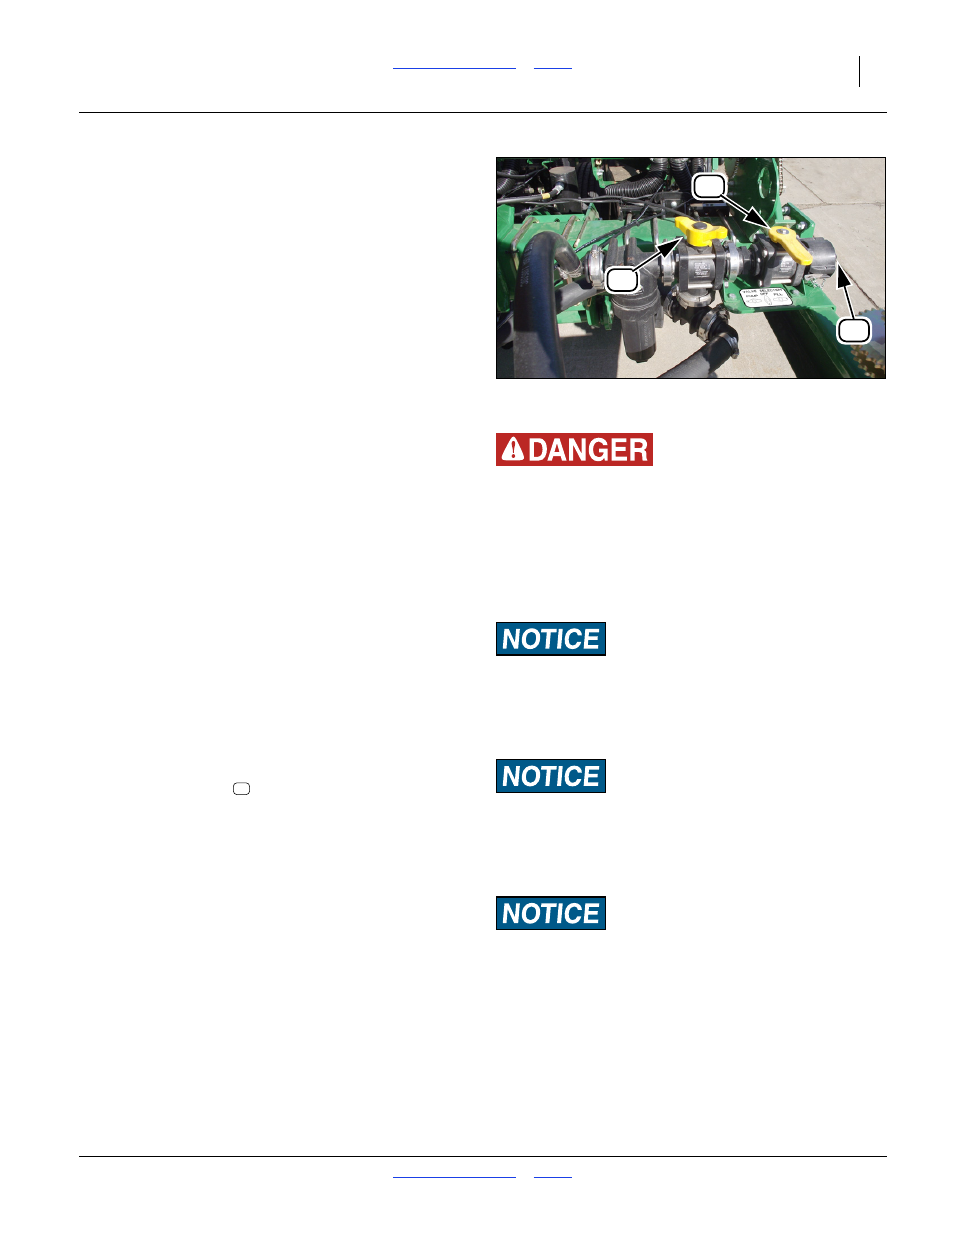
Refer to Figure 39, and
Figure 129 on page 135
Review the information below before commencing steps.
• Load chemicals immediately prior to use. Material
loaded too early may sediment or stratify, resulting in
uneven application or system plugging.
• Load on level ground. Fill is uneven across a slope on
a dual-tank system. Unless valves are set to prevent it,
material can flow from one tank to another.
• The tank is designed to be loaded using the 2 inch
CAM quick-fill inlet (
), located at the left front of the
implement. If for any reason you cannot use that inlet,
you can also load material via a ladder and tank top
hatch. The lid is threaded and unscrews.
• Determine how to monitor tank fill level. If the day is
bright, or loading at night with a bright light available, it
is possible to see the fluid level through the
semi-translucent tank walls. Otherwise, it is necessary
to have an observer monitor through the tank hatch.
• Be familiar with the location of plumbing valves.
Common task require setting as many as five planter
valves. See page 135.
7.
Consult the Seed and Fertilizer Rate manual
(401-923B) for rate setting details.
8.
Set the Fertilizer drive sprockets and piston pump
rate adjuster per the Rate charts.
9.
Install the recommended size orifice plate at each
active drop line (Seed Rate manual).
11
13
12
Agricultural Chemical Hazard:
Avoid contact with skin or eyes. Wear proper protective
equipment as required by chemical manufacturer. Avoid
prolonged breathing of chemical fumes. Wear respirator as
required by chemical manufacturer. Some chemicals will cause
serious burns, lung damage, and death. Seek medical
assistance immediately if an accident occurs. Know what to do
in case of accident.
Equipment Damage Risk:
Do not run the pump when dry. Remove the final pump drive
chain if not applying fertilizer. Air rapidly corrodes the pump.
When not pumping, fill the pump with clean water or RV
antifreeze.
Equipment Damage and Plugging Risks:
Use only materials compatible with polyethylene and
polypropylene. Use only pre-mixed liquid fertilizer. The system
is not designed for dry fertilizer mixes. Granular fertilizer may
damage the pump and plug orifices.
Equipment Damage Risk:
Do not leave fertilizer standing. Load late. Pump it all. Clean
out the system. Fertilizer is usually extremely caustic, and can
damage the piston pump if left standing. Also protect the pump
from air. See “Liquid Fertilizer Clean-Out” on page 98.
Note: Is it not possible to use the planter pump to load
material, as it only pumps when the planter is in
motion and is only plumbed to pump to the boom.
If the fertilizer source has no pump, it needs to be
elevated above the tank for gravity fill.
Figure 39
Quick-Fill Inlet
31996
11