In100 mortise lock, 2 how to change hand of lock body, 3 install lock body – SARGENT IN100 Mortise Locks User Manual
Page 7: A. reverse lock hand, B. reverse latch hand
6/30/12
1-800-810-WIRE • www.sargentlock.com • A8122A 7
Copyright © 2012, Sargen
t Manufacturing Company
, an A
SS
A AB
LO
Y G
roup company
. All right
s reser
ved
.
Reproductions in whole or in par
t without express writ
ten permission of Sargen
t Manufacturing Company is prohibited
.
IN100 Mortise Lock
2 How to Change Hand of Lock body
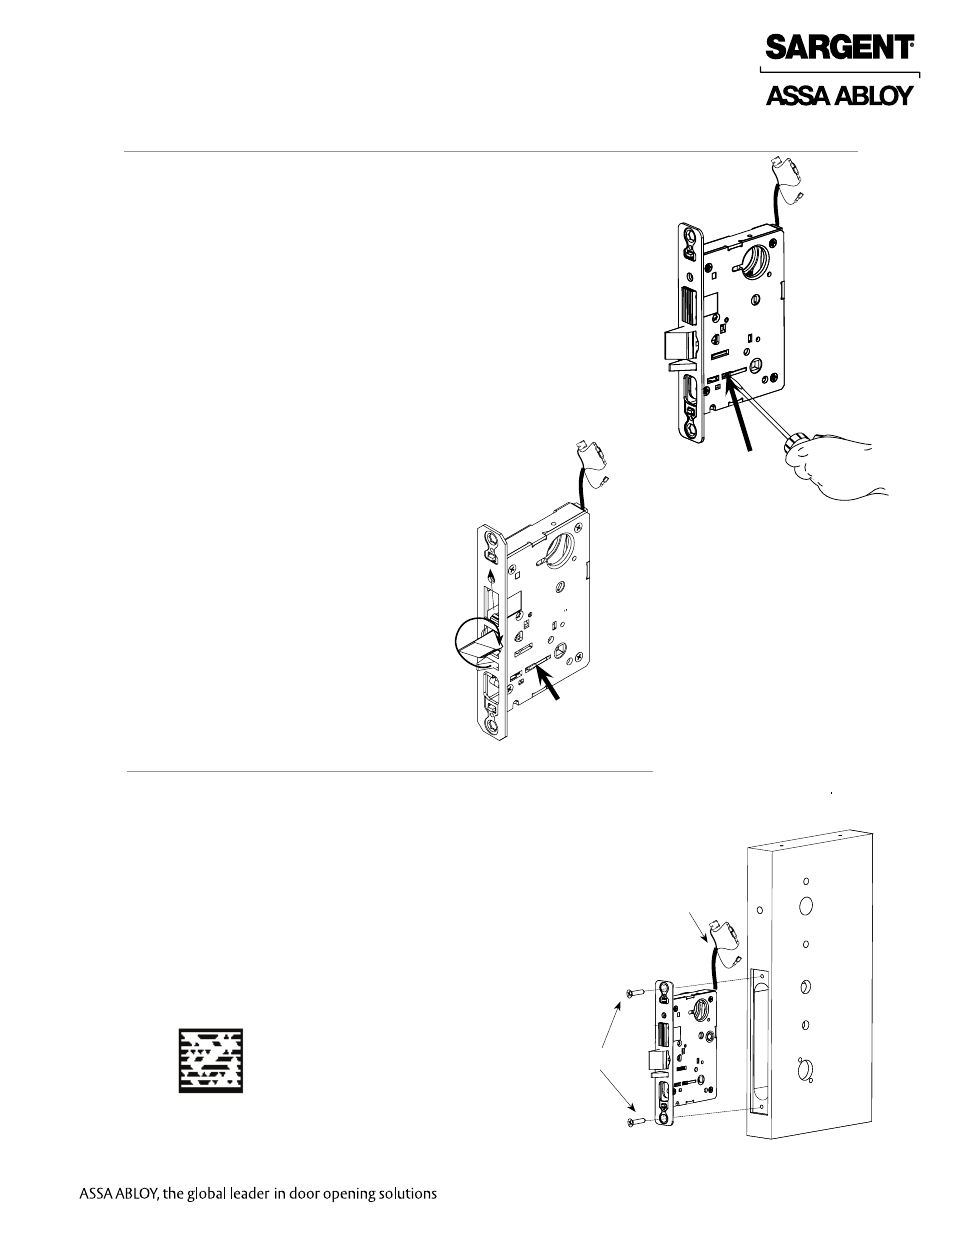
1. Position lock body so the red surface of the locking piece is visible.
2. Insert blade type screwdriver into locking piece slot to rotate
locking piece.
3. Push locking piece toward the back of the lock
body and rotate the locking piece 180°.
Note: Red indicates locked (outside) side.
Fig. 2A
A. Reverse Lock Hand
1. Rotate the latchbolt 180°.
2. Flip deadlatch by hand to match bevel of latchbolt.
B. Reverse Latch Hand
Locking piece
Fig. 2B
Locking piece
3 Install Lock body
1. Feed the wire harness through the mortise pocket
and inside preparation hole as depicted in Fig. 3.
2. Carefully push the lock body into the pocket while lightly
applying tension to the wire harness.
Note: Do not pull the lock into the pocket with the
harness alone. Ensure that the wire harness is not
pinched between the lock and the mortise pocket.
3. Insert (2) #12-24 screws into the lock body
and tighten with a screw driver.
Mortise
Connectors
Fig. 3
Inside of Door
(2) #12-24 screws
Scan this Microsoft® Tag using your mobile phone to
see a video of this installation step. The Microsoft Tag
mobile app is required to scan the Tag. Download the
free mobile app at http://gettag.mobi