SoundOff Signal Premium Gen3 LED Visor User Manual
Generation 3 led visor light, Elv3bv(y)+(x)
ELV3BV(y)+(x) 11.08
FLASH PATTERNS for VISOR LIGHT
1
Quint Flash
Both lights alternating
2 Warp Flash
" " "
3 Inter-Cycle Flash
" " "
4 Double Flash
" " "
5 Quad Flash
" " "
6 3 Flashes / Second
" " "
7 3 Flashes / Second
Both lights operating simultaneously
8 Q-Switch Pattern
Both lights alternating
9 Driver Side Steady Burn
Passenger side Double Flash
10 Driver Side Steady Burn
Passenger side Quad Flash
11 Driver Side Steady Burn
Passenger side Quint Flash
12 Driver Side Steady Burn
Passenger side Warp Flash
13 E-Pattern Single Flash
Both lights alternating
14 E-Pattern Double Flash
" " "
15 E-Pattern Single Flash
Both lights operating simultaneously
16 E-Pattern Double Flash
" " " "
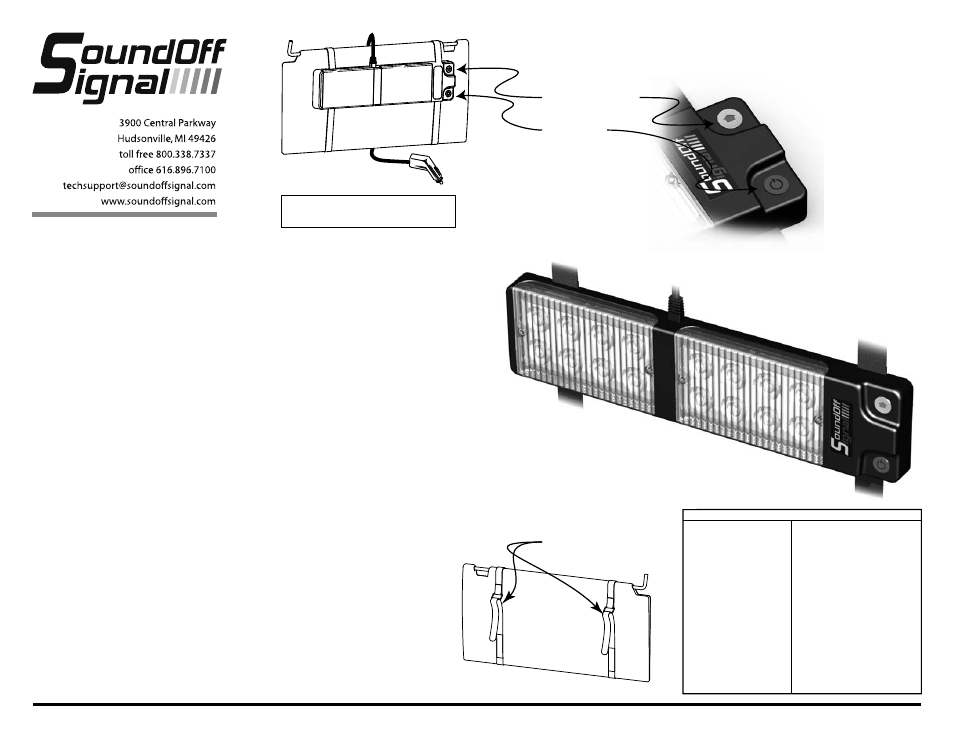
MOUNTING LED VISOR LIGHT
Important Note: LED VISOR LIGHT must
be properly installed to prevent the unit
from coming loose during braking or
maneuvering.
Note: Attach LED VISOR LIGHT to
passenger side visor ONLY.
1. Position the LED VISOR LIGHT with the
power cord toward the top of the
vehicle, and the back of the unit against
the vehicle's passenger side visor. Note:
The visor must be in the down position.
2. Pivot the visor down and secure the
LED VISOR LIGHT by passing the end
of one Velcro
tm
strap through the buckle
on the other end of the same strap. Pull
the loose end of the strap to tighten and
then attach the loose end to the buckle
side strap to secure. Repeat for the
opposite side. Return the vehicle's visor
to the stored position.
TECHNICAL SPECIFICATIONS
Input Voltage Range:
10-30 Vdc
Current Draw:
0.75 @ 12.8 Vdc
0.35 @2 5.6 Vdc
Reverse Polarity:
Protected
Transient: Protected
Operating Temperature: 40
o
to 65
o
C
Standby Current: 25 mA @ 12.8Vdc
35 mA @ 25.6Vdc
OPERATING INSTRUCTIONS
1. Plug the LED VISOR LIGHT power
cord into the vehicle cigarette lighter
or 12 Vdc Power receptacle outlet.
Note: The electrical protection fuse
(10 amp-type AGC) is located in the
nose of the cigarette lighter plug (not
shown). Unscrew the plastic retaining
ring to expose fuse.
2. To activate the light press the "power"
button located on the front of the unit.
3. To deactivate the light push the power
button.
4. The LED VISOR LIGHT can
generate 16 different light patterns.
To change light patterns,
momentarily press the white
“Arrow” button to advance the
pattern. Flash patterns are listed
on this sheet and on the back of
the LED VISOR LIGHT housing.
Note: The LED Visor Light will
memorize the power-down state.
It can be connected to a master
power switch and the Visor Light
will turn on without having to press
the power button.
GENERATION 3 LED
VISOR LIGHT
ELV3BV(y)+(x)
Pattern Select Button
Power Button
NOTE: Attach LED VISOR LIGHT
to PASSENGER SIDE visor ONLY
WARNING
: Warning devices are strictly
regulated and governed by Federal, State
and Municipal ordinances. These devices
shall be used ONLY on approved vehicles.
It is the sole responsibility of the user of
these devices to ensure compliance.
Pull Straps to Tighten