Prescolite T4 Halogen Housings User Manual
Instruction sheet, Installation instructions
Instruction
Sheet
www.prescolite.com
•
Prescolite
TollFree
Technical
Support
1.888.PRS.4TEC
•
Hours:
8am
-
5pm
ET
701 Millennium Boulevard • Greenville, SC 29607
With representatives offices in principal cities throughout North America.
Copyright 2010, 08/31/10 revision, All Rights Reserved - Printed in U.S.A.
Part No. . . . . . . . . . . . . . . . . . . . . . . . . . . . . . . . . 93006268
Instruction
Sheet
INSTALLATION INSTRUCTIONS
T4 HALOGEN HOUSINGS 250W & 400W 120/277V
1. BEND MOUNTING BRACKETS AS SHOWN.
INSTALL THE FIXTURE IN THE CEILING USING
MOUNTING CHANNEL OR BAR, (BY OTHERS),
PLACED IN THE ADJUSTABLE MOUNTING
BRACKETS. MOUNT THE FIXTURE IN THE CEILING
SO THAT THE WEIGHT OF THE FIXTURE IS
SUPPORTED BY THE MOUNTING CHANNEL OR
BAR AND/OR HANGER WIRES SECURED TO THE
BUILDING STRUCTURE.
2. ADJUST THE FIXTURE SO THE BOTTOM OF THE
PLASTER FLANGE IS FLUSH WITH THE FINISHED
CEILING, AND IS IN ALIGNMENT WITH ADJACENT
FIXTURES. SECURE MOUNTING BRACKETS BY
TIGHTENING THE WING NUTS ON EITHER SIDE
OF THE FIXTURE.
3. DETERMINE WHERE THE SUPPLY WIRING
CONDUIT WILL ENTER THE J-BOX, AND
ATTACH IT IN CONFORMANCE WITH THE
NATIONAL ELECTRIC CODE.
4. REMOVE THE J-BOX COVER PLATE(S),
CONNECT THE POWER SUPPLY LEADS,
BLACK TO BLACK (LINE), AND WHITE
TO WHITE (COMMON). CONNECT THE
GROUND WIRE TO THE BARE COPPER
GROUND WIRE IN THE J-BOX. REINSTALL
THE J-BOX COVER PLATES.
5. INSTALL THE PROPER LAMP ENSURING NOT TO
TOUCH THE LAMP WITH UNPROTECTED HAND.
OIL WILL CAUSE LAMP TO FAIL PREMATURELY.
INSTALL THE LENS. NOTE: WHEN USING A
TEXTURED OR PRISMATIC LENS TEXTURE OR
PRISMS GO TOWARDS APERTURE OR AWAY
FROM LAMP.
6. INSTALL THE SELF-TRIM REFLECTOR AFTER ALL
CEILING WORK AND FINISH WORK IS COMPLETE.
7. PUSH THE SELF-TRIM REFLECTOR INTO THE
PLASTER FLANGE APERTURE UNTIL THE FLANGE
ON THE REFLECTOR IS FLUSH AGAINST THE
FINISHED CEILING.
CAUTION: DO NOT ATTEMPT TO MODIFY OR REWIRE FACTORY INSTALLED WIRING ON THE FIXTURE.
SAFETY AND PROPER OPERATION OF THE FIXTURE DEPEND ON THE INTEGRITY OF THE WIRING.
SAVE THESE INSTRUCTIONS
CAUTION: TO REDUCE THE RISK OF ELECTRICAL
SHOCK MAKE CERTAIN THAT THE POWER IS OFF
BEFORE INSTALLING OR SERVICING THIS FIXTURE.
SEE PAGE 2 FOR RE-LAMPING INSTRUCTIONS.
IMPORTANT SAFETY INFORMATION. READ AND FOLLOW ALL SAFETY INSTRUCTIONS. Follow label information
and instructions concerning Wet or Damp Locations, installation near combustible materials, insulation, building materials,
and proper lamping. Do not install in areas subject to combustible vapors or gases. Before wiring to power supply and
during servicing or relamping, turn off power at fuse or circuit breaker. All servicing or relamping must be performed by
qualified service personnel. Product must be grounded to avoid potential electric shock or other potential hazard.
Product must be mounted in locations and at heights and in a manner consistent with its intended use, and in com-
pliance with the National Electrical Code and local codes. The use of accessory equipment not recommended by the
manufacturer or installed contrary to instructions may cause an unsafe condition. Do not block light emanating from product
in whole or part, as this may cause an unsafe condition. Do not allow items such as drapes, curtains, screens or the like to
come into contact with the product or to block light from the product, as this may cause an unsafe condition.
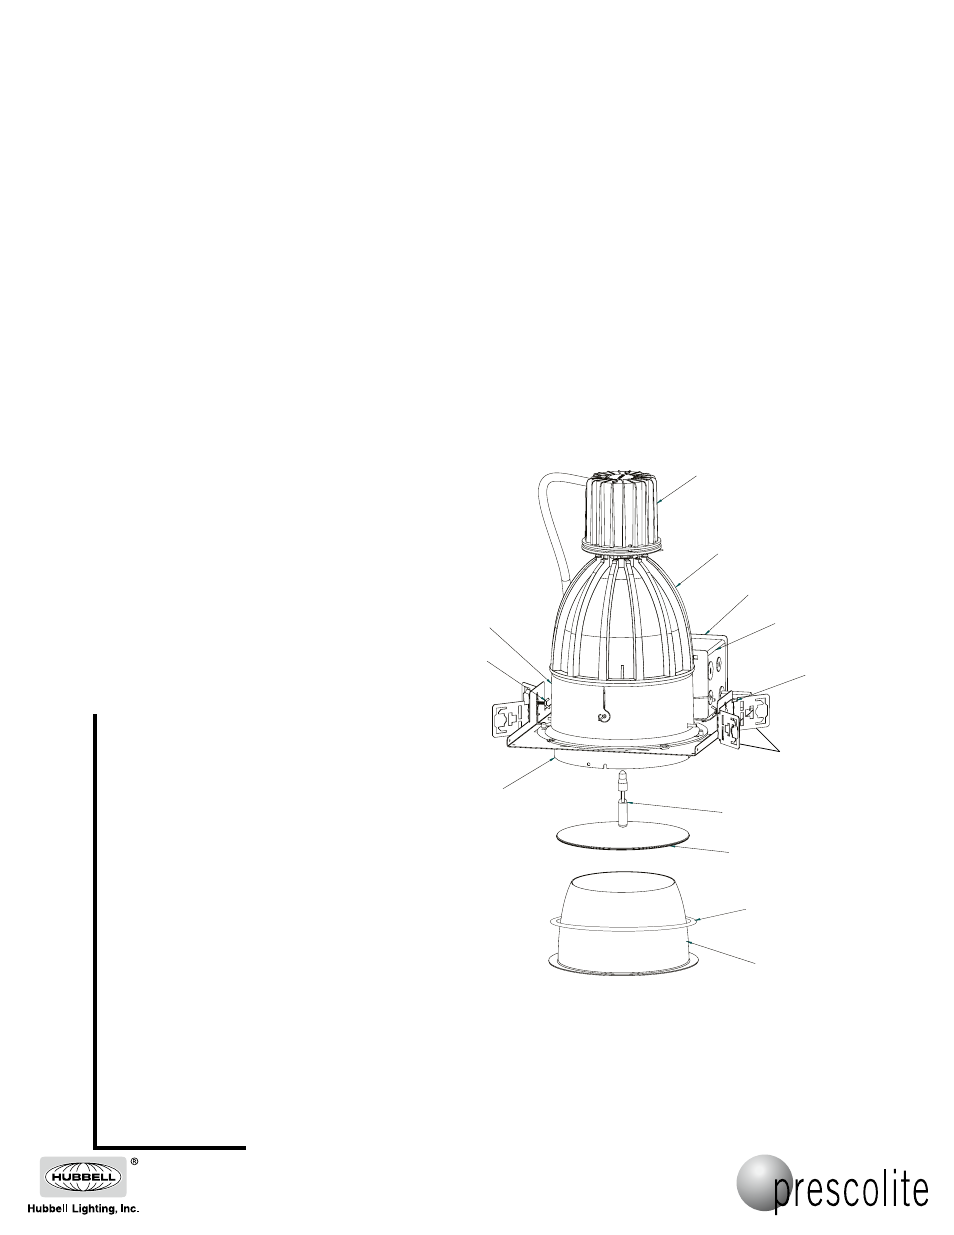
LENS
SELF-TRIM
REFLECTOR
MOUNTING BRACKETS
ARE SUPPLIED FLAT.
TO ENSURE PROPER
ALIGNMENT, BEND
BRACKETS ALONG THE
THREE OBLONG HOLES
PUNCHED IN THE
BRACKET ON EACH END,
AND ALIGN THE ANGLE
WITH THE MARKS
ON THE FLANGE
SURFACE.
MOUNTING
BRACKETS
HEATSINK
LAMP
SOCKET CUP ASSEMBLY
BOTTOM OF
PLASTER FLANGE
WING NUT
J-BOX DOOR
J-BOX
COWLING
WTR8 TRIM RING ACCESSORY
REQUIRED FOR 400W AND 500W
HOUSINGS
400W products are marked spacing and must be installed
with minimum spacings between:
Center-to-center of adjacent luminaires: 915mm (36in)
Top of luminaire to overhead building member: 152mm (6in)
Luminaire center to side of building member: 915mm (36in)
WARNING- This product contains chemicals known to the State of California to cause cancer, birth defects and/or
other reproductive harm. Thoroughly wash hands after installing, handling, cleaning, or otherwise touching this
product.