Print quality problems and solutions – Dascom MIP480 User Guide User Manual
Page 76
Trouble-Shooting
6-2
Print Quality Problems and Solutions
Poor print quality or other printing problems are often caused by incorrect printer set-up
or incorrect software settings. A gradual decrease in print quality usually indicates a worn
ribbon. The following table identifies common print quality problems and suggests
solutions.
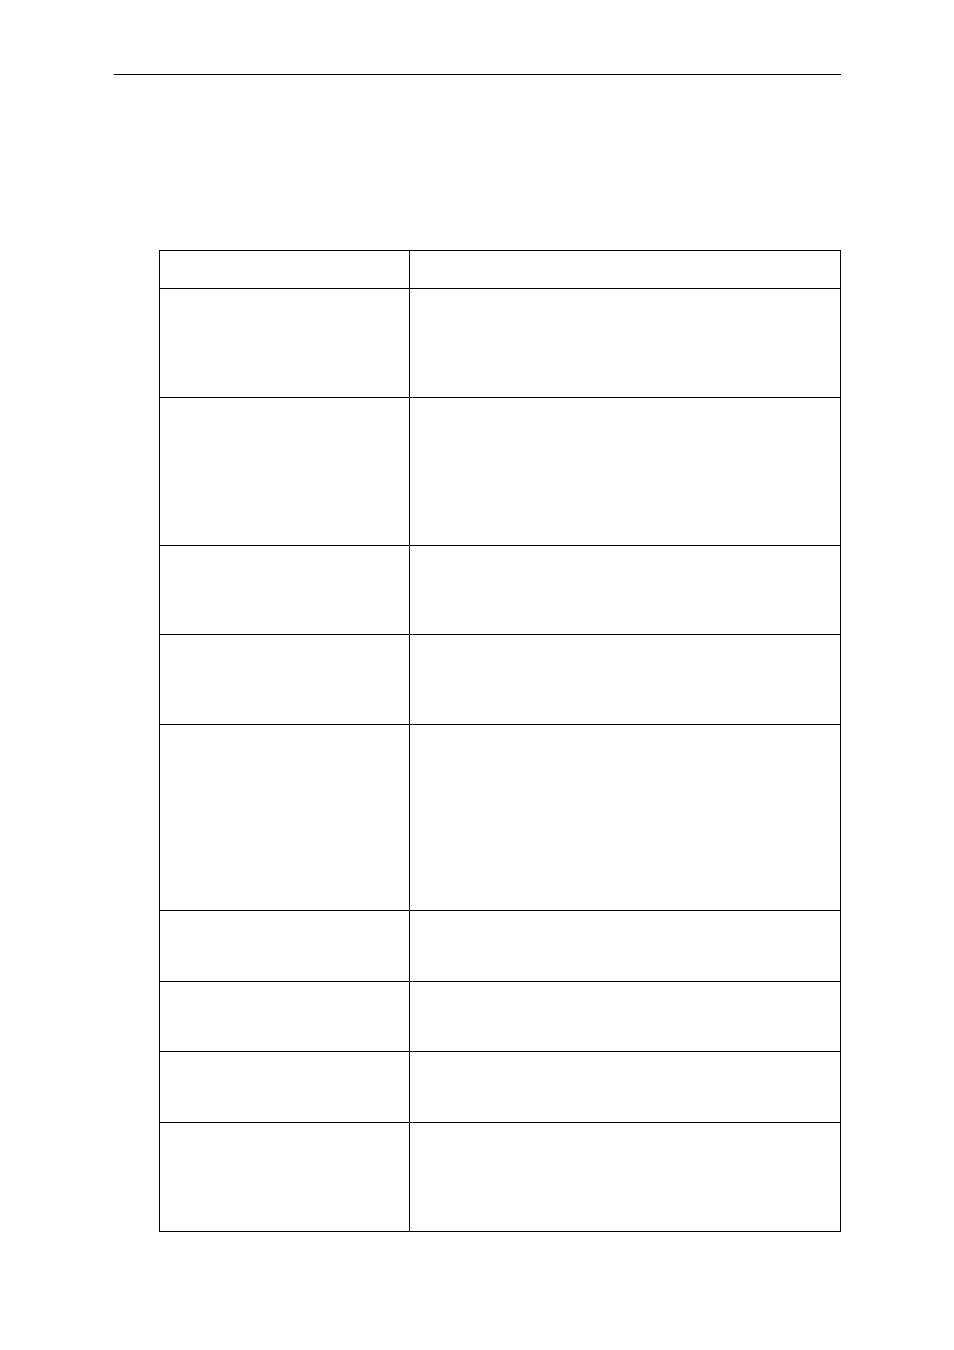
Problem
Solution
Printing is too light or too dark.
Make sure that the ribbon cartridge is properly installed
and that the ribbon feeds smoothly.
Make sure that the Print Gap lever is set for the thickness
of your paper. See Chapter 2, Paper Handling
Check ribbon wear. Replace the ribbon if necessary.
Smears and stains appear on
the page.
Make sure that the Print Gap lever is set for the thickness
of your paper. See “Adjusting for Paper Thickness” in
Chapter 2, Paper Handling.
Check ribbon wear. Replace the ribbon if necessary.
Check whether the tip of the print head is dirty. Clean the
head with a soft cloth if necessary. The print head should
be changed by a technician.
Printing is erratic or the wrong
characters are printed. Many “?”
or unexpected characters are
printed.
Make sure that the interface cable is securely connected
to both the printer and computer.
Make sure that the printer Emulation selected in your soft-
ware is the same as the Emulation selected on the printer.
Printing is vertically misaligned
(jagged).
Use the printer's vertical alignment function to check the
vertical print alignment. If necessary, adjust the print align-
ment. See the section, “Checking Vertical Alignment” in
this chapter.
The top margin is wrong.
The top margin is the sum of the printer’s top-of-form set-
ting, the software-specified top margin, and the printer’s
TOP-MRGN setting. Proceed as follows:
• Make sure that the top-of-form setting is correct. The
factory default is 0 mm (0 inch).
• Check the software-specified top margin. Refer to your
software documentation.
• Check the printer’s TOP-MRGN setting. See Chapter 4,
Set-Up Mode.
Lines are double spaced instead
of single spaced.
Change the LINE MODE setting in the printer Set-Up
mode to CR=LF+CR. See “Changing Macro Options” in
Chapter 4, Set-Up Mode.
The printer overprints on the
same line
Change the LINE MODE setting in the printer Set-Up
mode to CR=LF+CR. See “Changing Macro Options” in
Chapter 4, Set-Up Mode.
The next print line starts where
the previous line ended instead
of at the left margin.
Change the LINE MODE setting in the printer Set-Up
mode to LF=LF+CR. See the section, “Changing Macro
Options” in Chapter 4, Set-Up Mode.
The printer overprints on the
same line while the next print
line starts where the previous
line ended instead of at the left
margin.
Change the LINE MODE setting in the printer Set-Up
mode to CR=LF+CR and LF=LF+CR. See the section,
“Changing Macro Options” in Chapter 4, Set-Up Mode.