Xj rear bumper installation – OR-Fab 89000 ORF PRODUCT DISPLAY RACK User Manual
Page 16
16
DISPLAY RACK #89000
Step 3:
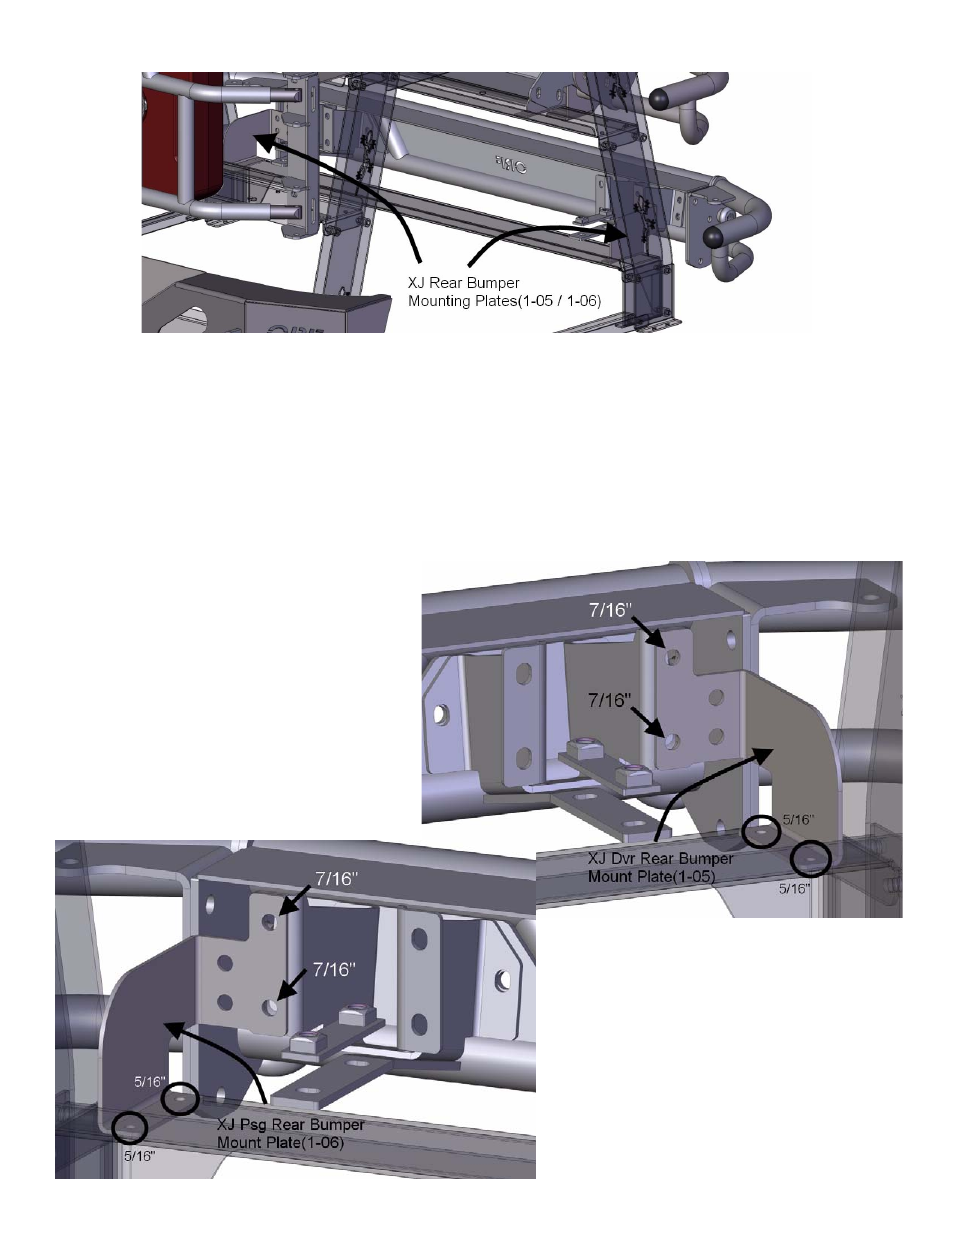
Use four kit 5/16” bolts, washers & flange nuts to assemble two kit rear bumper mount
plates (1-05 / 1-06) onto the kit bottom display tray(0-10) as shown in images
(Reference arrows for placement.)
Step 1:
Locate XJ Rear Bumper and two kit rear bumper mount plates(1-05 / 1-06)
XJ Rear Bumper Installation
Step 4:
Locate XJ Rear Bumper
Step 6:
Install two kit 716” bolts, nuts & washers
through kit XJ psg. rear bumper mount
plate(1-06) and XJ rear bumper; securing
XJ bumper on right side of display rack, as
shown in image.
(Reference arrows for placement.)
Step 5:
Install two kit 716” bolts, nuts & washers
through kit XJ dvr. rear bumper mount
plate(1-05) and XJ rear bumper; securing
XJ bumper on left side of display rack, as
shown in image.
(Reference arrows for placement.)
Step 2:
Use XJ rear bumper instructions and hardware to complete the assembly of the XJ rear
bumper, with rear body mounts, before installing it onto the kit brackets as shown in images.
- 86300 PRE RUNNER TIRE CARRIER - ALL PICKUPS (3 pages)
- 87030 DEF Skid Plate For 2011 - 2015 Chevy/GMC 2500 HD Duramax Diesel Pickups (2 pages)
- 89601 PRO LIGHT BAR - CHEVY 2500/3500 (3 pages)
- 87041 00-06 TOYOTA TUNDRA / 01-07 SEQUOIA TRANS. SKID PLATE/CAT THEFT SHIELD (2 pages)
- 89500 PRO-LIGHT BAR - FORD F150 4-DOOR (2 pages)
- 87042 TUNDRA/08-13 SEQUOIA TRANSMISSION SKID PLATE CAT THEFT (2 pages)
- 83095 JEEP YJ ROCK SLIDER FRONT BUMPER (2 pages)
- 83100 ROCK SLIDER REAR BUMPER CJ / TJ / TJL (2 pages)
- 83202 JEEP CHEROKEE - XJ NON-WINCH FRONT BUMPER (12 pages)
- 83204 OEM Light Mount Rock Slider Front Bumper for Jeep JKs (5 pages)
- 83205 ROCK SLIDER REAR BUMPER JEEP JK - 2/4 DOOR (6 pages)
- 83208 3/16 PLATE METAL REAR BUMPER FOR JEEP JK - 2/4 DOOR (4 pages)
- 83209 JEEP XJ CHEROKEE REAR TUBE BUMPER (5 pages)
- 83210 OR-Fabs Front Stinger Bumper for Jeep JKs - Centered Winch Mount (7 pages)
- 83218 JK REAR PLATE METAL BUMPER W/ LED BACKUP LIGHTS (5 pages)
- 83233 JK WRANGLER HD MID WIDTH OFFSET WINCH FRONT BUMPER (5 pages)
- 83235 JK WRANGLER HD FULL WIDTH FRONT BUMPER (4 pages)
- 83240 JEEP CHEROKEE XJ FRONT HD BUMPER WITH HOOP (10 pages)
- 83245 JEEP CHEROKEE XJ HD COMP CUT REAR BUMPER (CUT & FOLDED) REAR LOWER QUARTERS (8 pages)
- 83250 XJ CHEROKEE HD REAR BUMPER (4 pages)
- 83640 REAR ROCKSLIDER SHEET METAL BUMPER / TJ / TJL (2 pages)
- 83660 JEEP TJ FRONT WINCH BUMPER (2 pages)
- 83665 TJ WRANGLER HD FULL WIDTH FRONT WINCH BUMPER W/ HOOP (2 pages)
- 84095 ROCK SLIDER SIDE BAR YJ (1 page)
- 84200 ROCKER PANEL S1 (PAIR) TJ (9 pages)
- 84207 ROCKER PANEL W/ BAR - JK WRANGLER 2-DOOR (5 pages)
- 84310 ROCKER SIDE ARMOR WRANGLER JK 2-DOOR (3 pages)
- 84330 JK 2 DOOR QUARTER ARMOR W/ MAXXIMA LAMPS (10 pages)
- 84400 JEEP CHEROKEE XJ QUARTER ARMOR (3 pages)
- 84460 XJ CHEROKEE HD ROCK SLIDERS (4 pages)
- 85095 JEEP YJ SWING AWAY SPARE TIRE/CAN CARRIER (12 pages)
- 85207 JEEP JK WRANGLER SWING AWAY SPARE TIRE/GERRY CAN CARRIER (9 pages)
- 85209 JEEP WRANGLER JK SWING AWAY SPARE TIRE CARRIER WITH ROTOPAX CONTAINERS (9 pages)
- 87007 JK ROCK SLIDER FRONT SWAY BAR DISCONNECT SKID PLATE (3 pages)
- 87011 MULTI LIGHT MOUNT KIT ALL ORF BUMPERS (1 page)
- 87013 JEEP FUEL CAN ADAPTER KIT FOR NON-LIP GAS CAN (2 pages)
- 87016 BUMPER GRILL GUARD HOOP (2 pages)
- 87017 JEEP THIRD BRAKE LIGHT MOUNT FOR OR-FAB SPARE TIRE CARRIERS (4 pages)
- 87022 Winch Mounting Plate -- Fits OR-Fab Rock Slider Non-Winch Front Bumpers for Jeep JKs (1 page)
- 87024 JK WINDSHIELD LIGHT MOUNT SYSTEM (3 pages)
- 87025 ROCK DOOR MIRROR RELOCATION BRACKETS (2 pages)
- 87031 ROTOPAX FUEL CAN CARRIER ADAPTER BRACKET KIT (2 pages)
- 87034 JK WRANGLER HD TRANSMISSION CROSS MEMBER (4 pages)
- 87035 TIRE CARRIER T-HANDLE LICENSE PLATE RELOCATION BRACKET (2 pages)
- 87046 2012-2015 Jeep JK Vacuum Pump Relocation Kit (3 pages)