Pomiar, Pojedynczy pomiar】 【funkcja ciągłego pomiaru – Nikon COOLSHOT User Manual
Page 98
194
195
Pl
En
Jp
Fr
Es
Pt
Ru
Se
Nl
De
It
Dk
Hu
Cz
Fi
No
Ro
Pl
En
Jp
Fr
Es
Pt
Ru
Se
Nl
De
It
Dk
Hu
Cz
Fi
No
Ro
Measurement
1. Press the POWER button for power-on.
(Power turns off 8 seconds after the last
operation.)
Immediately after power-on.
(Initializing)
Stand-by.
3. Press POWER button once to start single measurement.
Measuring.
4. After measurement, “distance” or “fail to measure” indicator are displayed for 8 seconds, then power turns off. If you press the POWER
button during power-on (while the internal display is lit), another single measurement starts.
Failure to measure or
unable to measure distance.
Displays the measured
figure. (Target 1)
Displays the measured
figure. (Target 2)
3. Keep pressing POWER button to start continuous measurement up to 20 seconds. The internal display shows “distance” and
“fail to measure” indicator alternately.
Note: Laser irradiaton mark is blinking during the measurement.
Note: If you stop pressing the button, the continuous measuremen stops
Target focusing.
2. Aim at the target
.
Position the target at the center of the reticle
[Single measurement]
Failure to measure or
unable to measure distance.
Upward measurement.
Downward measurement.
Displays the measured figure.
[Continuous measurement]
4. After continuous measurement, the measure results are displayed for 8 seconds, then power turns off. If you press the POWER
button during power-on (while the internal display is lit), another measrement starts.
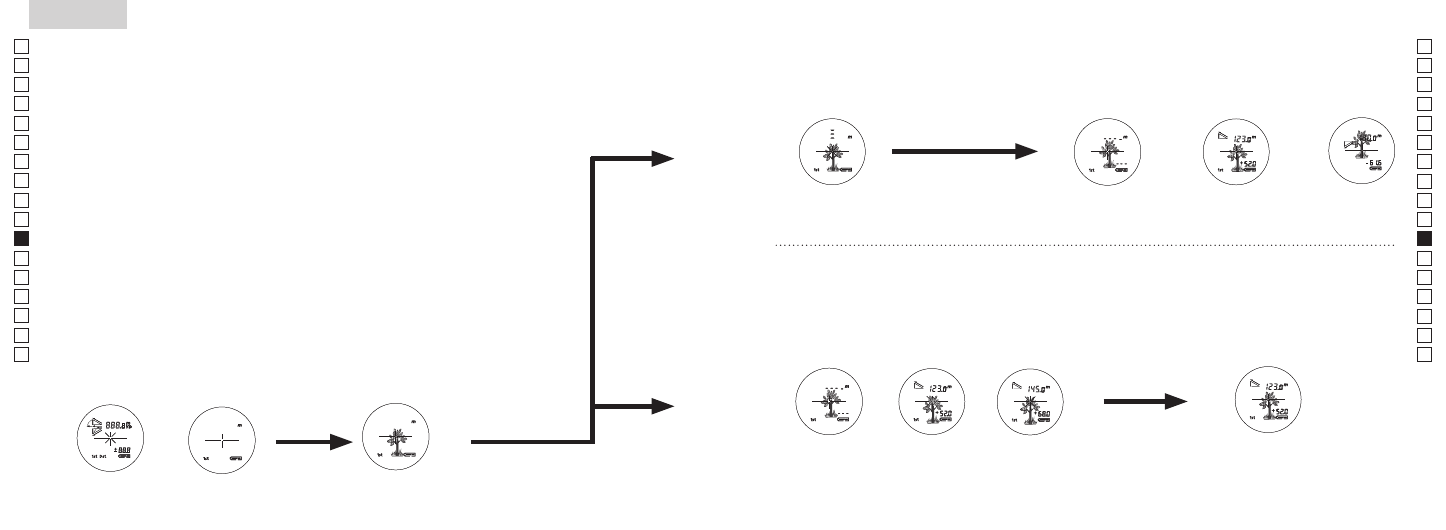
Pomiar
1. Włącz zasilanie (upewnij się, że
wewnętrzny ekran jest włączony)
2. Skieruj na cel.
Ustaw cel na środku krzyża
nitek.
Natychmiast po włączeniu
(Inicjalizacja).
Tryb czuwania
Ustawianie na celu
(Automatyczne wyłączanie zasilania
po upływie 8 sekund nieużytkowania)
【Pojedynczy pomiar】
【Funkcja ciągłego pomiaru】
3. Naciśnij raz przycisk POWER ON/
Measurement (Włączenie zasilania/pomiar),
aby rozpocząć pojedynczy pomiar.
Measurement
1. Press the POWER button for power-on.
(Power turns off 8 seconds after the last
operation.)
Immediately after power-on.
(Initializing)
Stand-by.
3. Press POWER button once to start single measurement.
Measuring.
4. After measurement, “distance” or “fail to measure” indicator are displayed for 8 seconds, then power turns off. If you press the POWER
button during power-on (while the internal display is lit), another single measurement starts.
Failure to measure or
unable to measure distance.
Displays the measured
figure. (Target 1)
Displays the measured
figure. (Target 2)
3. Keep pressing POWER button to start continuous measurement up to 20 seconds. The internal display shows “distance” and
“fail to measure” indicator alternately.
Note: Laser irradiaton mark is blinking during the measurement.
Note: If you stop pressing the button, the continuous measuremen stops
Target focusing.
2. Aim at the target
.
Position the target at the center of the reticle
[Single measurement]
Failure to measure or
unable to measure distance.
Upward measurement.
Downward measurement.
Displays the measured figure.
[Continuous measurement]
4. After continuous measurement, the measure results are displayed for 8 seconds, then power turns off. If you press the POWER
button during power-on (while the internal display is lit), another measrement starts.
4. Po wykonaniu pomiaru przez 8 sekund wyświetlany jest wskaźnik „błąd
pomiaru” lub komunikat „pomierzona odległość”, a następnie zasilanie jest
wyłączane. Po naciśnięciu przycisku POWER ON/Measurement button
(Włączenie zasilania/pomiar) podczas włączonego zasilania (gdy wewnętrzny
wyświetlacz jest aktywny) rozpoczyna się kolejny pomiar pojedynczy.
3. Naciśnij i przytrzymaj przycisk POWER ON/Measurement button
(Włączenie zasilania/pomiar), aby rozpocząć pomiar ciągły przez
około 8 sekund. W wewnętrznym wyświetlaczu pojawia się na
przemian komunikat „błąd pomiaru” i „pomierzona odległość”.
* Oznaczenie promienia lasera miga podczas pomiaru.
* Jeśli puścisz przycisk, pomiar ciągły zostanie zatrzymany.
„Pomiar zakończony
niepowodzeniem”
lub „brak możliwości
dokonania pomiaru”
Wyświetlanie
pomierzonej
wartości (Cel 1).
Wyświetlanie
pomierzonej
wartości (Cel 2).
4. Po wykonaniu ciągłego pomiaru ostateczny wynik pomiaru
(pomierzona odległość) będzie wyświetlany przez 8 sekund, a
następnie zasilanie jest wyłączane.
Po naciśnięciu przycisku POWER ON/Measurement button
(Włączenie zasilania/pomiar) podczas włączonego zasilania (gdy
wewnętrzny wyświetlacz jest aktywny) rozpoczyna się kolejny
pomiar pojedynczy.
Przykładowo, dokonując pomiaru na chorągiewce podczas gry w
golfa, skorzystaj z trybu priorytetu pierwszego planu. Aby dokonać
łatwego pomiaru, przeskanuj chorągiewkę z użyciem funkcji
ciągłego pomiaru. Z uwagi na to, że między Tobą a chorągiewką
nie ma innych obiektów, najniższa wartość będzie rzeczywistą
odległością od chorągiewki.
Pomiar
„Pomiar zakończony
niepowodzeniem” lub „brak
możliwości dokonania
pomiaru”
Pomiar w górę
Pomiar w dół
Wyświetlanie pomierzonej wartości.
Uwaga — korzystanie z elementów sterowania lub regulacji, czy też wykonywanie
procedur w sposób inny, niż określony w niniejszym podręczniku, może spowodować narażenie na
niebezpieczne promieniowanie.
1. Przygotowanie
Włóż baterię do komory baterii. (Patrz „Wymiana baterii”)
2. Gumowa muszla oczna
Z tego modelu dalmierza laserowego mogą korzystać zarówno osoby noszące, jak i nienoszące okularów.
3. Regulacja dioptrii
Przeprowadź regulację dioptrii, aby uzyskać wyraźny obraz na ekranie LCD w wizjerze.
Najpierw obróć do końca pierścień regulacji dioptrii w kierunku przeciwnym do ruchu
wskazówek zegara. Następnie naciśnij przycisk POWER ON/Measurement (Włączenie zasilania/
pomiar), aby włączyć zasilanie (upewnij się, że wewnętrzny ekran jest włączony). Patrząc przez
okular, obróć pierścień regulacji dioptrii w prawo, do momentu gdy obraz na ekranie LCD
będzie ostry.
Jeśli za mocno obrócisz pierścień, obróć go mocno w lewo i wyreguluj ponownie.
Jeśli regulacja dioptrii nie zostanie przeprowadzona, właściwe ustawienie celu na obiekcie może
nie być możliwe.
4. Pomiar
Przed dokonaniem pomiaru upewnij się, że zatwierdzono ustawienia każdego z trybów (Tryb
wyświetlania pomiaru/Tryb priorytetu pierwszego planu/Jednostki wyświetlania odległości).
* Informacje na temat ustawiania poszczególnych trybów znajdują się w odpowiednich sekcjach.