Měření, Jedno měření】 【funkce nepřetržitého měření – Nikon COOLSHOT User Manual
Page 134
266
267
Cz
En
Jp
Fr
Es
Pt
Ru
Se
Nl
De
It
Dk
Pl
Hu
Fi
No
Ro
Cz
En
Jp
Fr
Es
Pt
Ru
Se
Nl
De
It
Dk
Pl
Hu
Fi
No
Ro
Measurement
1. Press the POWER button for power-on.
(Power turns off 8 seconds after the last
operation.)
Immediately after power-on.
(Initializing)
Stand-by.
3. Press POWER button once to start single measurement.
Measuring.
4. After measurement, “distance” or “fail to measure” indicator are displayed for 8 seconds, then power turns off. If you press the POWER
button during power-on (while the internal display is lit), another single measurement starts.
Failure to measure or
unable to measure distance.
Displays the measured
figure. (Target 1)
Displays the measured
figure. (Target 2)
3. Keep pressing POWER button to start continuous measurement up to 20 seconds. The internal display shows “distance” and
“fail to measure” indicator alternately.
Note: Laser irradiaton mark is blinking during the measurement.
Note: If you stop pressing the button, the continuous measuremen stops
Target focusing.
2. Aim at the target
.
Position the target at the center of the reticle
[Single measurement]
Failure to measure or
unable to measure distance.
Upward measurement.
Downward measurement.
Displays the measured figure.
[Continuous measurement]
4. After continuous measurement, the measure results are displayed for 8 seconds, then power turns off. If you press the POWER
button during power-on (while the internal display is lit), another measrement starts.
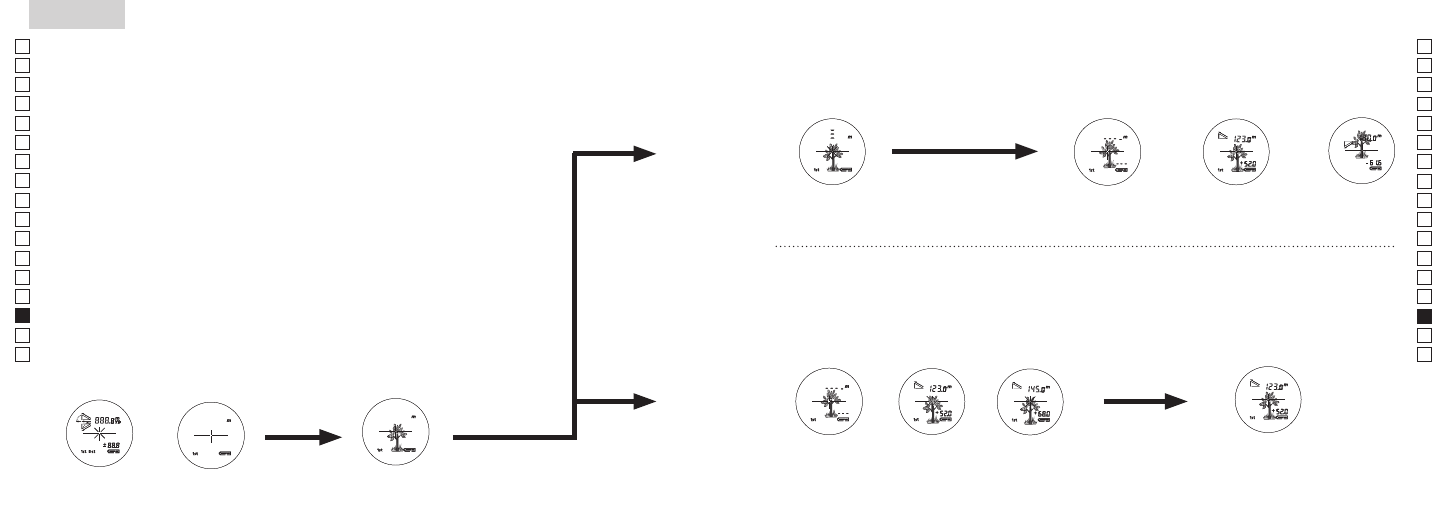
Měření
Pozor — Používání ovládacích prvků, provádění nastavení nebo vykonávání postupů jinak, než jak
popisuje tato příručka, může mít za následek vystavení se nebezpečnému záření.
1. Příprava
Do prostoru pro baterii vložte baterii. (Viz „Výměna baterie“.)
2. Gumová očnice
Laserový dálkoměr mohou bez úprav používat lidé s brýlemi i bez brýlí.
3. Dioptrická korekce
Seřiďte dioptrickou korekci, abyste v hledáčku jasně viděli údaje na LCD displeji.
Nejdříve otáčejte kroužkem dioptrické korekce proti směru hodinových ručiček až na
doraz. Poté stiskem tlačítka POWER ON/Measurement (vypínač/měření) přístroj zapněte
(zkontrolujte, zda je vnitřní displej zapnutý). Dívejte se očnicí a přitom otáčejte kroužkem
dioptrické korekce tak dlouho, až se LCD displej zaostří.
Pokud kroužkem otočíte příliš, dostatečně jím otočte proti směru hodinových ručiček a pak
korekci znovu seřiďte.
Pokud není korekce nastavena podle vašeho zraku, možná nebudete moci správně zaměřit
cíl.
4. Měření
Před měřením zkontrolujte nastavení režimů (režim zobrazení měření / režim priority cíle /
jednotka zobrazení vzdálenosti).
* Nastavení jednotlivých režimů viz příslušné kapitoly.
1. Zapněte napájení (zkontrolujte,
zda je vnitřní displej zapnutý).
2. Zamiřte na cíl.
Umístěte cíl do středu nitkového kříže.
Ihned po zapnutí
(inicializace)
Pohotovostní režim
Míření na cíl
(Automatické vypnutí přibližně po
8 sekundách nečinnosti.)
【Jedno měření】
【Funkce nepřetržitého měření】
3. Stiskem tlačítka POWER ON/
Measurement (vypínač/měření)
spustíte jedno měření.
Measurement
1. Press the POWER button for power-on.
(Power turns off 8 seconds after the last
operation.)
Immediately after power-on.
(Initializing)
Stand-by.
3. Press POWER button once to start single measurement.
Measuring.
4. After measurement, “distance” or “fail to measure” indicator are displayed for 8 seconds, then power turns off. If you press the POWER
button during power-on (while the internal display is lit), another single measurement starts.
Failure to measure or
unable to measure distance.
Displays the measured
figure. (Target 1)
Displays the measured
figure. (Target 2)
3. Keep pressing POWER button to start continuous measurement up to 20 seconds. The internal display shows “distance” and
“fail to measure” indicator alternately.
Note: Laser irradiaton mark is blinking during the measurement.
Note: If you stop pressing the button, the continuous measuremen stops
Target focusing.
2. Aim at the target
.
Position the target at the center of the reticle
[Single measurement]
Failure to measure or
unable to measure distance.
Upward measurement.
Downward measurement.
Displays the measured figure.
[Continuous measurement]
4. After continuous measurement, the measure results are displayed for 8 seconds, then power turns off. If you press the POWER
button during power-on (while the internal display is lit), another measrement starts.
4. Po měření se na 8 sekund zobrazí naměřená vzdálenost nebo indikace
„chyba při měření“. Poté se přístroj vypne. Pokud na zapnutém přístroji (při
zapnutém vnitřním displeji) stisknete tlačítko POWER ON/Measurement
(vypínač/měření), spustí se jedno další měření.
3. Chcete-li spustit nepřetržité měření, přibližně 8 sekund podržte
stisknuté tlačítko POWER ON/Measurement (vypínač/měření). Na
vnitřním displeji se střídá naměřená vzdálenost a indikace „chyba
při měření“.
* Během měření bliká symbol laserového záření.
* Pokud tlačítko uvolníte, nepřetržité měření se přeruší.
„Chyba při měření“
nebo měření nelze
provést
Zobrazení
naměřené
hodnoty (cíl 1)
Zobrazení
naměřené
hodnoty (cíl 2)
4. Po ukončení nepřetržitého měření se na 8 sekund zobrazí
poslední naměřená vzdálenost. Poté se přístroj vypne.
Pokud na zapnutém přístroji (při zapnutém vnitřním displeji)
stisknete tlačítko POWER ON/Measurement (vypínač/měření),
spustí se další měření.
Například při měření vzdálenosti praporkové tyče na golfovém
hřišti použijte režim priority prvního cíle. Vzdálenost tyče snadno
změříte pomocí funkce trvalého měření. Nejsou-li mezi vámi a tyčí
žádné objekty, nejmenší číslo je vzdálenost k zacílené tyči.
Probíhá měření
„Chyba při měření“
nebo měření nelze
provést
Měření s náklonem
nahoru
Měření se
sklonem dolů
Zobrazení naměřené hodnoty