Mätning, Enskild mätning】 【funktionen kontinuerlig mätning – Nikon COOLSHOT User Manual
Page 62
122
123
Se
En
Jp
Fr
Es
Pt
Ru
Nl
De
It
Dk
Pl
Hu
Cz
Fi
No
Ro
Se
En
Jp
Fr
Es
Pt
Ru
Nl
De
It
Dk
Pl
Hu
Cz
Fi
No
Ro
Measurement
1. Press the POWER button for power-on.
(Power turns off 8 seconds after the last
operation.)
Immediately after power-on.
(Initializing)
Stand-by.
3. Press POWER button once to start single measurement.
Measuring.
4. After measurement, “distance” or “fail to measure” indicator are displayed for 8 seconds, then power turns off. If you press the POWER
button during power-on (while the internal display is lit), another single measurement starts.
Failure to measure or
unable to measure distance.
Displays the measured
figure. (Target 1)
Displays the measured
figure. (Target 2)
3. Keep pressing POWER button to start continuous measurement up to 20 seconds. The internal display shows “distance” and
“fail to measure” indicator alternately.
Note: Laser irradiaton mark is blinking during the measurement.
Note: If you stop pressing the button, the continuous measuremen stops
Target focusing.
2. Aim at the target
.
Position the target at the center of the reticle
[Single measurement]
Failure to measure or
unable to measure distance.
Upward measurement.
Downward measurement.
Displays the measured figure.
[Continuous measurement]
4. After continuous measurement, the measure results are displayed for 8 seconds, then power turns off. If you press the POWER
button during power-on (while the internal display is lit), another measrement starts.
Mätning
IAKTTAG FÖRSIKTIGHET — Användning av reglage, justeringar eller funktioner för andra ändamål än de
avsedda kan leda till exponering av farlig strålning.
1. Förberedelse
Sätt i ett batteri i batterifacket. (Se "Byta batteri".)
2. Ögonmussla av gummi
Både glasögonbärare och icke glasögonbärare kan använda avståndsmätaren i levererat
skick.
3. Dioptrijustering
Justera dioptrin för att få en tydlig LCD-bild i sökaren.
Vrid först dioptrijusteringsringen moturs tills den stoppar. Tryck därefter på POWER ON/
Mätnings-knappen för att slå på strömmen (Bekräfta att den interna displayen är på). När
du tittar genom ögonmusslan, rotera dioptrijusteringsringen medurs till dess att LCD
hamnar i fokus.
Om du roterar ringen för mycket, rotera den moturs och justera den därefter igen.
Om dioptrin inte justeras efter din syn kan du få svårt att korrekt fokusera på dina mål.
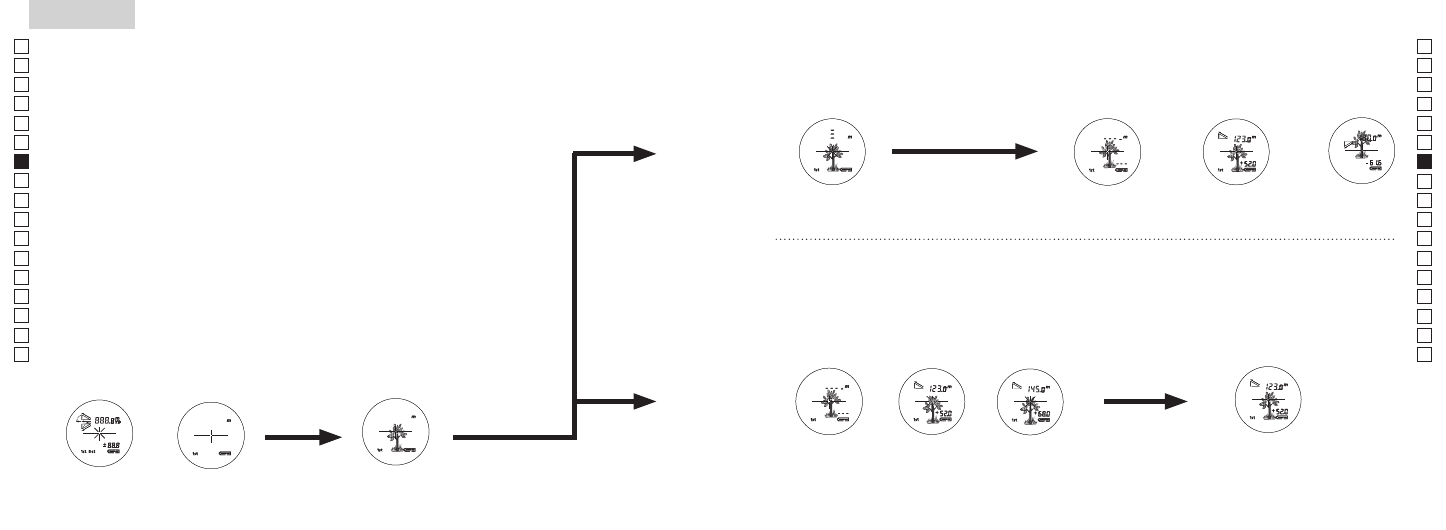
4. Mätning
Kontrollera varje inställt läge innan du mäter (Målprioritetsläge/Distansvisningsenheter).
* Se varje avsnitt för instruktioner om hur du ställer in läget.
1. Slå på strömmen (Bekräfta att
den interna displayen är på).
2. Sikta mot målet.
Positionera målet mitt i
hårkorset.
Direkt efter att strömmen
slås på (Initierar).
Viloläge
Insiktning
(Automatisk avstängning (efter
ung. 8 sekunder utan användning)
【Enskild mätning】
【Funktionen Kontinuerlig mätning】
3. Tryck på POWER ON/Mätning-
knappen en gång för att start en
enskild mätning.
Measurement
1. Press the POWER button for power-on.
(Power turns off 8 seconds after the last
operation.)
Immediately after power-on.
(Initializing)
Stand-by.
3. Press POWER button once to start single measurement.
Measuring.
4. After measurement, “distance” or “fail to measure” indicator are displayed for 8 seconds, then power turns off. If you press the POWER
button during power-on (while the internal display is lit), another single measurement starts.
Failure to measure or
unable to measure distance.
Displays the measured
figure. (Target 1)
Displays the measured
figure. (Target 2)
3. Keep pressing POWER button to start continuous measurement up to 20 seconds. The internal display shows “distance” and
“fail to measure” indicator alternately.
Note: Laser irradiaton mark is blinking during the measurement.
Note: If you stop pressing the button, the continuous measuremen stops
Target focusing.
2. Aim at the target
.
Position the target at the center of the reticle
[Single measurement]
Failure to measure or
unable to measure distance.
Upward measurement.
Downward measurement.
Displays the measured figure.
[Continuous measurement]
4. After continuous measurement, the measure results are displayed for 8 seconds, then power turns off. If you press the POWER
button during power-on (while the internal display is lit), another measrement starts.
4. Efter mätningen visar indikatorn "fail to measure" (Avstånd) eller "fail to
measure" (Misslyckad mätning) i åtta sekunder, sedan slås strömmen av. Om
du trycker på POWER ON/mätning-knappen när strömmen slås på (medan
den interna displayen är på), startar en ny enskild mätning.
3. Tryck och håll nere POWER ON/Mätning-knappen för att starta
kontinuerlig mätning i ca. 8 sekunder. Den interna displayen visar
"distance" (Avstånd) eller "fail to measure" (Misslyckad mätning).
* Laserstrålningsmärket blinkar under mätning.
* Om du släpper knappen, avslutas den kontinuerliga mätningen.
"Misslyckad
mätning" eller
"kunde inte mäta"
avstånd
Visar den
uppmätta figuren
(Mål 1)
Visar den
uppmätta figuren
(Mål 2)
4. Efter kontinuerlig mätning visar indikatorn mätresultaten
(mätavstånd) i ca. 8 sekunder, sedan slås strömmen av.
Om du trycker på POWER ON/mätning-knappen när strömmen
slås på (medan den interna displayen är på), startar en ny enskild
mätning.
Vid mätning av en flagga på en golfbana, använder du t.ex.
Första målprioritetsläget. Skanna flaggan med den kontinuerliga
mätningsfunktionen för enkel mätning. Om det inte finns några
föremål mellan dig och flaggan är den lägsta siffran avståndet
mellan dig och flaggan.
Mätning
"Misslyckad mätning" eller
"kunde inte mäta" avstånd
Uppåtmätning
Nedåtmätning
Visar den uppmätta figuren