Măsurare, Măsurarea simplă】 【funcţie de măsurare contină – Nikon COOLSHOT User Manual
Page 143
284
285
Ro
En
Jp
Fr
Es
Pt
Ru
Se
Nl
De
It
Dk
Pl
Hu
Cz
Fi
No
Ro
En
Jp
Fr
Es
Pt
Ru
Se
Nl
De
It
Dk
Pl
Hu
Cz
Fi
No
Measurement
1. Press the POWER button for power-on.
(Power turns off 8 seconds after the last
operation.)
Immediately after power-on.
(Initializing)
Stand-by.
3. Press POWER button once to start single measurement.
Measuring.
4. After measurement, “distance” or “fail to measure” indicator are displayed for 8 seconds, then power turns off. If you press the POWER
button during power-on (while the internal display is lit), another single measurement starts.
Failure to measure or
unable to measure distance.
Displays the measured
figure. (Target 1)
Displays the measured
figure. (Target 2)
3. Keep pressing POWER button to start continuous measurement up to 20 seconds. The internal display shows “distance” and
“fail to measure” indicator alternately.
Note: Laser irradiaton mark is blinking during the measurement.
Note: If you stop pressing the button, the continuous measuremen stops
Target focusing.
2. Aim at the target
.
Position the target at the center of the reticle
[Single measurement]
Failure to measure or
unable to measure distance.
Upward measurement.
Downward measurement.
Displays the measured figure.
[Continuous measurement]
4. After continuous measurement, the measure results are displayed for 8 seconds, then power turns off. If you press the POWER
button during power-on (while the internal display is lit), another measrement starts.
Măsurare
Atenţie — Flosirea dispozitivelor de comandă şi reglare sau efectuarea de proceduri altele decât cele
specificate aici pot duce la expunerea la radiaţii periculoase.
1. Pregătire
Instalarea unei baterii în compartimentul bateriei. (Vezi "Înlocuirea bateriei")
2. Bonetă de cauciuc
Atât persoanele care poartă sau nu poartă ochelari pot utiliza acest telemetru în condiţiile date.
3. Reglajul dioptric
Reglaţi dioptriile pentru a obţine indicaţii clare pe ecranul LCD pentru telemetru.
Mai întâi, rotiţi inelul de reglare a dioptriilor în sens antiorar până se opreşte complet. Apoi
apăsaţi butonul POWER ON/Measurement (PORNIRE/Măsurare) pentru a porni alimentarea
(Confirmaţi faptul că afişajul intern este pornit). În timp ce vă uitaţi prin ocular, rotiţi inelul
de reglare a dioptriilor în sens orar, până când afişajul LCD focalizează.
Dacă rotiți inelul prea mult , rotiți-l mai mult în sensul invers acelor de ceasornic, apoi reglați
din nou.
Dacă dioptriile nu sunt reglate pentru a corespunde vederii dvs., aţi putea să nu puteţi viza
corect subiectul.
4. Măsurare
Înainte de măsurare, asigurați-vă că aţi confirmat fiecare setare a modului (Mod de afişare
măsurare/Mod prioritate ţintă/Unitate afişare distanţă).
* Vă rugăm să consultați fiecare secțiune cu privire la modul de setare a fiecărui mod.
1. Porniți aparatul (verificaţi dacă
afişajul intern este pornit)
2. îndreptaţi către ţintă.
Poziţionaţi ţinta în centrul crucii
vizorului.
Imediat după pornire
(iniţializare)
Aşteptare
Vizare ţintă
(Oprire automată după aproximativ
8 secunde de inactivitate)
【Măsurarea simplă】
【Funcţie de măsurare contină】
3. Apăsaţi butonul PORNIRE/
Măsurare o singură dată pentru a
porni măsurarea simplă.
Measurement
1. Press the POWER button for power-on.
(Power turns off 8 seconds after the last
operation.)
Immediately after power-on.
(Initializing)
Stand-by.
3. Press POWER button once to start single measurement.
Measuring.
4. After measurement, “distance” or “fail to measure” indicator are displayed for 8 seconds, then power turns off. If you press the POWER
button during power-on (while the internal display is lit), another single measurement starts.
Failure to measure or
unable to measure distance.
Displays the measured
figure. (Target 1)
Displays the measured
figure. (Target 2)
3. Keep pressing POWER button to start continuous measurement up to 20 seconds. The internal display shows “distance” and
“fail to measure” indicator alternately.
Note: Laser irradiaton mark is blinking during the measurement.
Note: If you stop pressing the button, the continuous measuremen stops
Target focusing.
2. Aim at the target
.
Position the target at the center of the reticle
[Single measurement]
Failure to measure or
unable to measure distance.
Upward measurement.
Downward measurement.
Displays the measured figure.
[Continuous measurement]
4. After continuous measurement, the measure results are displayed for 8 seconds, then power turns off. If you press the POWER
button during power-on (while the internal display is lit), another measrement starts.
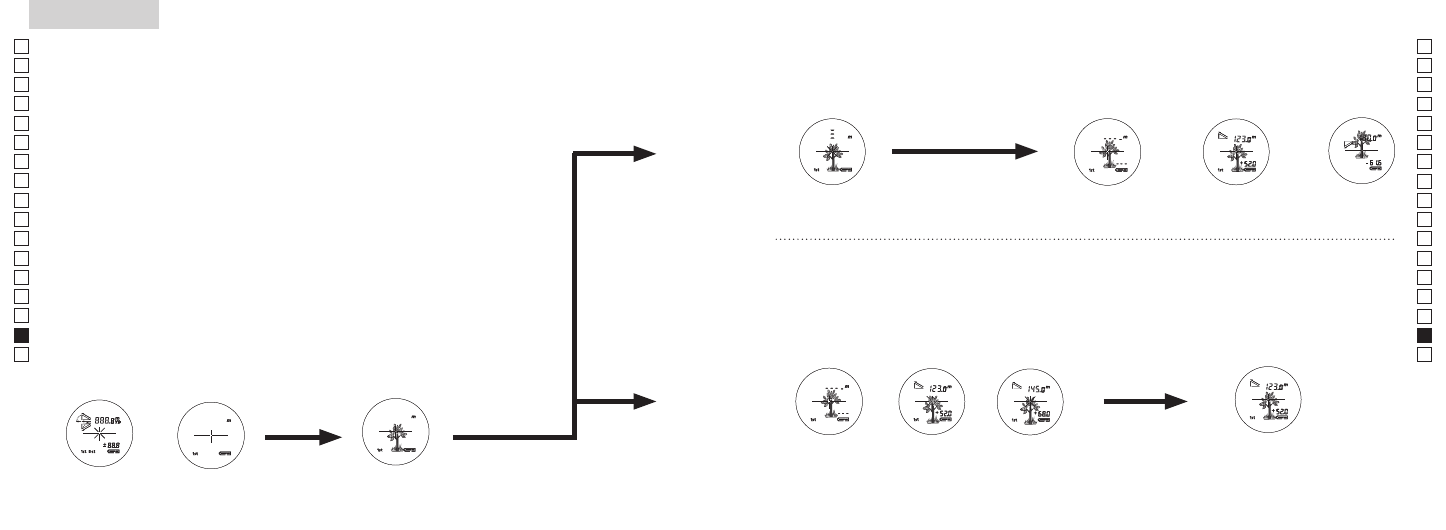
4. După măsurare este afişată indicaţia "eroare măsurare" sau "distanţă
măsurată" timp de 8 secunde, apoi aparatul se opreşte. Dacă apăsaţi
butonul PORNIRE/Măsurare în timp ce aparatul este pornit (în timp ce
afişajul intern este aprins), porneşte o altă măsurare simplă.
3. Apăsaţi şi ţineţi apăsat butonul PORNIRE/Măsurare pentru a porni
măsurarea continuă pentru aproximativ 8 secunde. Afişajul intern
prezintă în mod alternant indicatorul "eroare la măsurare" şi
"distanță măsurată".
* Marcajul de iradiere cu laser se aprinde intermitent în timpul
măsurării.
* Dacă lăsaţi degetul de pe buton, atunci măsurarea continuă se
opreşte.
"Eroare de măsurare"
sau "Imposibilitate de
a măsura" distanţa
Afişează figura
măsurată (ţinta 1)
Afişează figura
măsurată (ţinta 2)
4. După măsurarea continuă sunt afişate rezultatele măsurării finale
(distanţa măsurată) timp de aproximativ 8 secunde, apoi aparatul
se opreşte.
Dacă apăsaţi butonul PORNIRE/Măsurare în timp ce aparatul
este pornit (în timp ce afişajul intern este aprins), porneşte o altă
măsurare.
Când măsuraţi steguleţul unei ţinte de pe un parcurs de golf, folosiţi,
de exemplu, modul de prioritate a primei ţinte. Scanaţi steguleţul
unei ţinte cu funcţia de măsurare continuă pentru o măsurare facilă.
Când nu există obiecte între dumneavoastră şi steguleţul ţintei, cel
mai mic număr este distanţa până la steguleţul ţintei vizate.
Măsurare
"Eroare de măsurare" sau
"Imposibilitate de a măsura"
distanţa
Măsurare în sus
Măsurare în jos
Afişează figura măsurată