Misurazione – Nikon COOLSHOT User Manual
Page 53
104
105
It
En
Jp
Fr
Es
Pt
Ru
Se
Nl
De
Dk
Pl
Hu
Cz
Fi
No
Ro
It
En
Jp
Fr
Es
Pt
Ru
Se
Nl
De
Dk
Pl
Hu
Cz
Fi
No
Ro
Measurement
1. Press the POWER button for power-on.
(Power turns off 8 seconds after the last
operation.)
Immediately after power-on.
(Initializing)
Stand-by.
3. Press POWER button once to start single measurement.
Measuring.
4. After measurement, “distance” or “fail to measure” indicator are displayed for 8 seconds, then power turns off. If you press the POWER
button during power-on (while the internal display is lit), another single measurement starts.
Failure to measure or
unable to measure distance.
Displays the measured
figure. (Target 1)
Displays the measured
figure. (Target 2)
3. Keep pressing POWER button to start continuous measurement up to 20 seconds. The internal display shows “distance” and
“fail to measure” indicator alternately.
Note: Laser irradiaton mark is blinking during the measurement.
Note: If you stop pressing the button, the continuous measuremen stops
Target focusing.
2. Aim at the target
.
Position the target at the center of the reticle
[Single measurement]
Failure to measure or
unable to measure distance.
Upward measurement.
Downward measurement.
Displays the measured figure.
[Continuous measurement]
4. After continuous measurement, the measure results are displayed for 8 seconds, then power turns off. If you press the POWER
button during power-on (while the internal display is lit), another measrement starts.
Misurazione
Attenzione — l'uso di comandi, regolazioni o procedure diversi da quelli specificati nel presente manuale
può causare l'esposizione a radiazioni pericolose.
1. Preparazione
Inserire una batteria nell'apposito vano. (Vedere la voce "Sostituzione della batteria")
2. Paraocchio in gomma
Sia coloro che portano gli occhiali sia coloro che non li portano possono utilizzare questo telemetro senza
aggiunta di accessori.
3. Regolazione diottrica
Effettuare la regolazione diottrica in modo da ottenere una visualizzazione nitida dei
simboli sul display LCD nel mirino. Ruotare anzitutto l'anello di regolazione diottrica
in senso antiorario fino a quando non si arresta, quindi premere il tasto POWER ON/
Measurement (ACCENSIONE/misurazione) per accendere il telemetro (verificare che il
display interno sia acceso). Durante l'osservazione attraverso l'oculare, ruotare l'anello di
regolazione diottrica in senso orario fino alla messa a fuoco dei simboli sul display LCD. Se
la rotazione dell'anello è eccessiva, ruotarlo sufficientemente in senso antiorario e ripetere
la regolazione. Se non si effettua la regolazione diottrica in modo da adeguarla alla propria
vista, è possibile non riuscire a puntare correttamente i soggetti.
4. Misurazione in corso
Prima di effettuare la misurazione, verificare l'impostazione di ogni modalità (modalità di
visualizzazione misurazione/modalità priorità target/unità di misura per la visualizzazione
della distanza).
* Per informazioni su come impostare le modalità fare riferimento alle sezioni specifiche.
1. Accendere il telemetro (verificare
che il display interno sia acceso).
2. Mirare al bersaglio.
Posizionare il bersaglio al centro
del reticolo.
Immediatamente dopo
l'accensione (inizializzazione)
Stand-by
Puntamento del bersaglio
(spegnimento automatico dopo
circa 8 secondi di mancato utilizzo.)
【Misurazione singola】
【Funzione di misurazione continua】
3. Premere il tasto POWER ON/Measurement
(ACCENSIONE/misurazione) una volta per
avviare una misurazione singola.
Measurement
1. Press the POWER button for power-on.
(Power turns off 8 seconds after the last
operation.)
Immediately after power-on.
(Initializing)
Stand-by.
3. Press POWER button once to start single measurement.
Measuring.
4. After measurement, “distance” or “fail to measure” indicator are displayed for 8 seconds, then power turns off. If you press the POWER
button during power-on (while the internal display is lit), another single measurement starts.
Failure to measure or
unable to measure distance.
Displays the measured
figure. (Target 1)
Displays the measured
figure. (Target 2)
3. Keep pressing POWER button to start continuous measurement up to 20 seconds. The internal display shows “distance” and
“fail to measure” indicator alternately.
Note: Laser irradiaton mark is blinking during the measurement.
Note: If you stop pressing the button, the continuous measuremen stops
Target focusing.
2. Aim at the target
.
Position the target at the center of the reticle
[Single measurement]
Failure to measure or
unable to measure distance.
Upward measurement.
Downward measurement.
Displays the measured figure.
[Continuous measurement]
4. After continuous measurement, the measure results are displayed for 8 seconds, then power turns off. If you press the POWER
button during power-on (while the internal display is lit), another measrement starts.
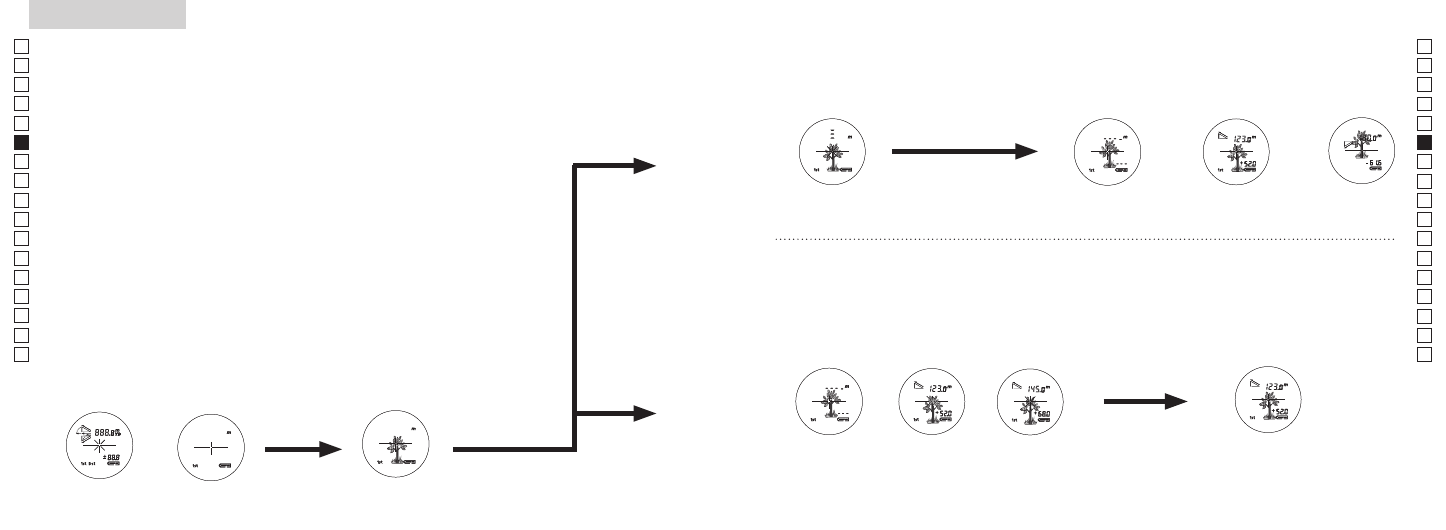
4. Dopo la misurazione, l'indicatore "misurazione non riuscita" o "distanza
misurata" viene visualizzato per 8 secondi, quindi il telemetro si spegne.
Premere il tasto POWER ON/Measurement (ACCENSIONE/misurazione)
durante l'accensione (con il display interno acceso) per avviare un'altra
misurazione.
3. Tenere premuto il tasto POWER ON/Measurement (ACCENSIONE/
misurazione) per avviare la misurazione continua per circa 8
secondi. Il display interno visualizza in alternanza gli indicatori
"misurazione non riuscita" e "distanza misurata".
* Il simbolo del fascio laser lampeggia durante la misurazione.
* Rilasciando il tasto, la misurazione continua si arresta.
"Misurazione non riuscita"
o "Impossibile effettuare la
misurazione" della distanza
Visualizza il
valore misurato
(bersaglio 1)
Visualizza il
valore misurato
(bersaglio 2)
4. Dopo la misurazione continua, i risultati della misurazione finale
(distanza misurata) vengono visualizzati per circa 8 secondi,
quindi l'unità si spegne.
Premendo il tasto POWER ON/Measurement (ACCENSIONE/
misurazione) durante l'accensione (con il display interno acceso)
si avvia un'altra misurazione.
Durante la misurazione di un'asticella segnabuca in un campo da
golf, ad esempio, utilizzare la modalità First Target Priority (Priorità
bersaglio più vicino). Scansionare l'asticella con la funzione di
misurazione continua per facilitare la misurazione. Se non vi sono
oggetti tra l'utente e l'asticella segnabuca, il numero più piccolo
sarà la distanza dall'asticella segnabuca inquadrata.
Misurazione in corso
"Misurazione non riuscita"
o "Impossibile effettuare la
misurazione" della distanza
Misurazione
verso l'alto
Misurazione verso
il basso
Visualizza il valore misurato