Meting, Enkelvoudige meting】 【functie voor continumeting – Nikon COOLSHOT User Manual
Page 71
140
141
Nl
En
Jp
Fr
Es
Pt
Ru
Se
De
It
Dk
Pl
Hu
Cz
Fi
No
Ro
Nl
En
Jp
Fr
Es
Pt
Ru
Se
De
It
Dk
Pl
Hu
Cz
Fi
No
Ro
Measurement
1. Press the POWER button for power-on.
(Power turns off 8 seconds after the last
operation.)
Immediately after power-on.
(Initializing)
Stand-by.
3. Press POWER button once to start single measurement.
Measuring.
4. After measurement, “distance” or “fail to measure” indicator are displayed for 8 seconds, then power turns off. If you press the POWER
button during power-on (while the internal display is lit), another single measurement starts.
Failure to measure or
unable to measure distance.
Displays the measured
figure. (Target 1)
Displays the measured
figure. (Target 2)
3. Keep pressing POWER button to start continuous measurement up to 20 seconds. The internal display shows “distance” and
“fail to measure” indicator alternately.
Note: Laser irradiaton mark is blinking during the measurement.
Note: If you stop pressing the button, the continuous measuremen stops
Target focusing.
2. Aim at the target
.
Position the target at the center of the reticle
[Single measurement]
Failure to measure or
unable to measure distance.
Upward measurement.
Downward measurement.
Displays the measured figure.
[Continuous measurement]
4. After continuous measurement, the measure results are displayed for 8 seconds, then power turns off. If you press the POWER
button during power-on (while the internal display is lit), another measrement starts.
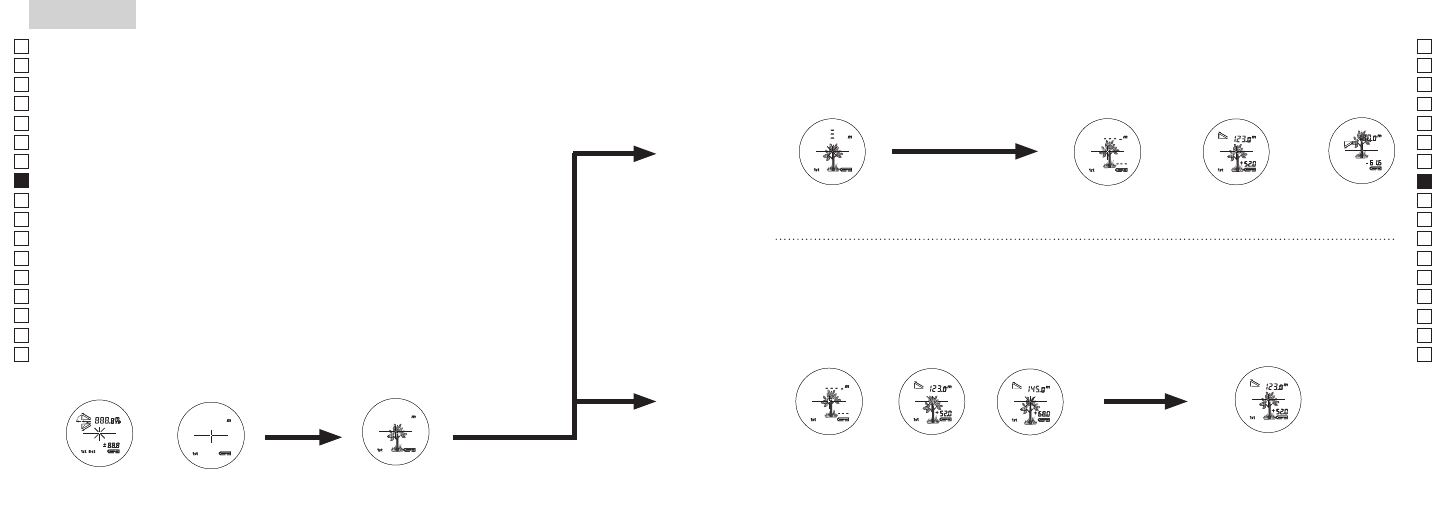
Meting
Voorzichtig
— als u zich bij het bedienen of afstellen van het apparaat niet houdt aan de instructies in dit
document, kan dit blootstelling aan gevaarlijke straling tot gevolg hebben.
1. Voorbereiding
Plaats een batterij in het batterijvak. (Zie "Batterij vervangen")
2. Rubberen oogschelp
Zowel brildragers als niet-brildragers kunnen deze laserafstandsmeter zonder aanpassingen gebruiken.
3. Aanpassing van de dioptrie
Stel de dioptrie af om een scherp beeld te krijgen op het LCD-venster in de zoeker.
Draai de dioptriering eerst helemaal naar links. Druk vervolgens op de POWER ON-/
Meetknop om het instrument aan te zetten (controleer of de interne display aanstaat).
Draai de dioptriering in de richting van de klok terwijl u door de zoeker kijkt totdat u het
LCD-venster scherp kunt zien.
Als u de ring te ver hebt gedraaid, draai de ring dan een eind terug en stel de dioptrie dan
nogmaals af.
Als de dioptrie niet is afgesteld op uw gezichtsvermogen, kan het lastig zijn om goed op
het doel te richten.
4. Meten
Controleer de modusinstellingen (weergavemodus voor meten/doelprioriteitmodus/
eenheid voor afstandsweergave) voordat u begint met meten.
* Raadpleeg elk hoofdstuk om te zien hoe elke modus moet worden ingesteld.
1. Zet het instrument aan
(controleer of de interne display aanstaat)
2. Richt op het doel.
Plaats het doel in het midden
van het dradenkruis.
(Automatische uitschakeling als instrument
ongeveer 8 sec. niet wordt gebruikt)
Onmiddellijk na
inschakeling (initialiseren)
Stand-by
Richten op het doel
【Enkelvoudige meting】
【Functie voor continumeting】
3. Druk één keer op de POWER ON-/
Meetknop voor een enkelvoudige
meting.
Measurement
1. Press the POWER button for power-on.
(Power turns off 8 seconds after the last
operation.)
Immediately after power-on.
(Initializing)
Stand-by.
3. Press POWER button once to start single measurement.
Measuring.
4. After measurement, “distance” or “fail to measure” indicator are displayed for 8 seconds, then power turns off. If you press the POWER
button during power-on (while the internal display is lit), another single measurement starts.
Failure to measure or
unable to measure distance.
Displays the measured
figure. (Target 1)
Displays the measured
figure. (Target 2)
3. Keep pressing POWER button to start continuous measurement up to 20 seconds. The internal display shows “distance” and
“fail to measure” indicator alternately.
Note: Laser irradiaton mark is blinking during the measurement.
Note: If you stop pressing the button, the continuous measuremen stops
Target focusing.
2. Aim at the target
.
Position the target at the center of the reticle
[Single measurement]
Failure to measure or
unable to measure distance.
Upward measurement.
Downward measurement.
Displays the measured figure.
[Continuous measurement]
4. After continuous measurement, the measure results are displayed for 8 seconds, then power turns off. If you press the POWER
button during power-on (while the internal display is lit), another measrement starts.
4. Na meting wordt "de gemeten afstand" of "het symbool voor Meting is
mislukt" gedurende 8 seconden getoond, daarna schakelt het instrument
uit. Als u op de POWER ON-/Meetknop drukt terwijl het instrument is
ingeschakeld (en het interne LCD-venster aanstaat), wordt een volgende
enkelvoudige meting gestart.
3. Houd de POWER ON-/Meetknop ingedrukt om een
continumeting van ongeveer 8 seconden te starten. Het interne
LCD-venster toont afwisselend "de gemeten afstand" en "het
symbool voor Meting is mislukt".
* Het symbool voor laserstraal knippert tijdens het meten.
* Als u uw vinger van de knop haalt, stopt de continumeting.
"De meting is
mislukt" of "de
afstand kan niet
worden gemeten"
Geeft het
gemeten getal
weer (Doel 1)
Geeft het
gemeten getal
weer (Doel 2)
4. Na een continumeting wordt het resultaat van de laatste meting
(gemeten afstand) gedurende 8 seconden getoond, daarna
schakelt het instrument uit.
Als u op de POWER ON-/Meetknop drukt terwijl het instrument
is ingeschakeld (en het interne LCD-venster aanstaat), wordt een
volgende enkelvoudige meting gestart.
Gebruik de modus Prioriteit eerste doel als u bijvoorbeeld de
afstand naar een vlag op een golfbaan wilt meten. De meting is het
gemakkelijkst uit te voeren door de vlag te scannen met de functie
continumeting. Als er zich geen voorwerpen bevinden tussen u en
de vlag, geeft de laagste waarde de afstand tot de vlag aan.
Meten
"De meting is mislukt" of
"de afstand kan niet worden
gemeten"
Omhoog
gerichte meting
Omlaag gerichte
meting
Toont de gemeten afstand.