Måling, Enkelt måling】 【funktion for fortsat måling – Nikon COOLSHOT User Manual
Page 125
248
249
Dk
En
Jp
Fr
Es
Pt
Ru
Se
Nl
De
It
Pl
Hu
Cz
Fi
No
Ro
Dk
En
Jp
Fr
Es
Pt
Ru
Se
Nl
De
It
Pl
Hu
Cz
Fi
No
Ro
Measurement
1. Press the POWER button for power-on.
(Power turns off 8 seconds after the last
operation.)
Immediately after power-on.
(Initializing)
Stand-by.
3. Press POWER button once to start single measurement.
Measuring.
4. After measurement, “distance” or “fail to measure” indicator are displayed for 8 seconds, then power turns off. If you press the POWER
button during power-on (while the internal display is lit), another single measurement starts.
Failure to measure or
unable to measure distance.
Displays the measured
figure. (Target 1)
Displays the measured
figure. (Target 2)
3. Keep pressing POWER button to start continuous measurement up to 20 seconds. The internal display shows “distance” and
“fail to measure” indicator alternately.
Note: Laser irradiaton mark is blinking during the measurement.
Note: If you stop pressing the button, the continuous measuremen stops
Target focusing.
2. Aim at the target
.
Position the target at the center of the reticle
[Single measurement]
Failure to measure or
unable to measure distance.
Upward measurement.
Downward measurement.
Displays the measured figure.
[Continuous measurement]
4. After continuous measurement, the measure results are displayed for 8 seconds, then power turns off. If you press the POWER
button during power-on (while the internal display is lit), another measrement starts.
Måling
Advarsel — Brug af betjeninger og justeringer eller udførsel af andre
procedurer end dem, der er specificeret heri, kan resultere i udsættelse for farlig bestråling.
1. Forberedelse
Læg et batteri i batterikammeret. (Se "Udskiftning af batteri")
2. Gummiøjestykke
Både brillebærere og ikke brillebærere kan bruge denne afstandsmåler, som den er.
3. Justering af diopter
Juster diopter for at opnå en tydelig LCD-angivelse på målsøgeren.
Drej først diopterjusteringshjulet mod uret, indtil det ikke kan komme længere.
Tryk derefter på POWER ON/Måle-knappen for at tænde for strømmen (Kontrollér,
at det interne display er tændt). Mens du kigger gennem øjestykket, drejes
diopterjusteringshjulet med uret, indtil LCD-visningen kommer i fokus.
Hvis du drejer hjulet for meget med uret, drejes det meget tilbage mod uret, og
justér derefter igen.
Hvis diopter ikke justeres efter dit syn, kan du ikke fokusere tydeligt på dit motiv.
4. Måling
Før måling skal du huske at bekræfte hver indstilling (funktion for visning af måling/
målprioritet/visning af afstandsenhed).
* Se venligst hver afsnit for indstilling af hver funktion.
1. Tænd for strømmen (Kontrollér,
at det interne display er tændt)
2. Sigt mod målet.
Placer målet i midten af
trådkorset.
Straks efter tænding
(initialiserer)
Stand-by
Sigter mod målet
(Automatisk slukning efter
ca. 8. sek. uden betjening)
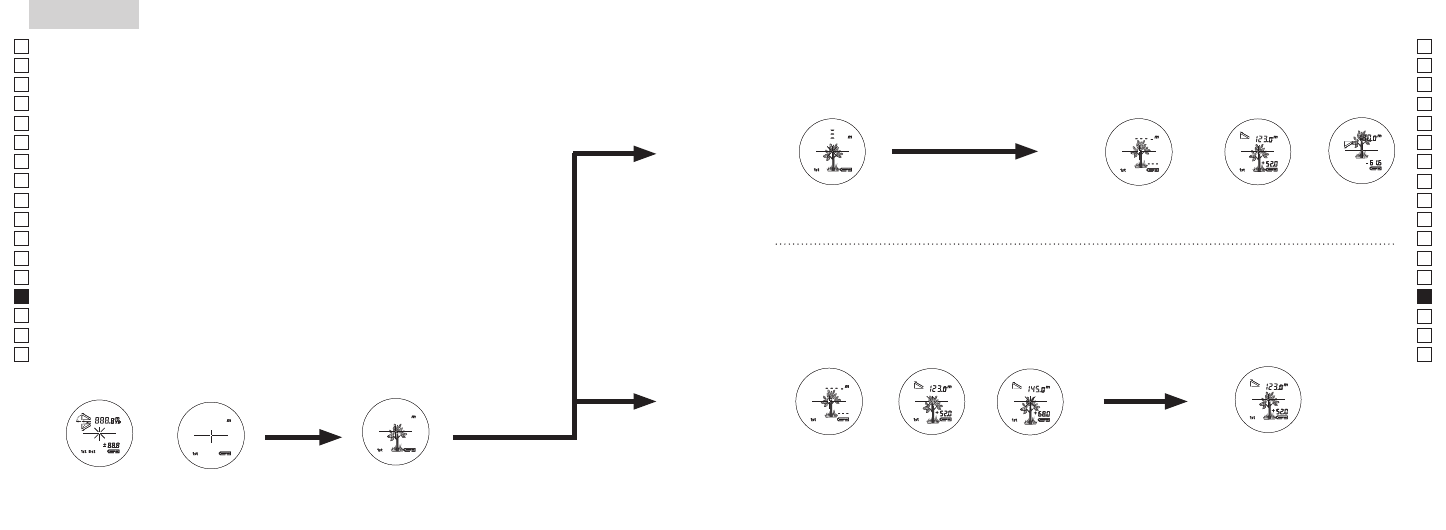
【Enkelt måling】
【Funktion for fortsat måling】
3. Tryk på POWER/Måle-knappen
én gang for at begynde en enkel
måling.
Measurement
1. Press the POWER button for power-on.
(Power turns off 8 seconds after the last
operation.)
Immediately after power-on.
(Initializing)
Stand-by.
3. Press POWER button once to start single measurement.
Measuring.
4. After measurement, “distance” or “fail to measure” indicator are displayed for 8 seconds, then power turns off. If you press the POWER
button during power-on (while the internal display is lit), another single measurement starts.
Failure to measure or
unable to measure distance.
Displays the measured
figure. (Target 1)
Displays the measured
figure. (Target 2)
3. Keep pressing POWER button to start continuous measurement up to 20 seconds. The internal display shows “distance” and
“fail to measure” indicator alternately.
Note: Laser irradiaton mark is blinking during the measurement.
Note: If you stop pressing the button, the continuous measuremen stops
Target focusing.
2. Aim at the target
.
Position the target at the center of the reticle
[Single measurement]
Failure to measure or
unable to measure distance.
Upward measurement.
Downward measurement.
Displays the measured figure.
[Continuous measurement]
4. After continuous measurement, the measure results are displayed for 8 seconds, then power turns off. If you press the POWER
button during power-on (while the internal display is lit), another measrement starts.
4. Efter målingen vises indikator for "måling mislykket" eller
"målt afstand" i 8 sekunder, derefter slukkes. Hvis du trykker på
POWER/Måle-knappen under opstart (mens det interne display
er aktivt), begynder en anden enkel måling.
3. Tryk på POWER-knappen, og hold den nede for at begynde fortsat
måling i 8 sekunder. Det interne display viser enten indikator for
"måling mislykket" eller "målt afstand".
* Symbolet for laserudsendelse blinker under målingen.
* Hvis du ophører med at trykke på knappen, stopper den
fortsatte måling.
"Måling mislykket"
eller "Kunne ikke
måle" afstand
Viser det målte tal
(mål 1)
Viser det målte tal
(mål 2)
4. Efter fortsat måling vises målingsresultaterne for den endelige
måling i 8 sekunder, derefter slukkes.
Hvis du trykker på POWER/Måle-knappen under opstart (mens
det interne display er aktivt), begynder en anden måling.
Når du f.eks. måler en markørpind på en golfbane, skal du bruge
Prioritet til nærmeste mål. Det er lettest at måle, hvis du scanner
markørpinden med funktion for fortsat måling. Hvis der ikke er
nogen genstande mellem dig og markørpinden, er afstanden til
markørpinden det mindste tal.
Måler
"Måling mislykket"
eller "Kunne ikke
måle" afstand
Måling opad
Måling nedad
Viser det målte tal