B210, Installation instructions – Hubbardton Forge 203030 User Manual
Page 2
Installation Instructions
B210
Flora Sconce 20-3030
Page 2 of 3
Hand-Forged,
Vermont-Made Lighting and Accessories
154 Route 30 South, Castleton, Vermont 05735
24581RevA
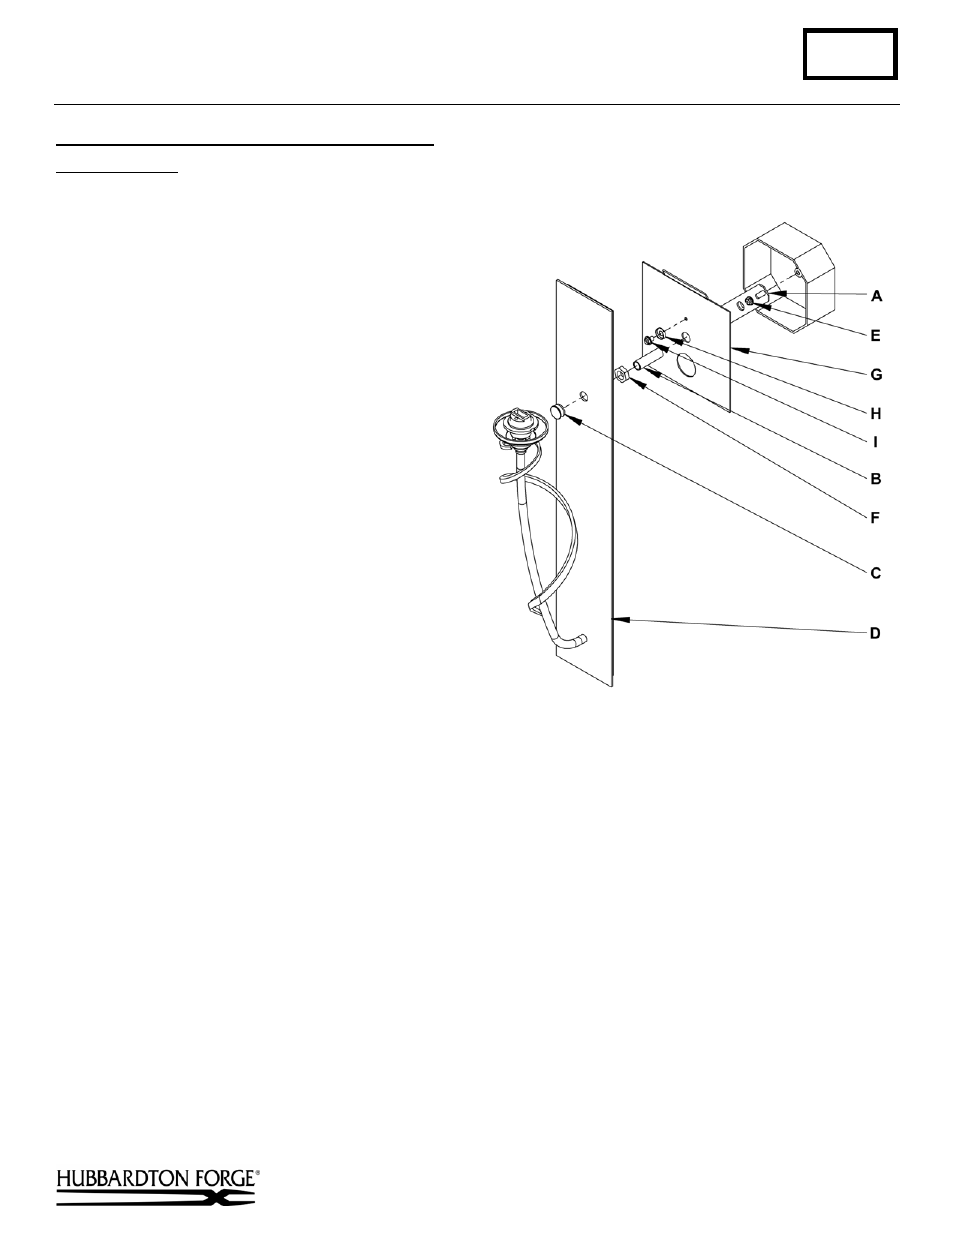
To Mount Fixture to Wall with Standard 4" Box
(Figure 2)
Component Parts
A Crossbar
B Nipple
C Threaded
Cap
D Fixture
Assembly
E Ground
Screw
F Lock
Nut
G Wall
Plate
H Cupped
Washer
I Ground
Screw
Caution: Be sure power is off at the main breaker
box prior to installation.
1.
Carefully unpack the fixture from the carton.
2.
Using two machine screws (not provided),
fasten the crossbar (A) to the electric box
making sure crossbar is level.
Note: A new electric box comes with screws.
When replacing a fixture, retain the existing
screws for use with the new fixture
.
3.
Thread the nipple (B) into the crossbar (A).
Adjust the nipple to proper length to ensure
the fixture will fit snugly to the wall.
4.
Ground the crossbar (A) by securing a pigtail
lead around ground screw (E).
5.
Orient the wall plate (G) so that the bent tab is
at the top and bent away from the wall and slip onto
nipple (B). The tab will fit into the back of the
fixture to facilitate alignment.
6.
Run a pigtail lead using ground screw (I) and cupped washer (H).
7.
Thread the pigtail lead and fixture wires through the large diameter hole at the bottom of the wall plate (G).
8.
Hold the fixture assembly (D) close to the wall and using suitable wire connectors, not provided, connect fixture
wires and pigtail leads to supply wires (white to white or ribbed, black to black or smooth and green to green or
bare).
Caution:
Make sure wire connectors are twisted on securely, and no bare wire is exposed.
9.
Secure nipple (B) and wall plate (G) with lock nut (F).
10. Place fixture firmly against the wall and fasten with threaded cap (C).
11. See instructions following to install glass.
(continued)
(Figure 2)