About v-link, Turning the v-link on/off, V-link settings – Roland RD-300 User Manual
Page 72: Detailed settings of v-link, Local on/off, Detailed settings for each function, Connection examples
74
Detailed Settings for Each Function
About V-LINK
V-LINK (
) is a function that provides for the play
of music and visual material. By using V-LINK-compatible video
equipment, visual eff ects can be easily linked to, and made part of the
expressive elements of a performance.
For example, if you use the RD-300NX in conjunction with the P-10,
you’ll be able to do the following.
MEMO
In order to use V-LINK between the RD-300NX and the P-10, you’ll
need to make connections using a MIDI cable (sold separately).
Connection Examples
As an example, we will use a Live Set in which the RD-300NX is
connected to the P-10. Use a MIDI cable to connect the RD-300NX’s
MIDI OUT connector to the MIDI IN connector of the P-10.
NOTE
Before connecting this unit to other devices, turn off the power
to all units. This will help prevent malfunctions and/or damage to
speakers or other devices.
MIDI IN
MIDI OUT
P-10
RD-300NX
Turning the V-LINK ON/OFF
1. Hold down the [REVERB] button and press the [CHORUS]
button .
The V-LINK indicator will appear in the one-touch screen or the live set
screen, showing that V-LINK is turned on.
When V-LINK is on, you can control visual material in synchronization
with your performance by playing the RD-300NX’s keyboard.
2. Once again, hold down the [REVERB] button and press the
[CHORUS] button .
The V-LINK indicator will disappear from the screen, indicating that
V-LINK is turned off .
V-LINK Settings
1. Press the [MENU] button, getting the indicator to light .
The EDIT MENU screen appears.
2. Press the Cursor [
] [
] buttons to select “7 .V-LINK .”
3. Press the [ENTER] button to display the EDIT screen .
4. Press the Cursor [
] [
] buttons to move the cursor to the
parameter to be set .
5. Use the [DEC] [INC] buttons to edit the value .
6. When you have fi nished making the settings, press the
[MENU] button .
You are returned to the previous screen.
MEMO
If you want to save this settings, press the [LAYER EDIT] (WRITE)
button. Settings saved in the RD-300NX are not deleted even when
the power is turned off .
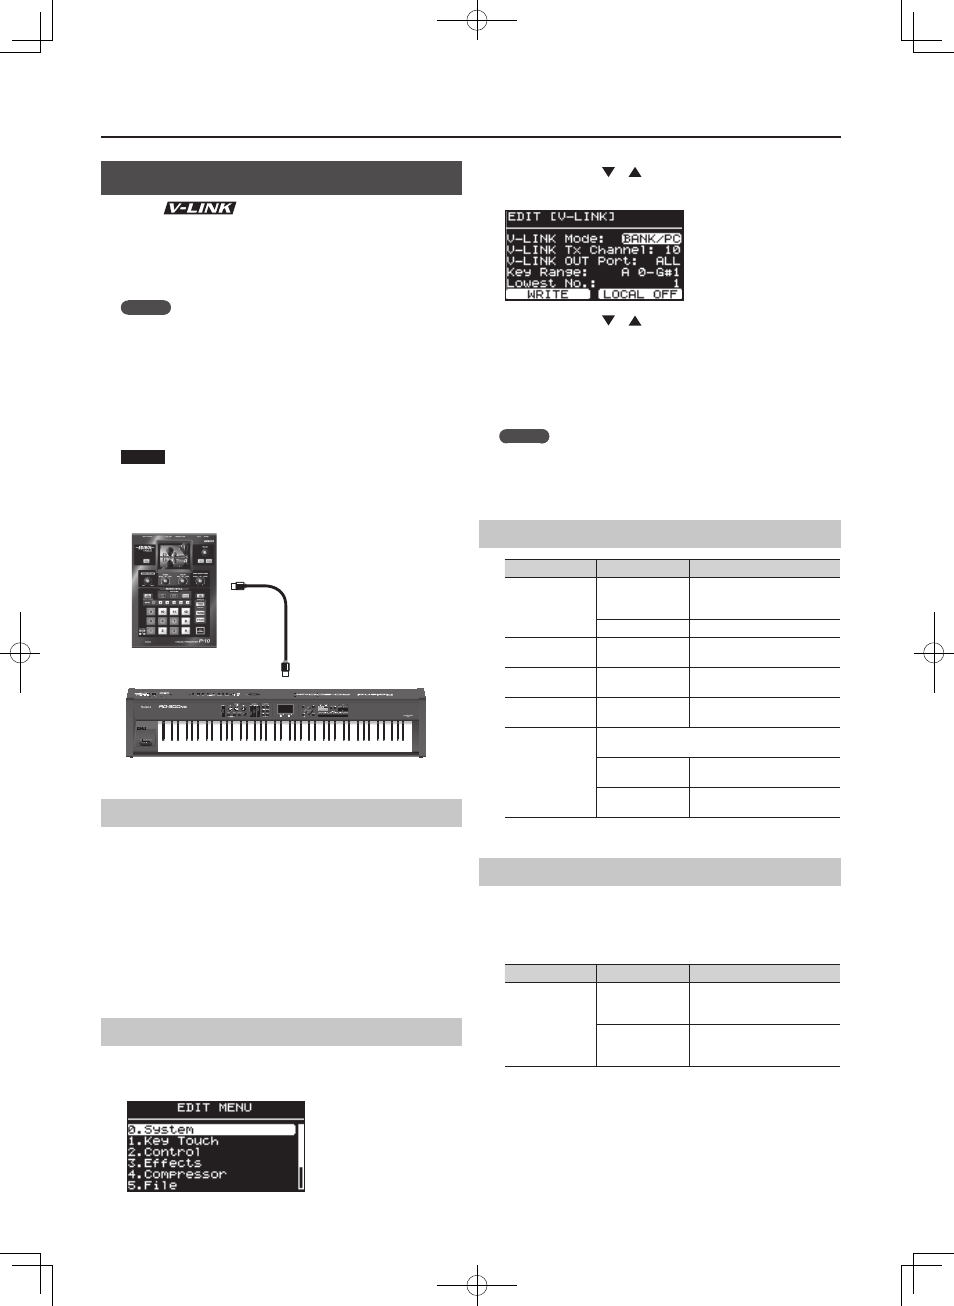
Detailed Settings of V-LINK
Parameter
Value
Description
V-LINK Mode
BANK/PC
PC (Clip) output with the white
keys, Bank Select (Pallet) output
with the black keys
NOTE
Note output
V-LINK Tx Channel
1–16
This selects the MIDI channel
used in outputting messages.
V-LINK OUT Port
ALL, MIDI, USB
This selects the port used for
outputting messages.
Key Range
A0–C8
This select the range of keys to
use as the V-LINK controller.
Lowest No .
This sets the number that is output when the lowest
key in the range set with Key Range is pressed.
1–128
When V-LINK Mode is set to
BANK/PC
0–127
When V-LINK Mode is set to
NOTE
Local ON/OFF
This setting determines whether or not the RD-300NX’s sounds are
played when a key within the range set with Key Range is pressed.
The function is alternately turned on or off each time press the [TONE
EDIT] button in the V-LINK EDIT screen.
Parameter
Value
Description
Local ON/OFF
LOCAL OFF
No sounds are played, even
when keys in the range set in Key
Range are pressed.
LOCAL ON
Sounds are played when keys in
the range set in Key Range are
pressed.