Adjusting the focus and size of the image, Adjusting the vertical angle of the projector, Keystone correction – Philips bSure 1 User Manual
Page 13: Set up
6
To switch off the mains supply completely, disconnect the mains lead.
–
Save energy! Please put the projector in the Power/Standby position if you are not going to use
the projector for more than 15 minutes.
–
When no signal inputs are detected for 30 minutes, the projector automatically switches
to Power/Standby (‘
SmartSave’ - SV10 and XG1 Brilliance versions only
). This setting can be
changed in the
‘Settings’
menu.
–
Before disconnecting the mains lead, make sure that the cooling fan has stopped
(about 3 minutes after the projector has been switched to
Power/
Standby).
•
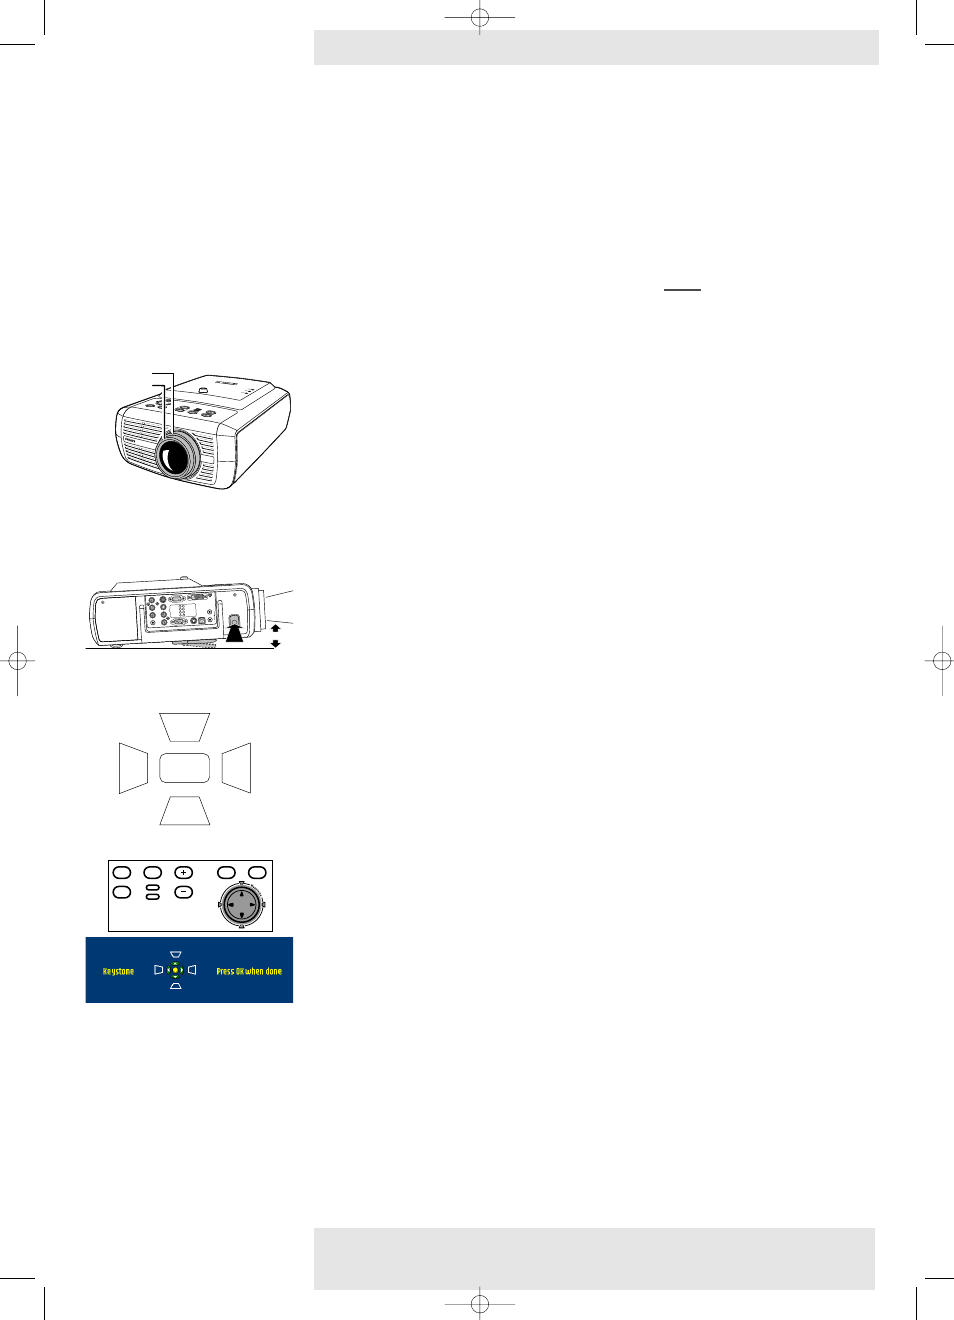
Use the Zoom ring to adjust the size of the image.
•
Use the Focus ring to adjust the focus of the image.
To raise:
•
Keep button A pressed and lift to raise the projector.
–
The Height/Level Adjuster B will come out.
To Lower:
•
Keep button A pressed and gently lower the projector.
•
Use the Focus Ring and Zoom Ring to readjust the focus and size of the image.
If projector and screen are not properly lined up
, the picture will be distorted, producing a
keystoned image (picture top width larger than picture bottom width or vice versa/
picture left
side width larger than picture right side width or vice versa)
. When a keystoned image occurs
the image ratio (4:3, 16:9) will still be guaranteed
(only when the projector is positioned straight in
front of the screen)
.This is especially important when the projector is being used together with an
‘intelligent whiteboard’.
‘Keystone correction’ allows you to correct picture distortion of the vertical and horizontal
keystone type by internal scaling.
•
Use Keystone 3 to heighten the image in vertical direction.
•
Use Keystone 4 to lower the image in vertical direction.
•
Use Keystone 2 to widen the image in horizontal direction.
•
Use Keystone 1 to narrow the image in horizontal direction.
–
As soon as the Keystone key is pressed, the Keystone feedback window will appear on the
screen.
•
The Keystone correction function is also accessible through the ‘Keystone’ option in the
‘Settings’ menu of the On Screen Display (OSD) menu.
Adjusting the focus and
size of the image
Adjusting the vertical angle
of the projector
Keystone correction
3. Set up
Philips Multimedia Projector
13
English User guide
cClear
Focus ring
Zoom ring
Audio L
Audio R
Video
Video
Audio Out
Pr/Cr
Data 2
Data 1 (DVI)
Data Audio
USB/USB Audio
PS/2
RS-232
1
2
Service
S-Video
Pb/Cb B
G
CVBS
Y
R
Audio L
Audio R
Video
Video
Audio Out
Pr/Cr
Data 2
Data 1 (DVI)
Data Audio
USB/USB Audio
PS/2
RS-232
1
2
Service
S-Video
Pb/Cb B
G
CVBS
Y
R
A
B
>
Menu
OK
AV
Mute
Source
Stand
by
Lamp
Temp
Menu
OK
AV
Mute
Source
Stand
by
Lamp
Temp
XP cClear10 English (good) 24-07-2003 15:52 Pagina 13