Figure 18.0 network menu (ip setup), Figure 18.1 email menu, Under smtp server, enter your smtp email server – Epson TOUCH DH200 User Manual
Page 37: Under smtp port, enter your smtp port, Under smtp auth, select on, Under smtp user id, enter your smtp user name, Under smtp password, enter your smtp password, Network, Email
27
Using the Main Menu
NETWORK
Configure network and DDNS
options.
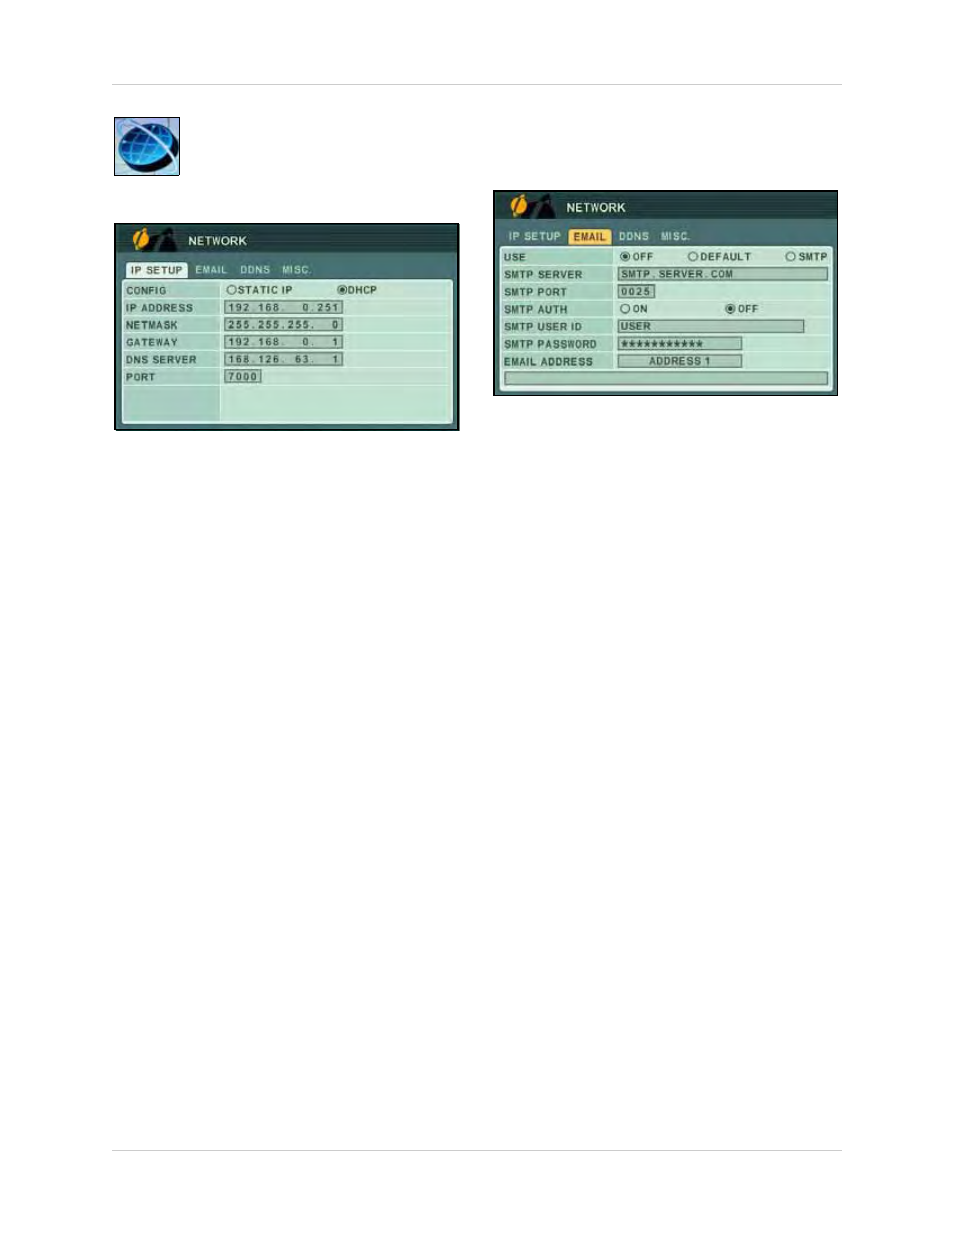
To configure IP Setup:
1. Connect an Ethernet cable to the LAN port
on the rear panel of the system.
2. Disconnect the power cable and let the
system power down for a few moments.
Reconnect the power cable. The system
automatically powers on.
3. Under CONFIG, select
STATIC
or
DHCP
.
DHCP allows you to instantly obtain an IP
address when first networking your
system. STATIC IP lets you manually enter
a fixed IP address. If you select STATIC, go
to step 4.
NOTE: DCHP allows you to quickly connect to
your network by obtaining an IP address from
the router. After the initial setup, we recommend
that you disable DHCP and set the IP address
between 1~100. For example, if your IP address
is 192.168.0.107, change the last digits to 90 (i.e.
192.163.0.90). This ensures that port forwarding
will not change in the event of power failure or
resetting of your network.
4. Press
ENTER
to save your settings. Press
CANCEL/ESC
to close remaining menu
windows.
Configure settings for email notification of
events on the system.
To configure email settings:
1. Under USE, select
DEFAULT
or
SMTP
(your
own email server). If you select DEFAULT,
go to step 7. If you select SMTP, go to step
2.
2. Under SMTP SERVER, enter your SMTP
email server.
3. Under SMTP PORT, enter your SMTP port.
4. Under SMTP AUTH, select
ON
.
5. Under SMTP USER ID, enter your SMTP
user name
.
6. Under SMTP PASSWORD, enter your
SMTP
password
.
7. Under EMAIL ADDRESS, enter the
recipient email address for the email
notification. You can add up to five email
addresses.
8. Press
ENTER
to save your settings. Press
CANCEL/ESC
to close remaining windows.
NOTE:
When an event is triggered, you will
receive an email alert. If no events occur in
the next 5 minutes, you will no receive
another email.
If a new event is triggered during that
minutes, you will only receive the new email
5 minutes after the first email.
Figure 18.0 Network menu (IP setup)
Figure 18.1 Email menu