Press - to exit the grid, Select all, Press tu to select all/clear and then press – Epson TOUCH DH200 User Manual
Page 34: Figure 15.0 record menu, Press pq to select a camera, Rate: select 1, 2, 3, 4, 5, 6, 7, 10, or 15 fps, Figure 16.0 alarm menu, Input: select n.o/ n.c, Record alarm, Etails, see “alarm” on
24
Using the Main Menu
• Press
+
enable/disable motion sensitivity.
Disabled blocks are colored
grey
. Active
blocks will be
turquoise-colored
when motion
is detected. Move an object in front of the
selected camera to test sensitivity and
enable/disable the appropriate blocks
• Press
-
to exit the grid
• Press WX to select All/Clear
and then press
+
.
6. Press
ENTER
to save your
settings. Press
CANCEL/ESC
to close remaining menu
windows.
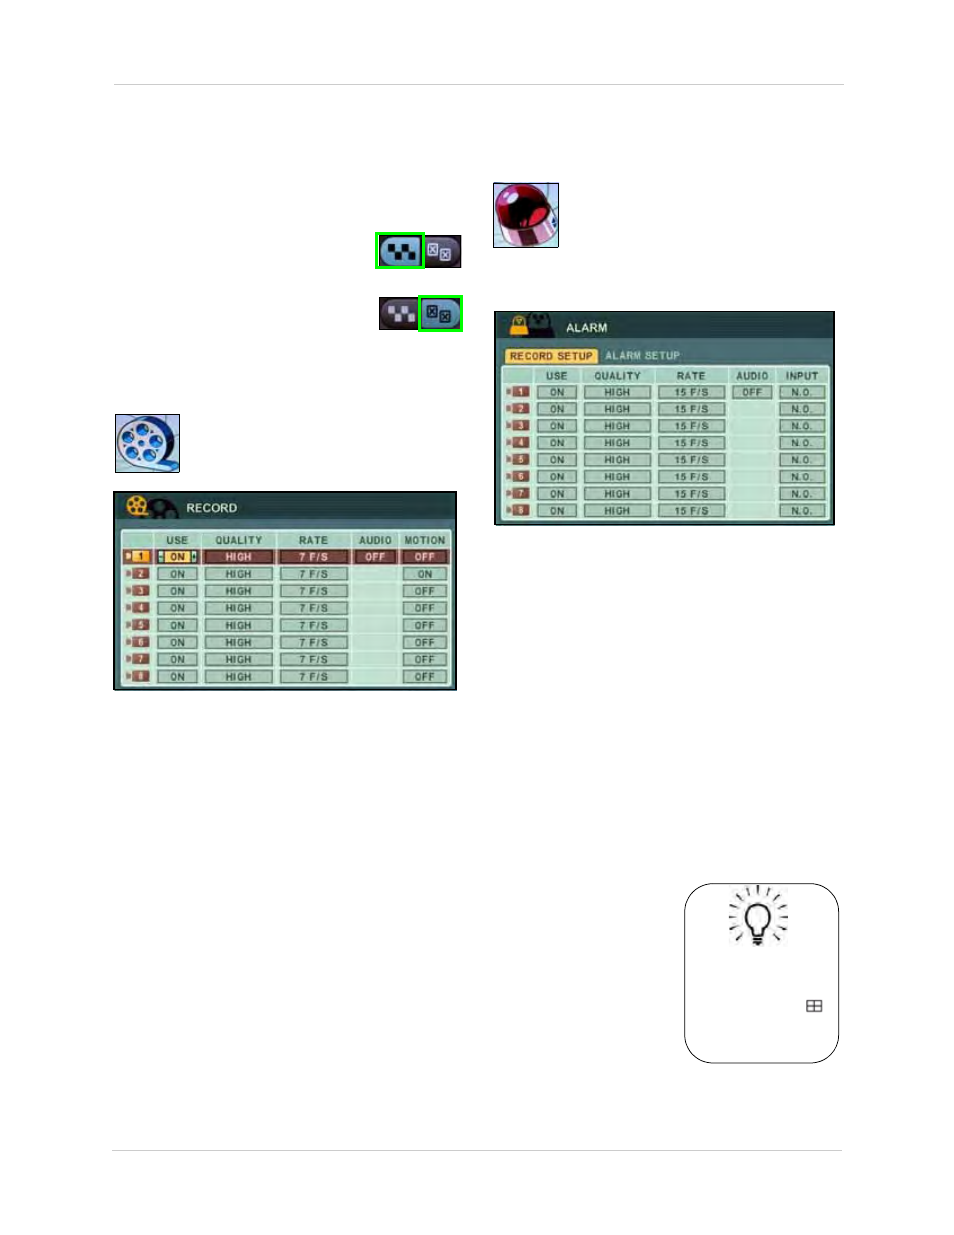
RECORD
Configure recording parameters for
each channel.
To configure recording settings:
1. Press
ST
to select a camera.
2. Press
WX
to select an option and the
press
+
/
-
to configure the following:
• USE: Select ON/OFF. If OFF, the selected
camera(s) will not record.
• QUALITY: Select LOW, MIDDLE, HIGH,
SUPER, and ULTRA.
• RATE: Select 1, 2, 3, 4, 5, 6, 7, 10, or 15 fps.
• AUDIO: Select ON/OFF. Audio capable
cameras or microphones are required for
audio recording.
• MOTION: Select ON/OFF. Motion Grid and
sensitivity must be configured in the Motion
menu. See “MOTION” on page 23.
3. Press
ENTER
to save your settings. Press
CANCEL/ESC
to close remaining menu
windows.
ALARM
Configure recording parameters for
alarm recording.
NOTE: An external alarm device is not included
with the system.
To configure alarm settings:
1. Under RECORD SETUP, press
ST
to
select a camera. Press
WX
to select an
option and press
+
/
-
to configure the
following:
• USE: Select ON/OFF. If OFF, the selected
camera(s) will not record.
• QUALITY: Select LOW, MIDDLE, HIGH,
SUPER, and ULTRA.
• RATE: Select 1, 2, 3, 4, 5, 6, 7, 10, or 15 fps.
• AUDIO: Select ON/OFF. The number of audio
input channels varies by model.
• INPUT: Select N.O/
N.C.
Select ALL.
Clear.
Figure 15.0 Record menu
Figure 16.0 Alarm menu
TIP!
When you have
configured settings for
one camera, press
to apply the settings for
the rest of the cameras!