Gb f d – Swim'n Play International Concord Round User Manual
Page 18
17
8-Fitting the liner:
This operation requires that at least one
person hold the wall while it is being per-
formed.
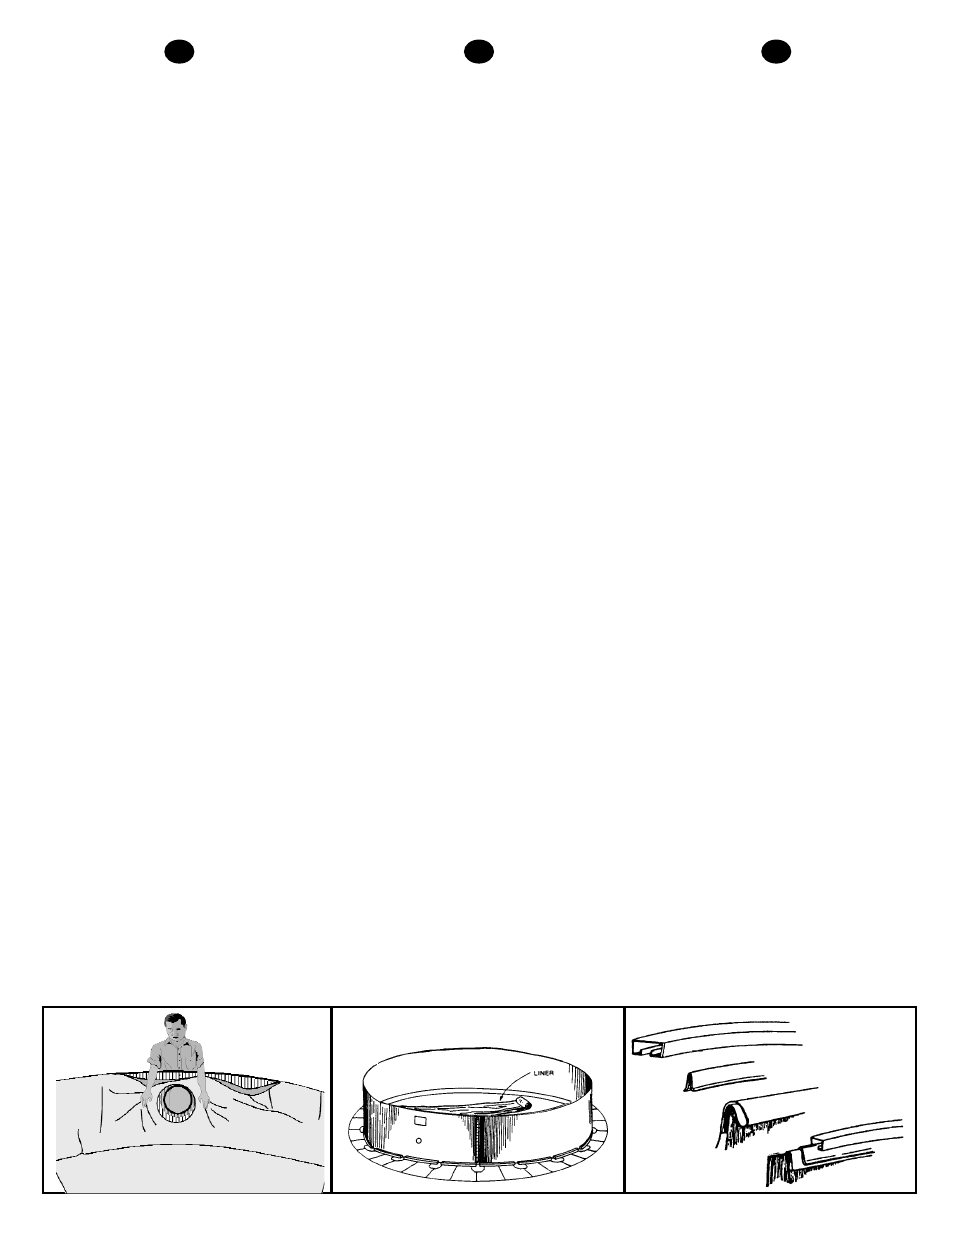
Unfold the liner as shown in Fig.12.
Inspect it closely. Spread it along the
inside of the pool wall as evenly as possi-
ble.
On the Port Hole Liner you must first
start the liner installation by positioning
the clear section of the liner with the Port
Hole on the pool wall (Fig. 11a)
Fold the liner double at the top edge and
fold not more than 4cm over the edge.
Holding the liner in position, fix it with a
plastic clamping bar (Fig. 13).
Follow this with another one and then fit
a piece of the top rail over the first bar.
Wherever the top rail sections meet,
push them into a joining part until they
touch the snug. At the same time fit the
corresponding vertical jamb and block it
with a screw (Fig.1).
-Continue this procedure around the
entire perimeter. Do not forget to contin-
ue fitting the liner carefully and tightly
into places as you go.
Again check the diameter of your swim-
ming pool. Fill about 2.5cm of water into
the pool in order to check that it is set
level.
Straighten out any folds or wrinkles, tak-
ing care not to pull the liner too tightly.
Now fill the pool, checking that the wall
maintains its round shape. If your pool
(1.20m high) is equipped with a sand fil-
ter, fill it up to 5cm below the cut-out for
the skimmer.
If you have used a protective ground
mat, cut the excess material protruding
around the outside of the pool.
8-Mise en place du liner :
-L’installation du liner nécessite le main-
tien de la paroi par au moins une person-
ne.
Dépliez le liner comme sur la (Fig. 12).
Déployez ensuite la poche le long de la
paroi en l’ajustant uniformément.
Pour la doublure du hublot, commencer
l’installation de la doublure en plaçant sa
section transparente avec le hublot sur la
paroi de la piscine (Fig. 11a)
Doublez l’épaisseur de la poche sur les
rebords et repliez la de 4 cm maximum
sur la paroi.
Maintenez la poche en place et emboîtez
un profilé plastique sur la tranche de la
paroi pour bloquer la poche (Fig. 13).
Ajustez à la suite un autre profilé et
enfoncez un rail sur le premier. A chaque
jonction du rail supérieur venir position-
ner un connecteur dans lequel les rails
supérieurs sont enfoncés jusqu’à l’ergot.
En même temps que vous mettez le con-
necteur vous devez insérer et bloquer le
montant vertical correspondant avec une
vis (Fig. 1).
-Continuer aisi l’opération sur tout le
périmètre. Ne pas oublier de bien tendre
le liner au fur et à mesure afin d’éliminer
les plis.
Vérifier à nouveau le diamètre de votre
piscine à plusieurs endroits. Faites couler
environ 2,5 cm d’eau dans la piscine
pour vous assurer de l’uniformité du
niveau.
Défaites les faux plis, en faisant attention à
ne pas trop tendre la poche. Remplissez-la
ensuite à la profondeur désirée, en veillant
à ce que la paroi garde sa forme circulaire.
Si votre piscine (hauteur 1,20m) est
équipée d’un filtre à sable, remplissez-la
jusqu’à 5 cm sous l’ouverture prévue dans
la paroi, pour le skimmer.
Découpez ensuite, si vous en avez mis
un, l’excédant du tapis de sol, à l’extérieur
de la paroi.
8-Die Beckenauskleidung anbringen:
-Beim Anbringen der Folie muß die
Beckenwand von mindestens einer
Person gehalten werden.
Falten Sie die Folie, wie in Abb. 12
dargestellt, auseinander. Breiten Sie die
Folie entlang der Ward aus und passen
Sie sie ein.
Bei der Bullaugen-Einlage beginnen Sie
mit der Installation der Einlage indem Sie
den transparenten Teil der Einlage mit
dem Bullauge an der Wand ausrichten
(Abb. 11a).
Falten Sie die Folie an den Rändern damit
sie doppelt liegt und klappen Sie sie {
Halten Sie die Folie in dieser Position fest
und stecken Sie ein Plastikprofil auf die
Wand, um die Folie festzuhalten (Abb.
13). Stecken Sie das nächste Plastik-pro-
fil auf die Folie und schieben eine
Schiene auf das erste Profil.
Setzen Sie immer an der Stelle an der die
oberen Schienen anein-anderstoßen ein
Anschlußstück ein. Schieben Sie dabei
die Schiene bis zum Nocken in das
Anschlußstück. Setzen Sie jedesmal,
wenn Sie ein Anschlußstück einsetzen,
auch einen senkrechten Pfosten ein und
schrauben ihn mit einer Schraube fest.
Wieberholen Sie diesen Vorgang bis alle
Pfosten eingesetzt sind. Vergessen Sie
nicht, die Folie dabei glattzustreichen,
damit sämtliche Falten verschwinden.
Überprüfen Sie erneut an mehreren
Stellen den Durchmesser des Beckens
und füllen Sie 2,5cm hoch Wasser ein,
um sicherzustellen, daß das Becken
waagerecht steht. Entfernen Sie die
Falten und achten Sie darauf, daß die
Folie dabei nicht zu sehr gespannt wird.
Füllen Sie die gewünschte Menge Wasser
ein und beachten Sie, daß die Wand ihre
Form beibehält. Wenn das
Schwimmbecken mit einem Sand-filter
ausgestattet ist (Hohe 1,20m), füllen Sie
das Becken bis sich der Wasserspiegel
5cm unterhalb der für den Skimmer
vorgesehenen Öffnung befindet.
Fig. 12
Fig. 11a
Fig. 13
GB
F
D