Model setup functions – HITEC Optic 6 User Manual
Page 7
Flashing
Model Setup Functions
Model Setup Functions
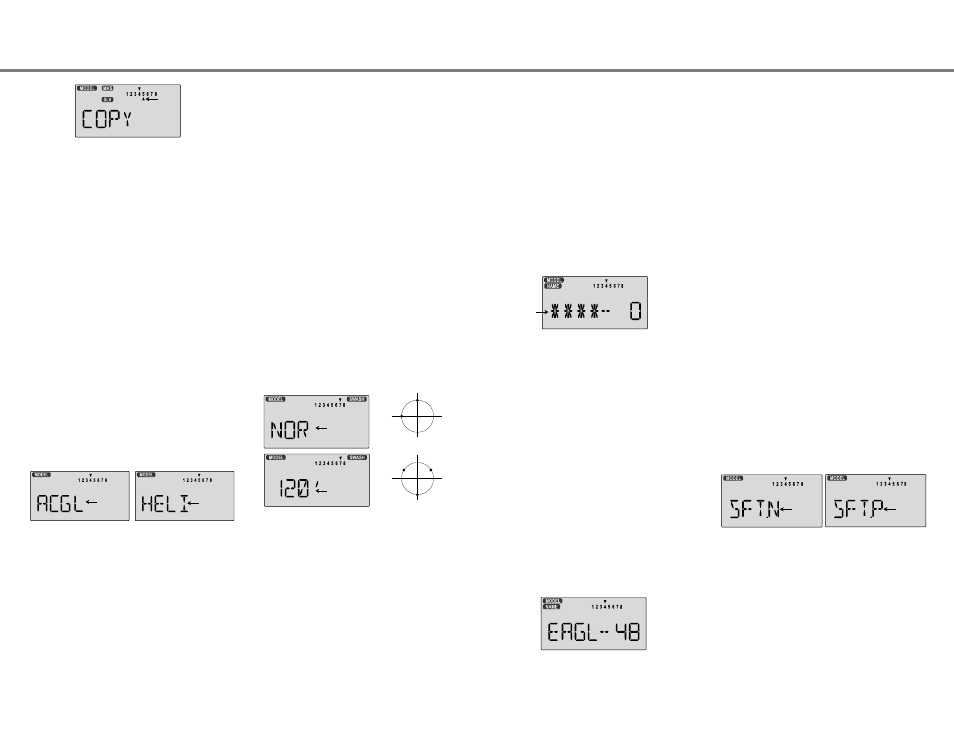
3. The source model memory (the memory that will be
duplicated) is the current one, indicated by the fixed upper
arrow. To select your destination model number, press the
Left or Right Cursor keys. The selected destination memory
number is shown by the flashing triangle under it.
4. Press the +Increase and -Decrease Data keys at the same
time. The transmitter beeps twice rapidly, indicating the
copy has been completed.
5. Switch power off.
6. Switch power back on. If you wish to go to the newly-saved
memory, repeat step 1.
This function is used to select the type of model to be
programmed in the current model memory. You may select
from aircraft/glider (ACGL) and helicopters (HELI). If you
select a helicopter type, you will need to set the swash type.
These settings are covered below.
Selecting the Model Type
1. With the transmitter switched off, turn on your transmitter
while pressing both of the two Edit keys (the two keys on the
far left). The model select (M.SEL) menu will be displayed.
2. Press the Down arrow key. This gets you into the type
select menu. The current model type will be flashing on and
off. (If you're already in the setup menus, you can just press
the Up or Down arrow key to get here.)
3. If the model type you want is displayed, you're done. [If you
wish to change the swash type in the HELI model settings,
see the sections below.]
4. If you wish to change the model type from that displayed,
press on the Left or Right Cursor buttons until the model
type you want, either ACGL or HELI, appears.
5. To select your desired model type, press both the +Increase
and -Decrease Data keys simultaneously. Two beeps tell
you that the new model type is now registered. THIS WILL
ERASE ALL THE OLD SETTINGS IN THE MODEL
MEMORY, SO BE SURE YOU'RE IN THE CORRECT
MODEL MEMORY BEFORE YOU CHANGE MODEL TYPE!
ACGL, HELI - Model Type Select
Swashplate Type Selection
Model Name
Transmit Shift - SFT.N, SFT.P
Destination
(Flashing)
Flashing
Flashing
6. If you've selected the HELI menu, go to the Swash select
menu (see below) and choose the swash type for your model.
7. Press the Up or Down arrow keys to get to another setup
menu, or switch power off.
8. Switch power back on. You may now set up the details of
your model in the Edit mode.
The Model Name function is used to create an alpha-numeric
name which is stored in the model memory along with the rest
of the model settings. You will find it useful to help keep track
of multiple models that are stored in your Optic system.
The model name can be four alphabetic characters, along with
up to three numbers, 0-199. The letters may be used to
abbreviate the model's name, and the numbers may be used
for the memory number, or you may wish to store that model's
channel number so you can remember it easier.
Inputting a Model Name
1. With the transmitter switched off, turn on your transmitter
while pressing both of the two Edit keys (the two keys on the
far left). The model select (M.SEL) menu will be displayed,
with "the model type" to represent letters to be chosen.
2. Press the Up or Down arrow key until you get into the model
name menu. You'll see the display as shown at the top,
with the MODEL and NAME indicators in the upper left on.
The first character of the name will be flashing on and off.
(If you're already in the setup menus, you can just press the
Up or Down arrow key to get here.)
3. To change the first character, press the +Increase and
-Decrease Data keys until you see the character you desire.
You may select from the upper case letters A - Z, *, +, -, /,
and the numbers 0 - 9.
4. Press the Right Cursor key to move to the next character.
5. Press the +Increase and -Decrease Data keys until you see
the character you desire.
6. Repeat the previous two steps to input the third and fourth
characters of the display.
7. Press the Right Cursor key to move to the number displays
on the right.
8. Press the +Increase and -Decrease Data keys until you get
to a number that you like. This can be any number from 0 to
199. If you have lots of models with different frequencies,
you may wish to input your channel number here.
9. Press the Up or Down arrow keys to get to another setup
menu, or switch power off.
If you are using the helicopter (HELI) setting menu, you must
tell the Optic system what type of swashplate your model uses.
Helicopters may have one servo each for pitch, aileron, and
elevator (NOR) or they may use three servos in concert on the
swash to provide these functions (120'). If you are not sure
about your swash type, please consult your model's instructions.
Note that this menu will not be available unless you have
selected the HELI model type
Selecting the Swashplate Type
1. Select the HELI model type in the Model Type Select menus
(see above).
2. With the transmitter switched off, turn on your transmitter
while pressing both of the two Edit keys (the two keys on the
far left). The model select (M.SEL) menu will be displayed.
3. Press the Up or Down arrow keys:
If you're in HELI mode, SWASH will be highlighted and you
can select from two swashplate types: NOR and 120':
4. If the swash type displayed is correct, go on to the next step.
If you wish to change the swashplate type from that displayed,
press on the Left or Right Cursor buttons until the swash type
you want appears. CAUTION: if you change types, you may
lose settings in the menus.
5. Press the Up or Down arrow keys to get to another setup
menu, or switch power off.
6. Switch power back on. You may now set up the details of
your model in the Edit mode.
CH1
CH2
NOR
(CH6=PITCH)
CH1
CH2
CH6
120
10. Switch power back on. You may now set up the details of
your model in the Edit mode.
The Transmit Shift function is used to change the shift
direction of the Optic system. Hitec receivers use a negative
shift direction for their transmissions. However, some other
brands of RC gear use positive shifting. With this menu, you
can change the way your transmitter broadcasts, so that it can
address all types of PPM receivers. (PPM receivers are also
referred to as "FM" receivers.) As shown later, the Optic FM is
also compatible with Hitec QPCM receivers. Hitec/RCD
TM
and
Futaba
TM
receivers use negative shift (N), where Multiplex
TM
,
JR
TM
and Airtronics
TM
use positive shift (P)
If you choose the wrong shift direction for your receiver, the
servos may move erratically and will not respond to the
transmitter, even if it is on the correct frequency. Turn off
your receiver at once and change the shift direction to preclude
damage to your servos.
If you use a mixture of receiver brands, sure that each model is
correctly set for the model of receiver you are using in the
corresponding model memory.
Changing the Frequency Shift
1. With the transmitter switched off, turn on your transmitter
while pressing both of the two Edit keys (the two keys on the
far left). The model select (M.SEL) menu will be displayed.
2. Press the Up or Down Edit key until you get into the shift
menu. You'll see either the word SFT.N or SFT.P, with the
last character, N or P, flashing on and off. (If you're already
in the setup menus, you can just press the Up or Down
arrow key to get here.)
3. N represents negative shift and will work with Hitec
TM
and
Futaba
TM
. P represents positive shift and will work with
Multiplex
TM
, JR
TM
and Airtronics
TM
brands.
4. To change the shift direction from what is shown, press
either the Left or Right Cursor key one time. This will
change the display from P to N or N to P.
5. Press the Up or Down arrow keys to get to another setup
menu, or switch power off.
Flashing
Flashing
(1
ST
Character Only)
Model Setup Functions - Page 13
Model Setup Functions - Page 12
Flashing
Flashing