HITEC Optic 6 User Manual
Page 6
Model Setup Functions
Transmitter Displays and Messages
This section describes the model setup functions that are used to choose all of the operating features of a particular model
memory. These functions are used to select the model memory, the model type (from airplane/glider, and helicopters), set the
stopwatch, and other useful functions. These functions are used to set up a new model or a new model memory, to switch
between memories, and to change transmit shift..
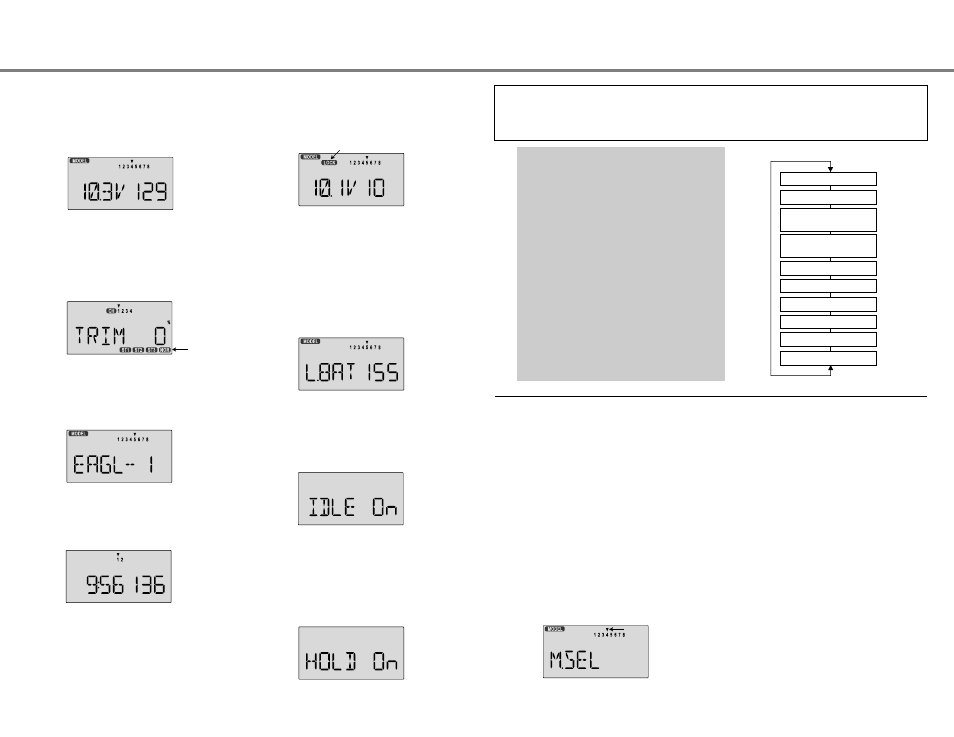
This screen appears at startup. The model memory number is
shown by the small down-arrow. Battery voltage is shown in
the bottom left, and operating time is on the lower right.
You can reset the operating time display by hitting the Clear
button (the one on the farthest right). Do this after each charge
to keep track of your operating time on a single charge.
Pressing the Up button gives the Trim display (different
numbers may appear depending on the model type). To see
where the trim for a certain channel is, you have to move it!
Be sure to move it back to where it was. Note that the CH3 trim
only moves downward, so if you need more engine RPM, set
up idle with the trim at -25% so you can increase it if needed.
Pressing the Up button again gives the Model Name display.
If you've named your model, it will appear here so you can be
sure you have recalled the correct memory. If you do not name
the model, you'll have to remember which model memory it's
stored within by the memory number.
Pressing the Right button gives the Timer display, with a
stopwatch display on the left, and operating time on the right.
This also starts the timer, so hit the Right key again to stop it.
Hitting the Cursor Left (Off) button resets the timer.
Pressing the Lock button locks the throttle servo and holds it
where you last commanded it. This is a safety feature to be
used when you are carrying the model and transmitter to
ensure you don't accidentally give throttle. The LOCK indicator
shows when the Lock switch has been engaged.
The LOW BATTERY warning is displayed when the transmitter
battery voltage drops below 9.3 volts, and a beeper sounds.
The operating time is still shown on the right. If you reset this
each time you charge the system, you will have a good idea of
how long you can safely operate.
WHEN THE BEEPER SOUNDS, LAND YOUR MODEL AS
SOON AS POSSIBLE BEFORE LOSS OF CONTROL DUE
TO A DEAD TRANSMITTER BATTERY.
The IDLE ON warning is displayed when the transmitter is
powered up with the Idle switch on in the helicopter mode only.
You can turn this off by moving the Flt. Mode (SW-4) switch
FORWARD. For your safety, the transmitter will not broadcast
until this alarm is ended
Your Optic system can store up to eight independent sets of
model data in its memory. The Model Select (MODL) function
allows you to choose from any of the eight sets of model data.
You can assign a four-character name and three numerals
from 0-199 to each model memory.
The model names are not visible when you wish to switch
memories. There are several ways to keep track of which
model is in each memory. You may attach a small piece of
white tape to the transmitter and write the model's name along
with the model setup number (and its channel number), or you
may use a notebook, or label the model with its memory
number prominently near its on-off switch inside the fuselage.
Choosing a model memory to load
1. Start with the transmitter switched off.
2. Turn on your transmitter while pressing both of the two Edit
keys (the two keys on the far left). This gets you into the
model select (M.SEL) menu
3. Select the desired model number by pressing the Cursor
Right or Left button. At this time, the small arrow above the
selected model number will blink on and off.
4. Switch power off.
5. Switch power back on. The previously-selected model
number is indicated by the arrow above the model numbers
in the display.
The COPY function is used to copy the model data stored in
the current model memory into another model memory. This
function is handy to use to start a new model that's similar to
one you have already programmed, and is also handy for
copying the current model data into another model memory as
a backup.
Copying from one model memory to another
1. With the transmitter switched off, turn on your transmitter
while pressing both of the two Edit keys (the two keys on the
far left). The model select (M.SEL) menu will be displayed.
2. Press the Up arrow key. This gets you into the model copy
(COPY) menu. (If you're already in the setup menus, you
can just press the UP or Down arrow key to get here.)
The HOLD ON warning is displayed when the transmitter is
powered up with the Throttle hold switch (SW-1) on in the
helicopter mode only. You can turn this off by moving the
SW-1 switch AFT (ELEV RUDD D/R switch). If you then get
the IDLE ON alarm (see above), you must move the Flt. Mode
switch fully FORWARD. For your safety, the transmitter
will not broadcast until this alarm is ended.
LOCK indicator
Warning Displays
M.SEL - Model Select
COPY - Copy Model
Map of Basic Menu Functions
(see right)
M.SEL
Model select: choose one of eight model
memories
11
****
Model Name (four letters +
up to three numbers)
13
ACGL
Acrobatic/Glider model mode
12
HELI
Helicopter model mode
12
NOR
Normal swashplate (HELI only)
12
120°
120° Swashplate (HELI only)
11
COPY
Data Copy
13
SFT.N
Negative Transmit Shift
13
SFT.P
Positive Transmit Shift
13
PPM
PPM or QPCM Modulation
14
QPCM
PCM Modulation
14
STCK1
Transmitter mode 1
7
STCK2
Transmitter mode 2
7
TIME
Timer setup
14
REST
Reset Memory
14
Power On While Pressing
both Edit keys
Model Select 1-8 [M. SEL]
Model Name [ABCD-99]
Model Type
[ACGL] or [HELI]
Swashplate type (HELI only)
[NOR] [120]
Copy Model [COPY]
Shift Dir. [SFT.N][SFT.P]
Modulation [PPM] or [QPCM]
MODE 1, MODE 2
Time Setup [TIME XX]
Reset Memory [REST]
Flashing
Model Setup Functions - Page 11
Transmitter Displays and Messages - Page 10
Flashing