Airplane model function descriptions – HITEC Optic 6 User Manual
Page 16
Airplane Model Function Descriptions
Airplane Model Function Descriptions
FLPT - Flap Travel Function
ADIF - Aileron Differential
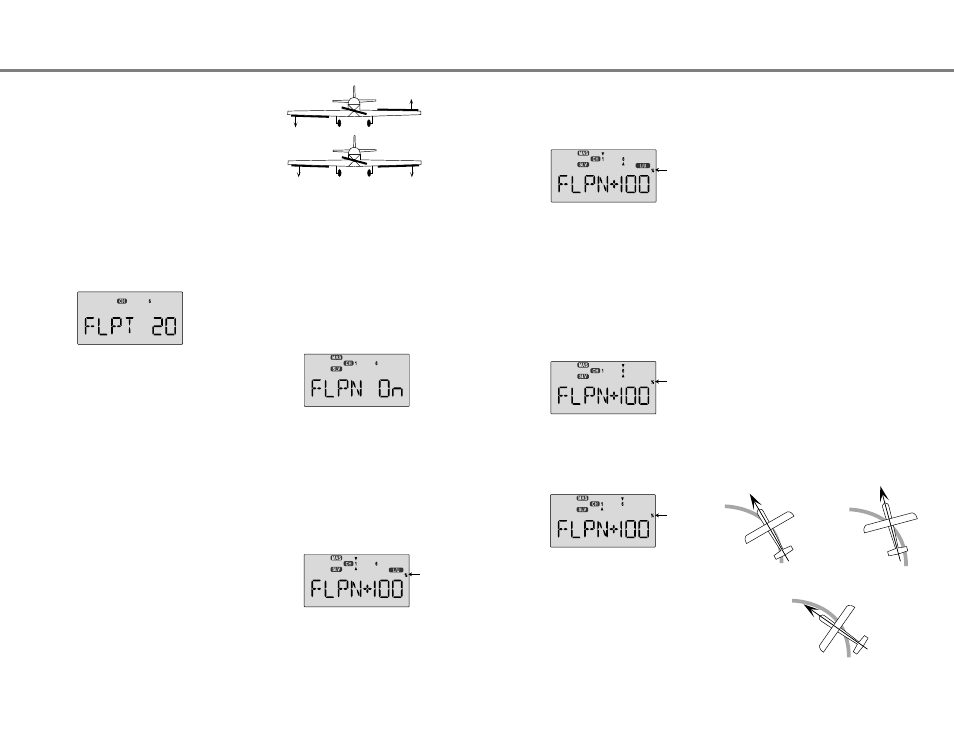
FLPN - Flaperon Mixing
Setting Flap Travel function
2. Press the CLEAR key to switch between the two possible
settings.
3. If you choose the Switch SW-01 control setting, be sure the
switch is in the OFF position before you switch on the
airborne system. This is to ensure you do not accidentally
turn on full throttle.
The Flap Travel function is used to specify the amount of flap
travel produced by motion of the flap control (the Left lever).
If flaperon is inactive, the Right lever may be used to trim the
flap position. With flaperons active, the Right lever controls
the motion of both flaperons.
1. Use the Edit Up Down arrow keys to select the FLPT
window. The number in the display may be different.
Setting up the Flaperon function
1. The right flaperon servo should be plugged into CH1, and the
left flaperon servo should be plugged into CH6.
2. Press one of the Up Down Edit buttons repeatedly to select
the FLPN window. The INH indicator will show.
3. Press the Active/Inhibit (Clear) key to activate the flaperon
function. This will show the On indicator.
4. Press the Cursor Right key once. A small arrow is displayed
over the numeral 1, representing aileron master channel, and
the percent indicator will blink on and off. A small arrow is
displayed under the numeral 1, which tells us we're setting
the right (CH1) flaperon servo. Move the aileron stick all the
way to the right, and check that both flaperons move the right
direction. If the right (CH1) flaperon moves the wrong way,
change the its travel direction by holding the stick to the right,
pressing the Active/Inhibit (Clear) key, then pressing the
Data -Decrease key until you reach -100%. This will also
change the travel for the left stick motion.
5. If the left (CH6) flaperon moves correctly with aileron stick,
go to the next step. Otherwise, change the its travel direction
by pressing the Cursor Right key (the little arrow moves
under the 6), press the Active/Inhibit (Clear) key (sets 0%),
then press the Data -Decrease key until you reach -100%.
6. Now you'll input the amount of flap response on the flaperons.
The flap motion is commanded by the Right Lever on the
right side of the case (near your right-hand index finger), and
both flaperons should move the same direction when you
move the lever. Press the Cursor Right key one time, so the
little arrow moves over the 6 indicating flaps are now the
master channel. Note the arrow under the 6 as well,
indicating left (CH6) flaperon. Now you may adjust the
amount of left flaperon travel with the Data +Increase and
-Decrease keys. Press Active/Inhibit (Clear) key if you wish
to reset to 0%). You may need to choose negative values to
get the control to travel the correct direction.
7. Now you'll input the amount of flap lever response on the
right (CH1) flaperon by pressing the Cursor Right key once.
Now the little arrow moves under the 1, and you may adjust
the amount of right flaperon travel with the Data +Increase
and -Decrease keys.
8. You may wish to set aileron differential. Aileron differential
means that each aileron has more travel in the 'up' direction
than the 'down' direction. Normally the down travel is
reduced to about half of the up travel, especially on slower-
flying models. Press the Cursor Right key two times, so the
little arrows move over and under the 1 indicating aileron
stick is again the master channel. The arrow under the 1
indicates the right (CH1) flaperon. Move the stick to the LEFT
and press the Data -Decrease key until you get to 50-75%.
If you need even more differential, you can choose as low
as 0% down, and the ailerons will move up only.
This is preferred over reducing the up travel, which reduces
the roll rate.
9. You must repeat this procedure for the left flaperon also.
Press the Cursor Right key one time, so the little arrow
moves under the 6 indicating the left (CH6) flaperon. Move
the stick to the Right and as before, press the Data
-Decrease key until you get to 50-75%.
Before we explain why we use differential, please note that this
function drives two aileron servos out of channels 1 and 5. So
if you have a five-channel receiver, use the ADIF function
to set up your model.
Ailerons are used to roll or bank the aircraft's wing, but making
a roll or turn has a price. A wing that generates lift also
generates a drag component called induced drag, meaning that
drag is induced as a byproduct of the lifting wing. This means
that the wing that is lifting more is also dragging more, and the
resulting drag difference causes the fuselage of the model to
yaw away from the desired turn direction, exactly the wrong
thing to have happen. This causes even more drag, which can
really hurt an aircraft's performance. There are two ways to
reduce the yaw of the fuselage, differential (ADIF) and rudder
coupling (A->R). Both should be used together.
Aileron differential causes the ailerons to automatically move
with more UP than DOWN motion, which helps to reduce
induced drag. It helps, along with rudder-coupling, to make the
fuselage point straight into the oncoming air stream (this is also
called "coordinating the turn").
The amount of differential is highly dependent on the model
configuration. A good starting point is for the down aileron to
move 50% to 75% as much as the up-moving aileron.
2. Press the Data +Increase or -Decrease key to input your
desired flap motion setting. The 30% default value produces
"reasonable" travel for many models, but you must try it out
on your own model to be sure. A 100% setting causes
extreme travel and is not recommended as it can cause the
servos to bind or excessive trim changes. You may want to
set it to a smaller number, say 10% for starters. If you wish
to return to the default 30% setting, press the Active/Inhibit
(Clear) key. You can toggle through the settings 0%, 30%,
and 100% by continuing to press this key. Setting it to 0%
disables the Right lever control, but the flaps will still respond
to mixing functions such as E->F and to the Landing function.
You can combine the flaperon function with the landing function
(LAND), to get steeper descents without building up airspeed.
This is very convenient for making short approaches on small
fields. Note that you cannot have both flaperon and elevon
mixing active at the same time.
The Flaperon mixing function uses two servos to individually
control two ailerons, combining the aileron function with the flap
function. Both ailerons can be raised and lowered
simultaneously for a flap effect. Of course, aileron function,
where the two controls move in different directions, is also
performed. The down travel of the left and right ailerons can be
adjusted, so you can also get a differential effect. (Left and
right flap travel are adjusted individually in the EPA menu.)
To take advantage of the flaperon mixing function, you'll need
to connect the right aileron servo to CH1 (AIL) and the left
aileron servo to CH6 (FLP).
CH1
CH6
Aileron Operation
CH1
CH6
Flap Operation
Nose Points outside Circle
increase coupling and/or
differential
Coordinated turn
fuse lines up with turn direction
(don't change anything!)
Nose Points inside circle
Too much coupling or differential.
Reduce one or both.
Airplane Model Function Descriptions - Page 31
Airplane Model Function Descriptions - Page 30
Flashing
Flashing
Flashing
Flashing