Airplane model function descriptions – HITEC Optic 6 User Manual
Page 18
Airplane Model Function Descriptions
Airplane Model Function Descriptions
Airplane Model Function Descriptions - Page 35
Airplane Model Function Descriptions - Page 34
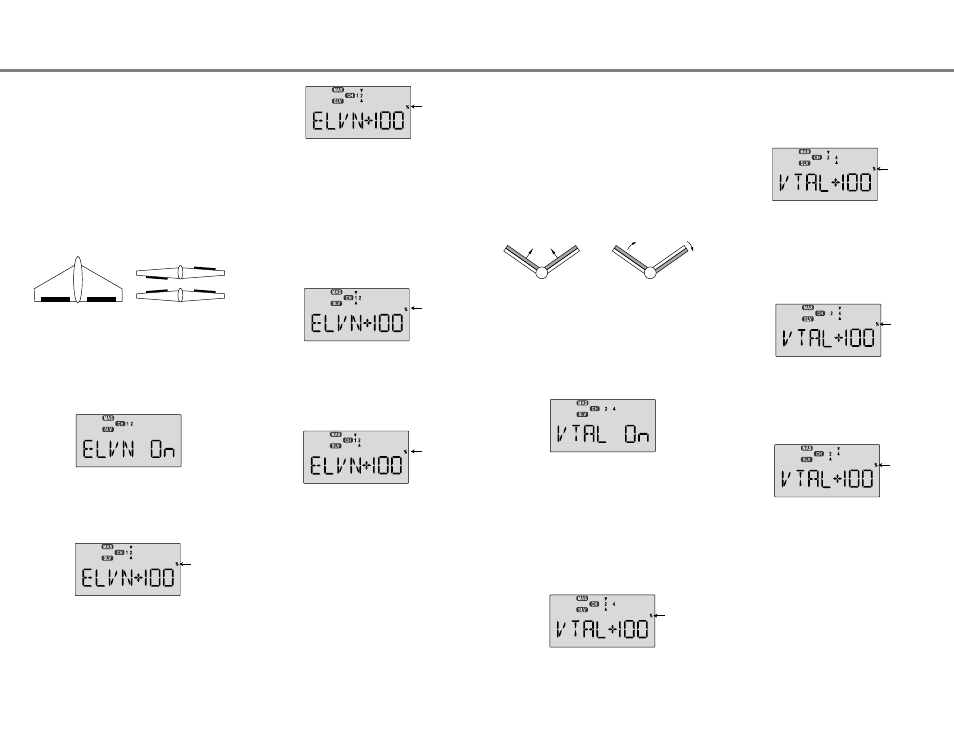
Setting up elevon mixing
1. The right elevon should be plugged into CH1, and the left
elevon should be plugged into CH2.
2. Press one of the Up Down Edit buttons repeatedly to select
the ELVN window.
3. To activate, press the Active/Inhibit (Clear) key. The letters
"INH" will turn to "On."
4. Press the Cursor Right key once, to get to the elevator travel
setting menu. A small arrow is displayed over the numeral 2
represents elevator master channel, and the percent
indicator will blink on and off. The little arrow below the 2
indicates left elevon is being set.
5. Move the elevator stick all the way to the back (full up
position): both elevons should move upwards like elevators.
If the left (CH2) elevon moves down, change the its travel
direction by pressing the Active/Inhibit (Clear) key to get
0% quickly, then pressing the Data -Decrease key until you
reach -50%.
6. If the right (CH1) elevon moves down with up elevator stick,
change the its travel direction by pressing the Cursor Right
key (the little arrow moves under the 1), then press the Data
-Decrease key until you reach -50%. Otherwise, continue.
7. Now you'll input the amount of aileron stick response on the
right (CH1) elevon by pressing the Cursor Right key once.
Now the little arrows move both over and under the 1, and
you may adjust the amount of right elevon travel with the
Data +Increase and -Decrease keys. 50% is a good starting
point. As before, change the sign and use -50% if it travels
the wrong way with aileron stick.
8. Now you'll input the amount of aileron stick response on the
left (CH2) elevon by pressing the Cursor Right key once.
Now the little arrow moves under the 2, and you may adjust
the amount of left elevon travel with the Data +Increase and
-Decrease keys. 50% is a good starting point. Change the
sign if travel needs to be reversed.
VTAL - V-Tail Mixing
V-tail mixing is used with V-tail aircraft so that both elevator
and rudder functions are combined for the two tail surfaces,
called "ruddervators." The response to both elevator and
rudder inputs can be adjusted independently. However, if you
program in too much elevator or rudder travel, when both
rudder and elevator are commanded the servos may reach
their travel limits before full stick motion has occurred.
Therefore, you should keep the travel settings at 50% or below
and adjust the control linkages to get the travel you desire.
Note that you cannot have both V-tail and elevon mixing active
at the same time.
Setting up V-Tail mixing
1. The right ruddervator should be plugged into CH2, and the
left ruddervator should be plugged into CH4.
2. Press one of the Up Down Edit buttons repeatedly to select
the VTAL window. The INH indicator will show.
3. Press the Active/Inhibit (Clear) key to activate the V-tail
function. The display will show On.
4. Press the Cursor Right key once, to get to the elevator
setting menu. A small arrow is displayed over the numeral
2, representing elevator master channel, and under the
numeral 2, indicating the right (CH2) ruddervator, and the
percent indicator will blink on and off. Move the elevator
stick all the way to the back (full up position): both
ruddervators should move upwards. If the right (CH2)
ruddervator moves down, change the its travel direction by
pressing the Active/Inhibit (Clear) key, then pressing the
Data -Decrease key until you reach -50%.
CH2
CH4
CH2
CH4
Up Elevator
Right Rudder (view from rear)
5. If the left (CH4) ruddervator moves down with up elevator
stick, change the its travel direction by pressing the Cursor
Right key (the bottom arrow moves under the 4), the Active/I
nhibit (Clear) key (sets 0%), then press the Data -Decrease
key until you reach -50%. Otherwise, continue.
6. Now you'll input the amount of rudder stick response on the
left (CH4) ruddervator by pressing the Cursor Right key
once. Now the little arrows move both over and under the 4,
and you may adjust the amount of left ruddervator travel
with the Data +Increase and -Decrease keys. 50% is a
good starting point. Press Active/Inhibit (Clear) key if you
wish to reset to 0%).
7. Now you'll input the amount of rudder stick response on the
right (CH2) ruddervator by pressing the Cursor Right key
once. Now the little arrow moves under the 2, and you may
adjust the amount of right ruddervator travel with the Data
+Increase and -Decrease keys. 50% is a good starting point.
Press Active/Inhibit (Clear) key if you wish to reset to 0%).
8. Remember to be sure not to have so much travel as to
cause binding when both elevator and rudder are
commanded simultaneously.
ELVN - Elevon Mixing
The Elevon function should be used with delta wings, flying
wings, and other tailless aircraft whose layouts combine the
aileron and elevator functions, and requires one servo for each
elevon. Connect the right elevon to receiver CH1 and the left
elevon to CH2. The amount of aileron and elevator response
can be adjusted independently. However, if you program in
too much elevator or aileron travel, the servos may reach their
travel limits before full stick motion has occurred. The default
values for this mixer are 100%, but you may want to keep the
travel settings at 50% or below because most elevon planes
are very sensitive, and adjust the control linkages to get the
travel you desire. Note that you cannot use either flaperon or
V-tail mixing when elevon mixing is active.
CH1
CH2
Aileron Operation
Elevator Operation
Flashing
Flashing
Flashing
Flashing
Flashing
Flashing
Flashing
Flashing