Hanna Instruments HI 4521 User Manual
Page 20
20
• Press
to confirm your selection. Use
and
and then use
to modify the value with
or
(for
Set Date and Time option). For the
other two options press
to confirm your selection and
select one of the displayed formats with
or
.
• Press
to confirm your selection and return to the
Date
& Time options.
• Press
to return to the previous mode.
Notes: • For the
Set Date and Time option, if the Saving Confirmation is
enabled, press
to accept the modified option,
to escape without saving or
to return to the editing mode.
Otherwise, the modified option is saved automatically.
• If the time is changed with more than one hour before
last pH/ION calibration, a pop-up warning will appear on the LCD, notifying the user that a date/time
conflict has occured and some time-dependent modes could work improperly (e.g.
Measure, GLP,
Log).
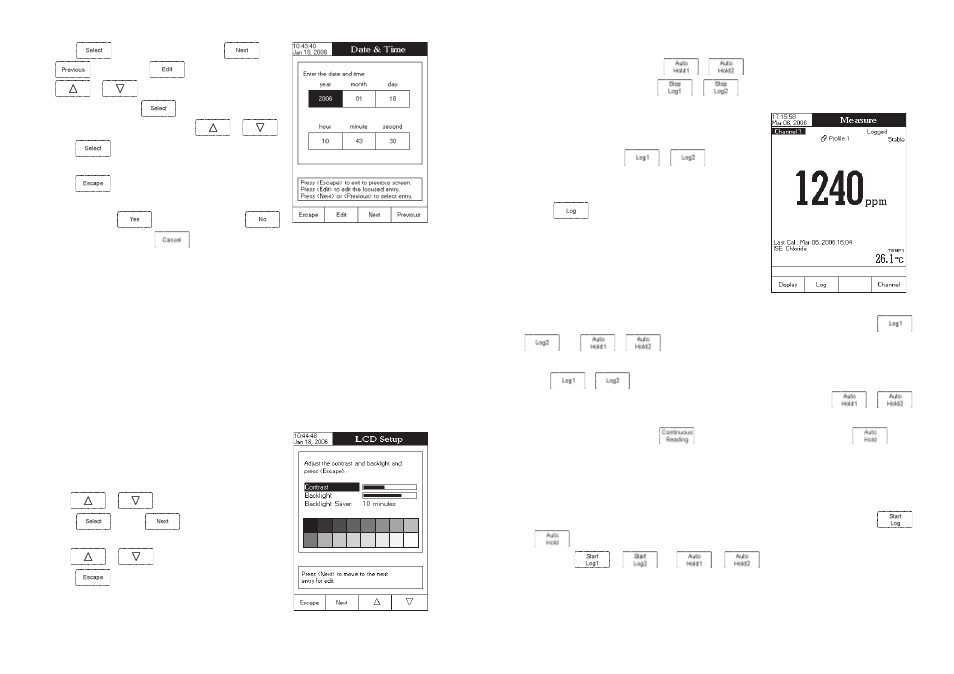
LCD Setup
This option allows the user to set the
Contrast, the Backlight of the LCD and the Backlight Saver. The Contrast
parameter can be adjusted within 7 steps, while the
Backlight parameter within 4 steps. The Backlight Saver can
be set from 1 to 60 minutes or it can be OFF (disabled). All the changes are visible on the LCD for each parameter.
Note: If the instrument backlight is turned off after the set period of
time, press any key to turn it back on.
To set the LCD Setup:
• Use
or
to select the
LCD Setup option.
• Press
and use
key to highlight the desired
parameter.
• Use
or
to adjust the selected parameter.
• Press
to return to the
System Setup menu with saving.
97
The “Logging”, sampling period and “AutoHold” indicators will be displayed on the LCD.
• To store another frozen value, press
/
again.
• To stop the logging session, press
/
.
LOGGING MODE 3
This logging mode can be used for any sample measurements. By
choosing this logging mode,
/
will be avail-
able in
Measure mode.
To log data using this mode:
• Press
while in
Measure mode to manually log a
record. The “Logged” indicator will be displayed on the LCD.
• The records will be stored in one lot. In order to change the
logging lot, see the measured parameter setup for details, Log
option, New Lot generation.
LOGGING MODE 4
This logging mode can be used for multiple samples measurement. By choosing this logging mode,
/
and
/
will be available in
Measure mode.
To log data using this mode:
• Press
/
while in
Measure mode to manually log a record. Each value is logged at the time
when the key was pressed. When the measured value is frozen on the LCD by pressing
/
and the stability criterion is reached, the logged value is the one that has been frozen on the LCD.
• To store another frozen value, press
to return to normal logging mode and then
again.
• The records will be stored in one lot. In order to change the logging lot, see the measured unit
Setup for
details, Log option, New Lot generation.
LOGGING MODE 5
This logging mode can be used for multiple samples measurement. By choosing this logging mode,
and
will be available in
Measure mode.
Notes: • The
or
and
or
will be available in multichannel
Measure
mode, depending on the focused channel.
• If the Reading Mode option is set as Direct and the Logging Mode 5 session is started, a warning
pop-up will be displayed on the LCD, informing the user that the Reading Mode option must be