Hanna Instruments HI 4521 User Manual
Page 19
19
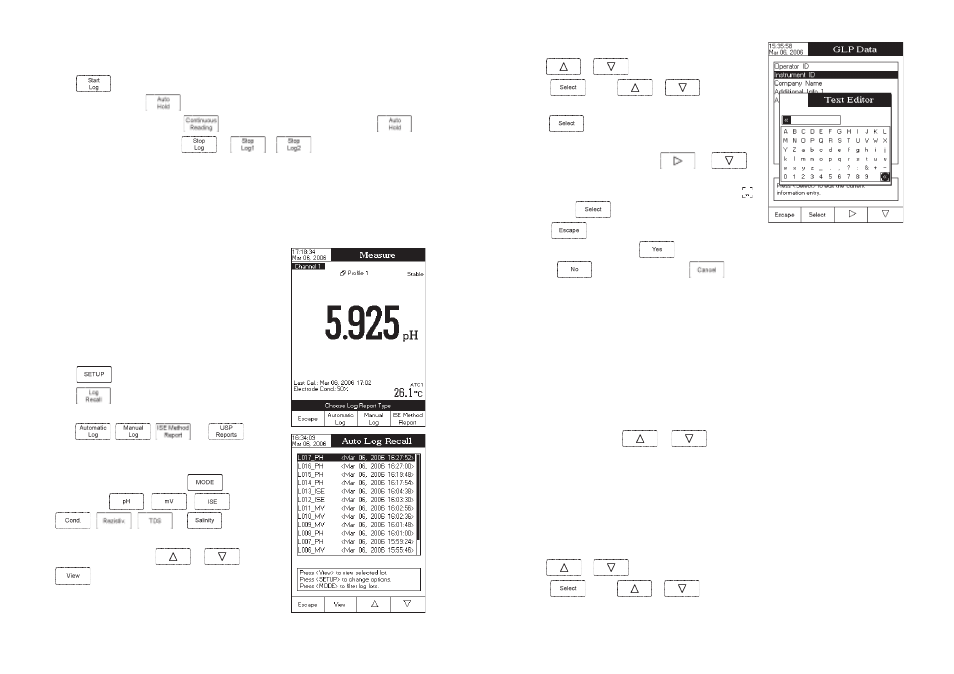
To set the GLP Data:
• Use
or
to select the
GLP Data option.
• Press
and use
or
to highlight the
desired option.
• Press
to edit the desired information. The Text Editor menu
will be displayed on the LCD.
• Enter the desired information by using
and
to
highlight the desired character. It is also possible to delete the last
character by positioning the cursor on the Backspace character ( )
and pressing
.
• Press
to return to the
GLP Data menu. If the Saving
Confirmation is enabled, press
to accept the modified
option,
to escape without saving or
to return
to the editing mode. Otherwise, the modified options are saved
automatically.
Date & Time
This option allows the user to set the current date & time and the format in which they appear.
Set Date and Time
This option allows you to set the current date (year/month/day) and time (hour/minute/second).
Notes: • Only years starting with 2000 are accepted.
• The time is set using the selected time format. For 12 Hour time format only, the AM/PM can also
be selected with
or
.
Set Time Format
This option allows you to choose between 12 Hour (AM/PM) time format and 24 Hour time format from the
displayed pop-up menu.
Set Date Format
This option allows you to choose the desired date format from 6 available options: DD/MM/YYYY; MM/DD/YYYY;
YYYY/MM/DD; Mon DD, YYYY; DD-MM-YYYY and YYYY-Mon-DD.
To set the Date & Time:
• Use
or
to select the
Date& Time option.
• Press
and use
or
to highlight the desired option you want to modify.
98
set as Direct/AutoHold in order to use this logging mode.
To log data using this mode:
• Press
while in
Measure mode to start the logging session. The logged values are only the ones
frozen on the LCD, after
was pressed and the stability criterion reached.
• To store another frozen value, press
to return to normal logging mode and then
again.
• To stop the logging session, press
or
/
.
Notes: • For the automatic logging, if the maximum logging time (24h) has been reached, a warning pop-
up will be displayed on the LCD in order to stop the current log and start another one in a new lot.
• If 100 lots have been saved or maximum 10000 records have been manually stored, a warning
pop-up will be displayed on the LCD in order to delete one lot or to select a new lot for the
manual logging to log other records.
LOG RECALL
This feature allows the user to view all stored data. If no data were
logged, the “No records were found” message will be displayed on
the LCD in the Log Recall screen. Otherwise, the instrument will
display all the memorized lots in accordance with the selected option:
Automatic Log, Manual Log ISE Method Report (
HI 4522), or USP
Report.
To view the memorized data:
• Press
while in
Measure mode.
• Press
. The “Choose Log Report Type” message will
be displayed in the Reminder messages area.
• Press
,
,
, or
to select
the desired Log / ISE/ USP Report type. All logged lots for the
selected Log Report type will be displayed on the LCD.
• To filter the displayed lots, press
and then the
desired unit (
,
,
(
HI 4522),
,
,
or
). Only the se-
lected measurement unit lots will be displayed on the LCD.
• Select the desired lot with
or
and press
to display the logged / report data from the