Troubleshooting – Dillon Precision SL 900 User Manual
Page 46
Troubleshooting Section #1, Primer System
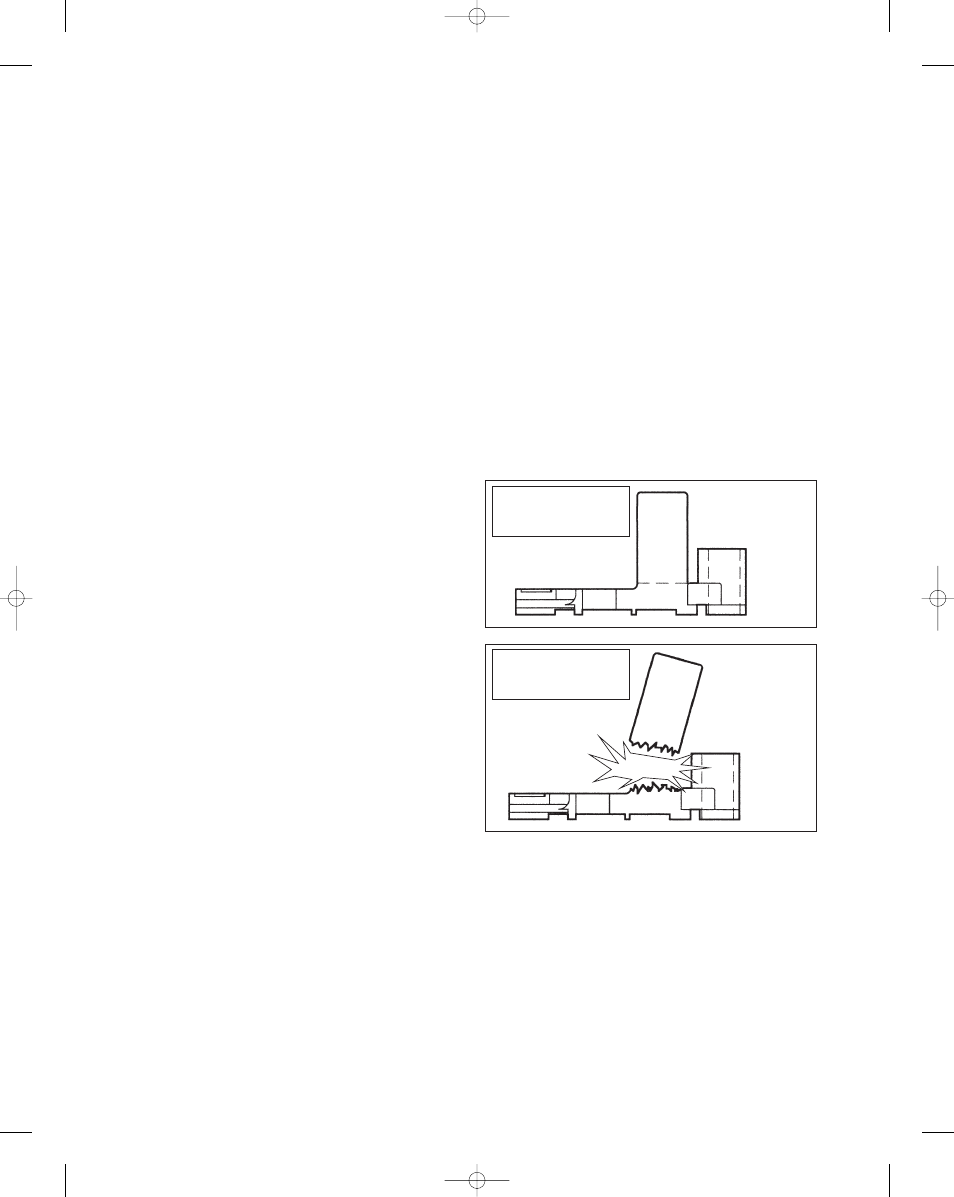
1. I broke my primer transfer arm (#16691). This
happens when a new primer is only partially seated
into the shotshell. A spare is included with the
machine, but it’s important that you make complete,
full strokes of the operating handle when using the
SL 900. See Illustrations 1 & 2
2. A primer is laying sideways inside the clear
cover of the primer tray. How do I remove it?
Shotshell Primers are steel – get a small magnet,
screw-driver or pointer and use it to get that primer
out. Dillon also provides a magnetic pick-up wand
(#22292) as an accessory for the SL900.
Another method available is to simply unscrew the
black knobs that secure the cover, slide the clear
cover off, and remove all the primers. Reassemble the
parts, then refill the primer tray with primers.
3. From time to time I notice that a new primer
lands on the platform rather than into the hole in the
primer transfer arm. Why? Two things may be
occurring here: First, the speed in which you operate
the handle affects the feeding of new primers. As the
new primer is dispensed from the primer tray, it takes
a fraction of a second to fall through the tube and into
the hole in the primer transfer arm. When you reach
the bottom of the handle’s stroke, pause for a second,
then move the handle again. Always pace yourself
when operating your machine.
Second, you always get a new primer with every
complete stroke of the machine’s handle. If there isn’t
a shotshell in station two to receive the primer, that
primer will be left on the platform.
4. A dirty primer tray can be annoying. If you
reload in a dusty environment (for instance, a barn or
garage) or the shotshells you have are dirty, over time
dust will collect on the primer tray. We've made the
primer tray stainless steel so you can clean it with
windex or alcohol. Just remove the clear cover and
wipe it clean. Our machine cover was designed to
help keep your loader clean when you're not using it.
Ask for part #13329.
5. Where does the grease go again? See page 37
in the manual, also make sure your hands are grease-
free when handling new primers; they don't feed well
in any machine when they’re greasy.
6. How do I stop the primers from feeding? A
rectangular insert has been included with the
machine. Place your thumb on the primer drop tube
and raise the primer system by pushing it up. Insert
the stop block BETWEEN the primer feed body and
the tray mounting bracket. Remove the stop block
when you're ready to begin reloading again.
7. When I operate the machine, it doesn’t always
drop a primer. An adjustment screw (#17639, see the
schematic on page 13) is located in the platform. This
screw increases or reduces the stroke of the black
primer slide located on the primer tray via the primer
drop tube. If the primer moves over the hole but it
does not drop thru, turn the adjustment screw
counterclockwise to raise the primer drop tube and
the black primer slide will stroke more and then the
primer will drop thru the hole.
The adjustment screw (#17639) may periodically
go out of adjustment. Remove the screw and clean
the threads and the hole in the platform with alcohol.
Apply some blue Loctite to the threads and reinstall.
8. Why do I get high primers when using
Winchester primers and Remington hulls, but not
when using Remington hulls and primers? The new
silver colored Winchester primers appear to be .002
diameter larger than the previous copper colored
primers at the point just above the flange. We suggest
using a bit more forward push on the operating
handle when seating the primer or switching to
Remington primers for Remington hulls.
Illustrations 1 & 2
Inside your parts bag you will find an extra primer
transfer arm, #16691, see illustration 1. While every
effort has been made to manufacture a sound
machine for you,
it’s important that you make
complete, full strokes of the operating handle when
using the SL 900. Assure yourself that the primer is
fully seated into the shotshell. We’ve found that the
primer transfer arm WILL break if the primer is only
partially seated into the shotshell. Never force the
handle when a jam occurs, instead, slowly return the
handle to its rest position. When the shotshells appear
out of the bottom of the dies, remove the suspect
shotshell from the priming station. Once you have
46
SNAP!
Illustration 1
Primer Transfer Arm
Illustration 2
Primer Transfer Arm
Troubleshooting
SL 900, May 2007 5/21/07 11:51 AM Page 46