Important – Chicago Gaming Medieval Madness Remake User Manual
Page 28
PLAYFI
E
L
D
GLASS
FR
O
N
T
MO
LDI
NG
LEVER GUID
E ASS
E
MBLY
O
N/O
F
F
S
WITCH
Note:
This measurement must be made ON the playf
i
eld
,
not the cabinet or the playfield cover
glass. Tighten the nut on each leg leveler shaft to maintain this setting
.
1-4
7.
Extend each leg leveler slightly below the leg bottom
,
so that all four foot pads are extended
about the same distance. Remove the cabinet from its support and place it on the floor.
T
RU
-P
I
T
C
H
l
evel
6
-1/2
deg
ree
s.
TM
IMPORTANT!
11.
Be sure the
required number of balls is
i
nstalled. The
MEDIEVAL MADNESS game uses FOUR
balls
.
Playfield pitch angle can affect the operation of the plumb bob tilt. The plumb bob weight is among
the parts in the cash box; the operator should install the weight and adjust this tilt mechanism fo
r
prope
r
operation, after comple
t
ion of the desired p
layfield pitch angle sett
i
ng. The un
i
t is factory
installed for
a
6
-
1
/2 degree angle. If an adjustment
is
necessary, loosen the screw at the bottom
ofthe unit. Move the pointe
r
, one groove at
a
time to the left or the right, depending on the
degreedesired. Hold the pointer in place and tighten screw
8
.
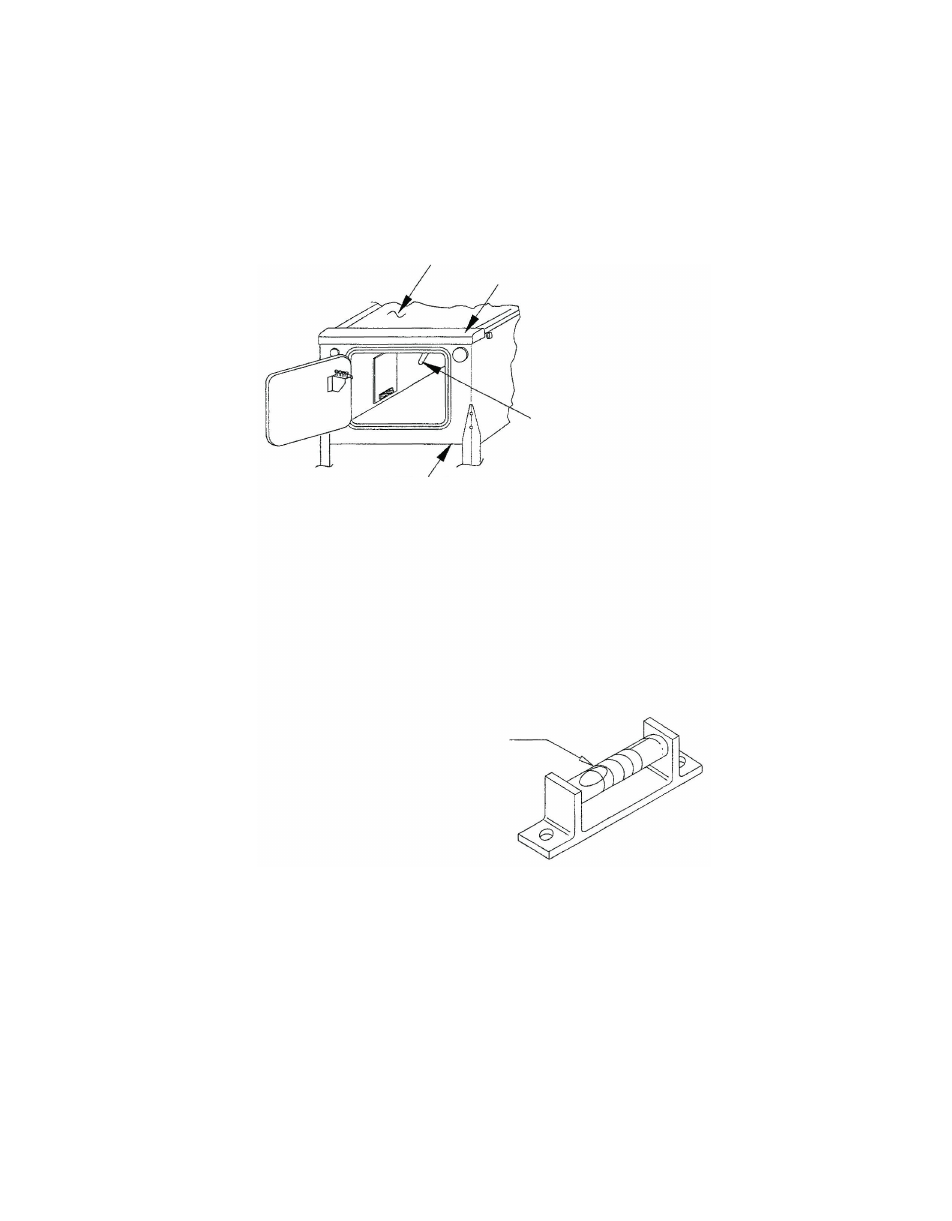
Unlock and open t
he coin door. Move the leve
r
guide toward the left side o
f
the game
,
and lift the
f
ront molding off of the playfield cover glass. Slide the lever gu
i
de to the r
i
ght, a
nd close the co
i
n
d
oor.
Carefully slide the glass downward
,
until it clears the grooves of the left and right side
m
oldings. Lift the glass up and away from the game, storing it carefully to avoid breakage.
9.
Place a level or an inclinometer on the playfield surface
.
Adjust the leg levelers for proper playfield
level (side-to-side).
10
.
The
TRU-PITCH™ level is located on the right shooter rail. This allow
s
the playfield pitch angle to
be
properly adjusted WITHOUT REMOVING THE GLASS. The first line (closest to the front o
f
the
game) on the level is approximately 6 degrees. Every line the
r
eafter is approximately another
1
/
2 degree of pitch. The recommended pitch is 6-1/2 degrees. The NOSE of the bubble should
bebetween the first and second line on the level (see diagram below).