USL JSD-100 Manual User Manual
Page 26
26
To the left of the filter plot are three buttons. The View button toggles the graph between a calculated filter plot
and the internal RTA output. Pressing the Speaker button opens the speaker library (there are separate libraries in
separate directories for biamp and triamp speakers). The speaker library files are simple text files. Users can add
new speakers by modeling new text files on existing ones.
The Copy button copies the crossover settings for this channel to one or more additional channels. The Zoom slider
allows the vertical resolution of the plot to be adjusted.
See sections 7.5 & 7.6 for a suggested procedure for crossover and equalization adjustments.
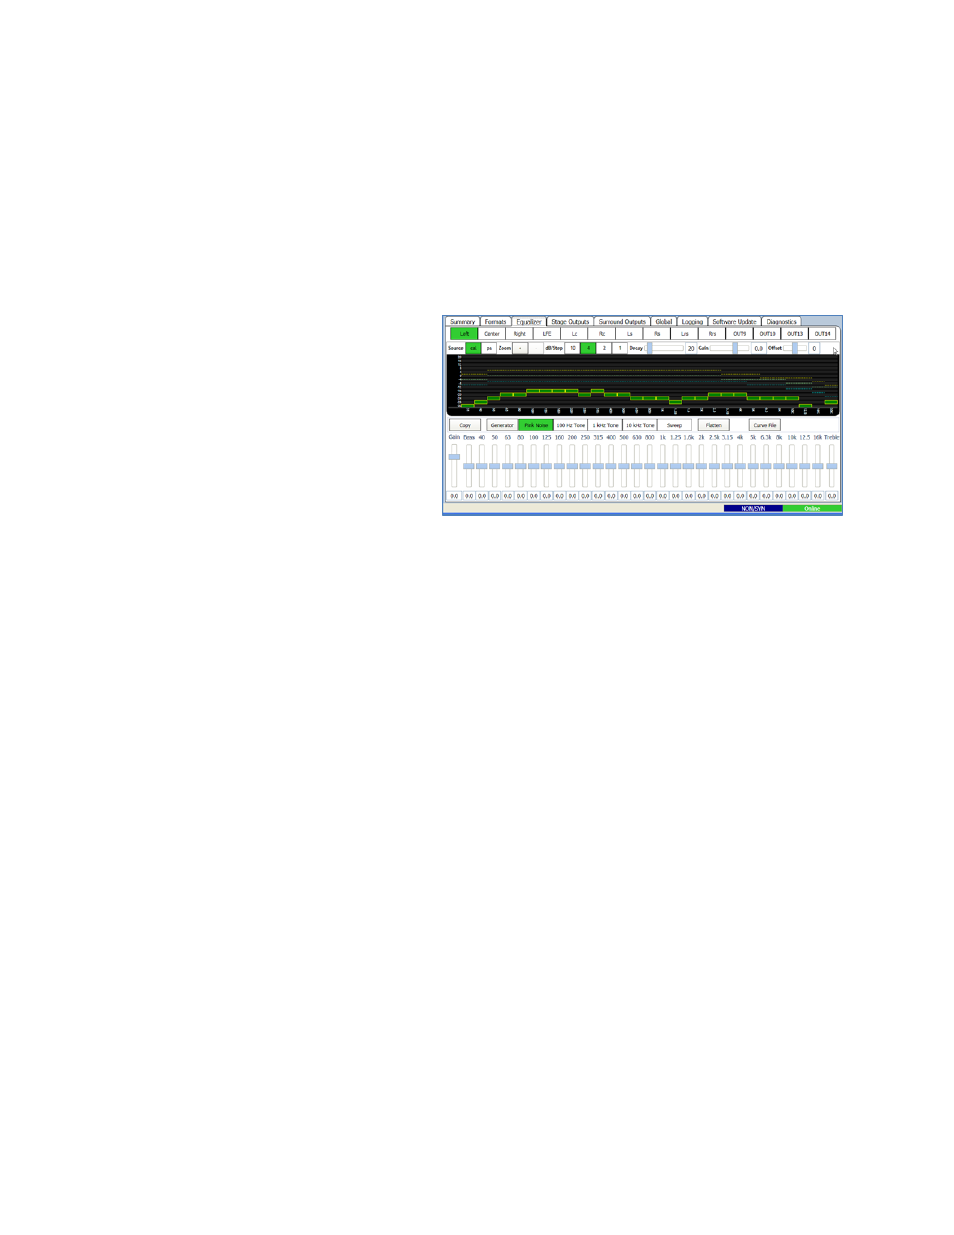
Equalizer
The JSD‐100 equalizer allows the frequency
response of the JSD‐100 to be adjusted for the
acoustics of the room. The RTA screen shows the
measured level in each spectrum band along with
limit lines for a 500 seat auditorium as defined
by SMPTE ST 202:2010. Using the internal pink
noise generator and the internal real‐time
analyzer (RTA), the equalizer is adjusted so the
RTA shows the response specified between the
limit lines.
RTA Channel Select Buttons
Channel select buttons are along the top of the RTA window. These select which speaker the generator is driving
and which channel the equalizer controls are adjusting.
RTA Settings
When the mouse cursor is over the display area of the RTA, another row of settings becomes visible (as shown
above). Use the Source button to select whether the calibrate or PA microphone input is being used to drive the
RTA. The calibrate microphone input is on the 3.5mm TRS connector on the rear panel. The PA microphone input
is on the combination XLR ¼ inch TRS connector. Use the Zoom buttons to enlarge or reduce the text within the
RTA display area. Use the dB/step selector to adjust the vertical resolution as required to get all bands on screen
while providing the best vertical resolution. Make initial adjustments with a fast decay time. The fast decay time
provides a faster update, but a less stable display. As you close in on the final adjustment of the equalizer, increase
the decay time towards maximum to provide a stable display and precise indication of the equalization. Adjust the
gain control as required to place the mid‐band signal level at 0dB.
Generator
Use the Generator button to turn the internal generator on and off. Use the adjacent buttons to select the type of
generator output: pink noise, various frequency tones, or a tone sweep.
Flatten
Pressing this button returns all the equalizer adjustments to 0.0dB.
Curve File
Press this button to load a curve file from the “My Documents/ USL/JSD‐100/EQ Curves” directory. The installer
placed several curve files for different sized auditoriums in this directory. Current practice is to use one of the X‐
Curve files, based on auditorium size. N‐Curves are also available for use with loudspeakers with poor high
frequency response. If a custom equalization curve is required, use one of the existing files as a template to create
a new curve limit file using a text editor.