Checkline TI-CMX User Manual
Page 9
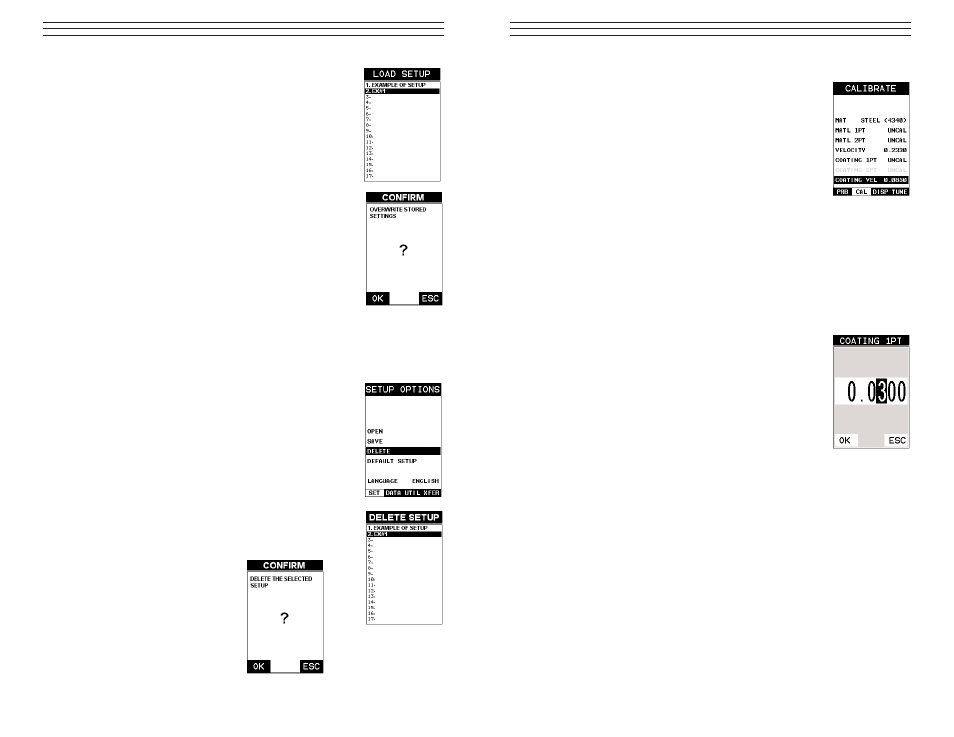
Known Coating Thickness
When the exact velocity of a coating is unknown, the user has
the option of performing a one point calibration on a sample of
the coating with a known thickness to determine the sound
velocity. It would be very handy to carry a set of mechanical
calipers to use in conjunction with the TI-CMX for calibration in
the field:
1. Physically measure a location on a coating sample using a set
of calipers or a digital micrometer.
IMPORTANT NOTE: In PECT (pulse-echo coating) mode, the
coating sample must be coupled to metal in order to calibrate
successfully. Simply place a drop of couplant on a piece of
metal, lay the coating sample over the couplant on the metal and
proceed to step 2.
2. Apply a drop of couplant on the transducer and place the transducer in steady contact
with the coating (on metal) sample or actual test material. Be sure that the reading is
stable and the repeatability indicator, in the top left corner of the display, is fully lit
and stable. Press the MENU key once to activate the menu items tab. Press the
MENU key multiple times to tab right and the ESC key multiple times to tab left
until the CAL menu is highlighted and displaying the sub
menu items.
3. Use the UP and DOWN arrow keys to scroll through the
sub menu items until COATING 1PT is highlighted.
4. Press the ENTER key to display the Digits Edit Box.
5. Press the UP and DOWN arrow keys to scroll the
highlighted value.
6. Press the LEFT and RIGHT arrow keys to scroll the digit
locations.
7. Repeat steps 5 & 6 until the known thickness value is
correctly displayed.
8. Press the OK key to calculate the coating velocity and return
to
the menu screen, or ESC to cancel the one point calibration.
9. Finally, press the MEAS key to return to the measurement screen and begin taking
readings.
NOTE: CHECK YOUR CALIBRATION! Place the transducer back on the calibration
point. The coating thickness reading should now match the known coating thickness
sample. If the thickness is not correct, repeat the steps above.
2.6 Measure
The TI-CMX is now ready to measure. There are two different measurement view
options, each with a specific purpose – Digits & B-Scan. The steps below outline how to
toggle between the different view mode options:
-9-
10. Press the ENTER key to activate the Setup List Box.
11. Use the UP and DOWN arrow keys to scroll through the
setups until the target location to save the Setup is
highlighted.
12. Press the OK key to activate the confirmation screen.
13. Press the OK key to save the Setup, or ESC to cancel saving
the Setup.
14. Finally, press the MEAS key to return to the measurement
screen.
NOTE: The Name and Comments of the Setup can be edited at
any time by simply repeating the Save Setup routine described
above. Therefore, the Save Setup function can also be consid-
ered an Edit Function.
11.4 Deleting a Saved Setup
This option allows a user to delete setup files that were previously saved and no longer
needed. It’s a simple feature to allow the user to do a bit of
“house cleaning”.
1. Press the MENU key once to activate the menu items tab.
Press the MENU key multiple times to tab right and the
ESC key multiple times to tab left until the SETUP menu
is highlighted and displaying the submenu items.
2. Use the UP and DOWN arrow keys to scroll through the
sub menu items until DELETE is highlighted.
3. Press the ENTER key to display the Setups List.
4. Press the UP and DOWN arrow keys to scroll to the
Setup Name.
5. When the Setup Name is highlighted, press the ENTER key
to display the confirmation
screen.
6. Press the OK key to delete the
Setup File.
7. Finally, press the MEAS key to
return to the measurement
screen.
-48-