Checkline TI-CMX User Manual
Page 4

F. Scan Bar – Another view of material thickness in a deflection style horizontal bar.
This visual tool enables the user the ability to see thickness changes during high
speed scans from flaws and pits.
G. Units – The current measurement units being used (English, Metric).
H. Digital Material Thickness Value – Smaller font size when the B-Scan display
view is enabled.
I. Coating Thickness Value – Displays the actual thickness of any coating adhered
to a metallic material surface (PECT Mode), or a coating adhered to a non-metallic
surface (CT Mode).
J. Minimum Material Thickness – Part of the Alarm feature. Displays the minimum
thickness value found during a scan.
K. Maximum Material Thickness – Part of the Alarm feature. Displays the maximum
thickness value found during a scan.
L. B-Scan Display – Cross section view of the material. Provides the user with
graphical view of the opposite/blind surface (i.e. inside pipe wall surface), to give the
user some idea of the condition, or integrity of the material being tested.
2.2 Auto Probe Recognition
When the TI-CMX is initially powered up, the gauge will automatically check to see if
the transducer plugged into the gauge can be recognized. The steps that follow assume
the TI-CMX recognized the probe type:
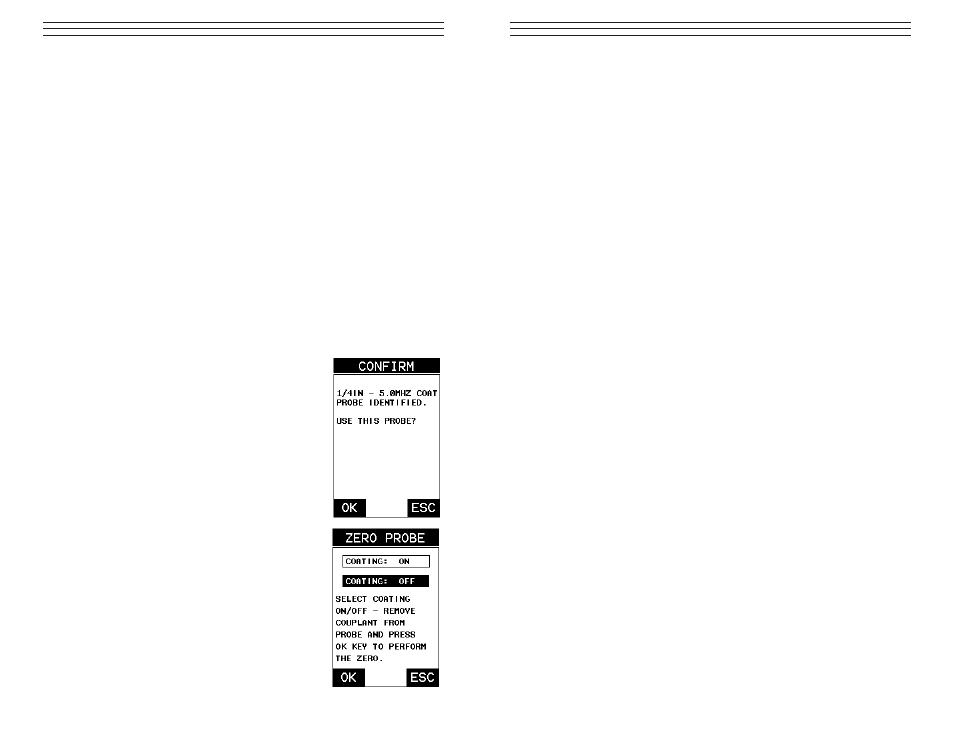
1. Press the OK key once to use the identified probe,
or ESC to display a list of optional transducers.
NOTE: If the TI-CMX recognizes a specific
transducer, the user should always select OK
to use the identified probe. The only time an
alternative probe should be selected from a
list is if the user switched probes following
initial power up and recognition.
2. Assuming the TI-CMX recognized the probe and
the OK key was pressed, the TI-CMX will advance
to a Zero Probe menu. If the transducer was
identified as a special transducer capable of
measuring coating thickness, a menu will be
displayed allowing the user the ability to toggle
the coating thicknessdisplay on/off as follows:
3. Press the UP and DOWN arrow keys to toggle
the coating option on/off.
4. Wipe all couplant from the transducer face
and advance to the Probe Zero & Calibration
section, 6.0.
-4-
N
OTES
-53-
