Open the box and remove all the parts, Carefully lean the main unit against a wall, Attach the front legs – Yamaha Clavinova CVP-70 User Manual
Page 6: Attach the rear legs and pedal box assembly, Adjust the legs and pedal adjusters, Versandkarton öffnen und alle teile auspacken, Das keyboard vorsichtig gegen eine wand lehnen, Die vorderen standbeine anschrauben
Attention! The text in this document has been recognized automatically. To view the original document, you can use the "Original mode".
CVP-70 ASSEMBLY/MONTAGE DES CVP 70/M0I\ITAGE DU
NOTE: We do not recommend attempting to assemble the CVP-70
alone. The job can be easily accomplished, however, with
only two people.
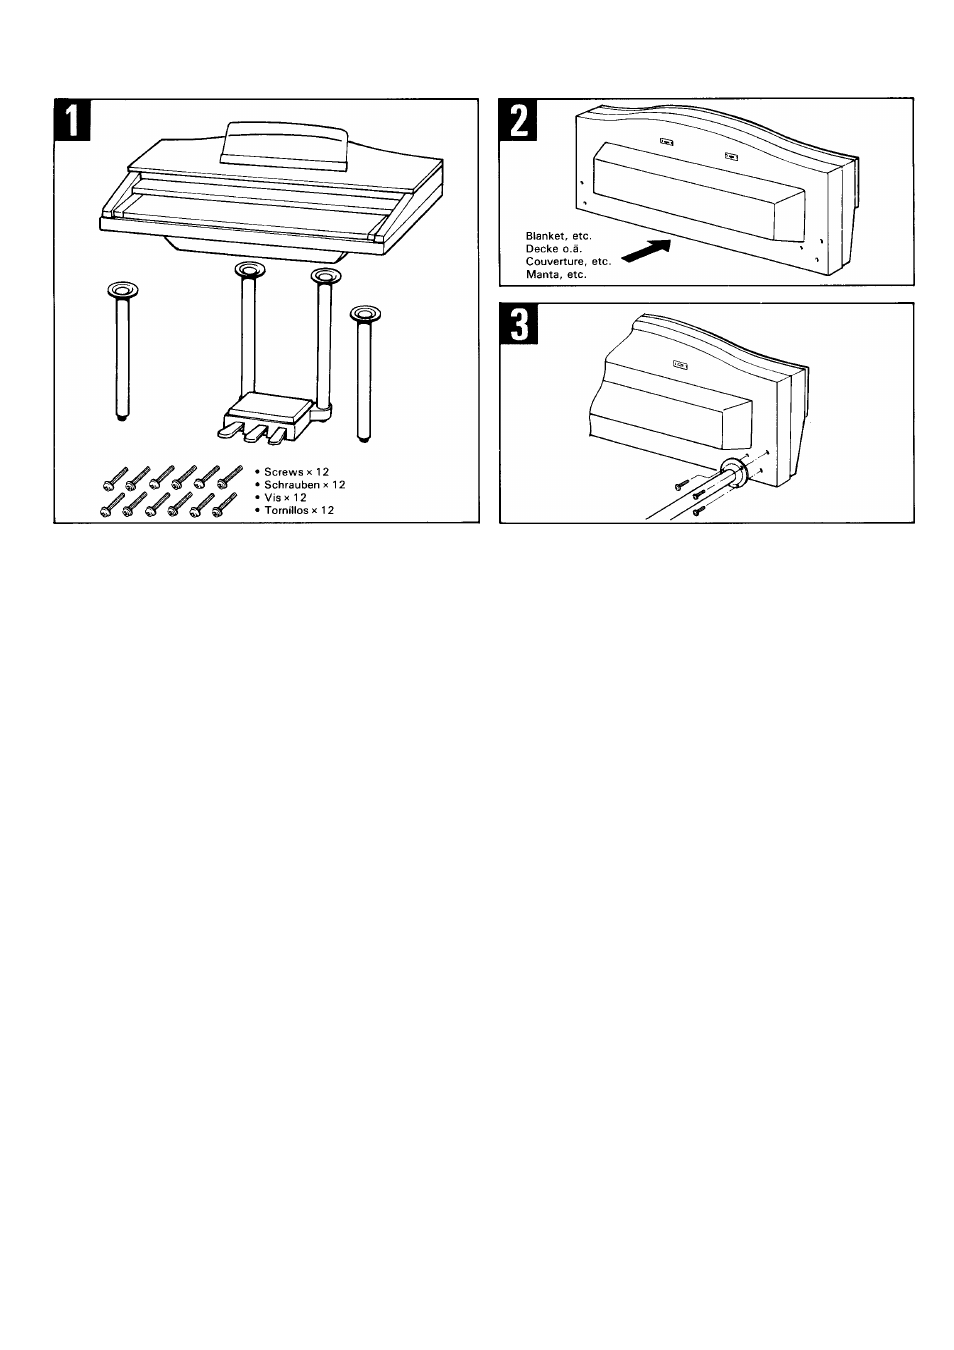
Open the box and remove all the parts.
On opening the box you should find the parts shown in the
illustration. Check to make sure that all the required parts are
provided.
Carefully lean the main unit against a wall.
To make it easier to install the legs, place a soft blanket or
similar material on the floor near a wall, place the front panel
of the Clavinova (the side with the keyboard) on it and gently
lean the unit against the wall—MAKING SURE THAT IT
CAN NOT FALL—as shown in the illustration.
Attach the front legs.
Securely attach the two front legs using three screws each, as
shown in the illustration. Make sure the screws are securely
tightened.
Attach the rear legs and pedal box assembly.
Before attaching the rear legs and pedal box assemble, insert
the plugs extending from the top of each leg into the sockets
in the corresponding recesses in the main unit. Then securely
attach the rear legs and pedal box assembly using three screws
per leg.
Adjust the legs and pedal adjusters.
Stand the Clavinova upright and use the screw feet at the bot
tom of each leg to adjust the length of the legs for optimum
stability. For pedal stability, two adjusters are also provided
on the bottom of the pedal assembly. Rotate the adjusters until
they come in firm contact with the floor surface. The adjusters
ensure stable pedal operation and facilitate pedal effect control.
* If the adjusters are not in firm contact with the floor surface,
distorted sound may result.
HINWEIS: Wir raten davon ab, die Montage und Aufstellung des
CVP-70 alleine auszuführen. Zwei Personen können das
CVP-70 jedoch problemlos zusammenbauen und auf
stellen.
Versandkarton öffnen und alle Teile auspacken.
Der Karton sollte all die in der obigen Abbildung gezeigten Teile
enthalten. Vergewissern Sie sich, daß alle benötigten Teile vor
handen sind.
Das Keyboard vorsichtig gegen eine Wand
lehnen.
Eine Decke auf den Boden neben der Wand legen, die Vorder
seite des Keyboards (Manualseite) entsprechend der Abbildung
daraufstellen und das Clavinova sanft gegen eine Wand lehnen,
um das Montieren der Standbeine zu erleichtern. ACHTEN
SIE DARAUF, DASS DAS CLAVINOVA NICHT UMFAL
LEN KANN!
Die vorderen Standbeine anschrauben.
Entsprechend der Abbildung die Standbeine an das Keyboard
anschrauben. Sicherstellen, daß die Schrauben gut festgezogen
sind.
Die hinteren Standbeine mit dem Pedalkasten
montieren.
Vor dem Anschrauben die Stecker der Standbeine an den einge
lassenen Anschlüssen des Keyboards anschließen. Dann die
Standbeine und den Pedalkasten mit drei Schrauben pro Bein
fest anbringen.
Die Höhe der Beine und der Pedalstützschrau
ben justieren.
Das Clavinova aufrecht stellen und die Schraubfüsse an den
Standbeinen so justieren, daß das Clavinova stabil steht. Am
Pedalkasten befinden sich unten ebenso zwei Stützschrauben,
um diesen zu stützen. Die Stützschrauben drehen, bis sie fest
auf dem Boden aufsetzen. Diese Schrauben gewährleisten eine
stabile Pedalansprechung und vereinfachen die Effektsteuerung
über Pedale.
* Falls die Stützschrauben nicht am Boden aufsitzen, kann es zu
Verzerrungen kommen.