Insert pole cap into the top of the pole, Mounting accessories assembly instructions – Welch Allyn Vital Signs Monitor - User Manual User Manual
Page 65
Vital Signs Monitor
59
Mounting Accessories Assembly Instructions
Mobile Stand Kit (Model #5200-60 & 5200-61)
(Refer to figure 1 for the following
instructions)
1. Lay BASE on floor with wheels down.
Assemble POLE into BASE by
inserting tapered end into hole in
center of BASE. Stabilize BASE. Push
down and twist on POLE until POLE
is tight and two holes in the top of
POLE are aligned between two
adjacent legs in the BASE. Check to
be sure POLE is secure. Tighten if it is
not.
2. Loosen HANDLE BRACKET screws
(tool provided) and slide HANDLE
over pole as shown. Position
approximately 10” from top fo POLE.
Lightly tighten screws.
3. Insert POLE CAP into the top of the
POLE.
4. Assemble BASKET to BASKET plate
by inserting (4) #8 x 3/16” long
phillips screws through four holes
designated “A”. Securely tighten
screws.
5. Assemble BASKET PLATE to POLE
CAP using (1) #8 x 1/2” long phillips
flat head screw inserted through top
hole “B” in BASKET PLATE and into
top threaded hole in POLE CAP. Do
not securely tighten screw.
6. Align two “C” holes in BASKET with
corresponding holes in POLE and insert (2) #8 x 1/2 long phillips screws. Securely tighten these
screws and screw assembled in step 5.
7. Loosen HANDLE BRACKET screws again and slide HANDLE up under basket to desired height
and location. Securely tighten screws.
8. For Model #5200-60 only, attach ACCESSORY PACK by orienting as shown in figure 1 and
inserting onto side plate of BASKET and pushing up. This will lock ACCESSORY PACK onto
BASKET.
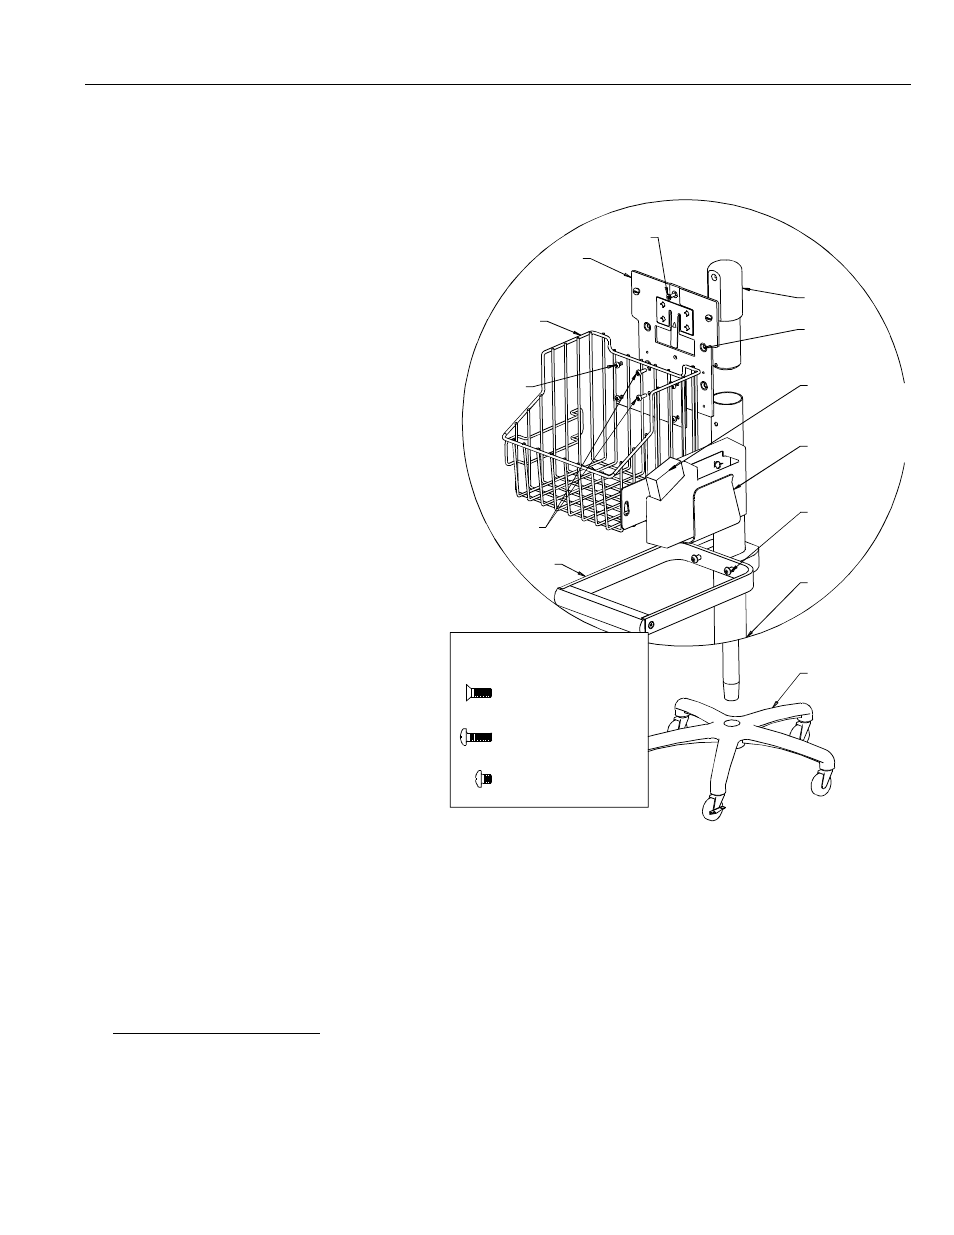
FIGURE 1
“B”
Basket
Plate
Basket
Pole Cap
“D” 4X
Probe
Covers
“A”
4X
Accessory
Pack
Handle Bracket
Screws
Pole
“C”
Handle
Base
Hardware
Included
(1) #8 FLAT HEAD
SCREW, 1/2” LONG
(2) #8 PAN HEAD
SCREW, 1/2” LONG
(4) #8 PAN HEAD
SCREW, 3/16” LONG