E-flite Mystique RES 2.9m ARF User Manual
Page 20
20
4
Use a glue stick (available at a craft store or discount
store) to apply a small amount of adhesive to the first
1 inch (25mm) of the larger carbon stabilator joiner rod.
This will keep the rod secure in the stabilator, yet allow it
to be removed for transport.
Tragen Sie mit einem handelsüblichen Klebestift
etwas Klebstoff auf die ersten 25mm des größeren
Leitwerksverbinder. Das sichert das Leitwerk auf
dem Verbinder, ermöglicht aber zum Transport die
Demontage.
Con uno stick di colla comune, applicare una piccola
quantità di adesivo sui primi 25mm della baionetta
più grande dello stabilizzatore; questo per rendere il
suo inserimento sicuro, ma allo stesso tempo poterla
togliere per il trasporto.
6
Fit the rods into the bellcrank inside the fuselage. Make
sure the smaller rod is inserted into the bellcrank toward
the rudder. Slide the stabilator against the fuselage
so there is a very small gap between the fuselage and
stabilator.
Stecken Sie die Verbinder in den Winkelhebel im Rumpf.
Bitte achten Sie darauf dass der kleinere Verbinder in
den Winkelhebel Richtung Ruder gesteckt wird. Schieben
Sie das Höhenruder an den Rumpf, so dass nur ein sehr
kleiner Spalt zwischen Rumpf und Leitwerk bleibt.
Inserire le baionette nella squadretta che si trova
all’interno della fusoliera, accertandosi che quella più
piccola sia verso il timone. Spingere lo stabilizzatore
contro la fusoliera in modo che ci sia la minima distanza
possibile.
5
Slide the larger and smaller stabilator rods into the
stabilator. They will slide easily, so don’t force them any
farther than they will easily slide.
Schieben Sie den größeren und kleinen
Leitwerksverbinder in das Höhenruder. Schieben Sie
diese nicht weiter rein als sie ohne Kraft in die Öffnung
gehen.
Inserire le due baionette nello stabilizzatore. Esse
dovrebbero entrare facilmente, quindi non forzarle troppo
una volta che sono entrate.
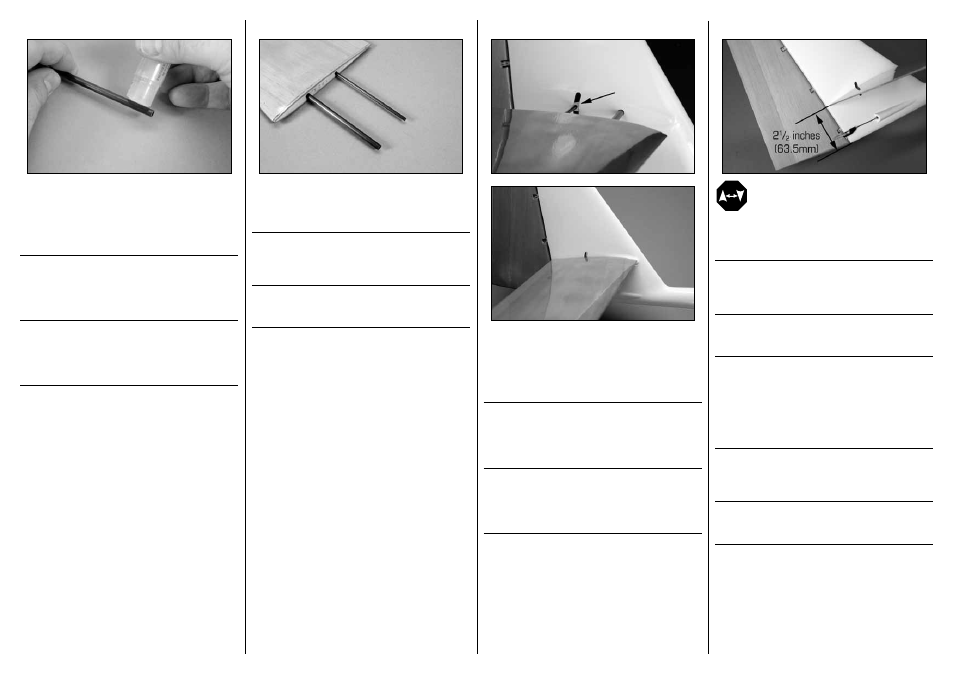
7
Position the stabilator so the trailing edge is 2
1
/
2
inches
(63.5mm) from the bottom of the fuselage. This is the
neutral position for the stabilator for your first flights.
Richten Sie das Höhenruder so aus, dass die Hinterkante
des Ruders 63,5mm von der Unterkante des Seitenruder
entfernt ist. Das ist die Neutralstellung für die ersten
Flüge.
Posizionare lo stabilizzatore in modo che il suo bordo di
uscita sia a 63,5mm dalla parte inferiore della fusoliera.
Questo è il punto neutro dell’elevatore per i primi voli.
Î Place a piece of low-tack tape on the fin in
the area along the stabilator trailing edge. The
neutral position can be marked on the tape so
it can be easily aligned if it happens to move
accidentally while installing the stabilator linkage.
Î Kleben Sie ein Stück Kreppband auf die Finne.
Die Neutralposition kann so auf dem Klebeband
auf der Finne eingezeichnet werden sollten Sie
versehentlich die Neutralstellung verstellen.
Î Mettere un pezzo di nastro a bassa adesività sul
direzionale all’altezza dello stabilizzatore per potervi
segnare la posizione neutra come riferimento.