Sheet7, Drawing view30, Drawing view31 – ERICO IJS100 Insulated Joint Slotter User Manual
Page 7: Drawing view33, Drawing view34
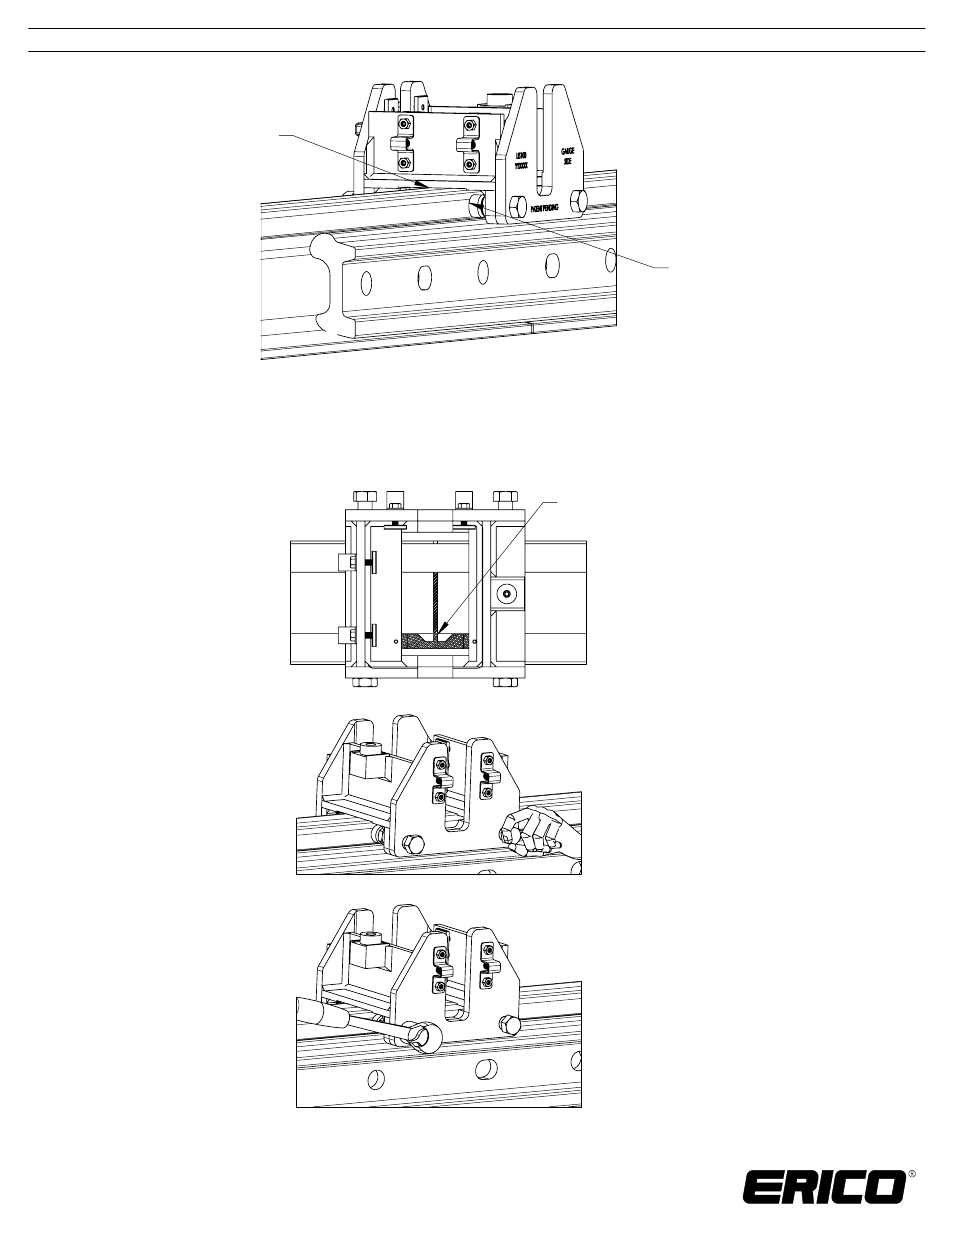
Stationary pads on
the gauge side of rail
Bottom surface of base
on the head of rail
Figure 14: Base properly seated on the head of rail
4. Use the joint alignment bracket to align the base assembly over the insulated joint end
post (Figure 15). Tighten the adjustable clamping pads to finger tight (Figure 16). Confirm
that the base has not shifted and is aligned properly. Apply 20 ft-lb to each of the clamp pads
using a 15/16” hex socket (Figure 17).
Figure 15: Alignment guide oriented with the insulated joint end post
Alignment guide aligned
to insulated joint
Figure 17: Tighten the adjustable clamping pads with wrench
Figure 16: Finger tighten the adjustable clamping pads
TECHNICAL SUPPORT:
www.erico.com
IP8240_B
INSTRUCTION SHEET
7 OF 10
CADDY, CADWELD, CRITEC, ERICO, ERIFLEX, ERITECH, and LENTON are registered trademarks of ERICO International Corporation.
© 2012 ERICO International Corporation.
- 6Z34VF14 Rod Hanging Basket Tray Clip (1 page)
- 766PM Far Side Box Support (1 page)
- 766PMD Far Side Box Support (1 page)
- CADDY MPVTI Low Voltage Mounting Clip (2 pages)
- H-Series CADDY PYRAMID Support System (3 pages)
- CADDY PYRAMID RL, PIPE RETAINERS (2 pages)
- CADDY PYRAMID Rooftop Equipment Support (4 pages)
- CADDY PYRAMID Single Post Support (1 page)
- CADDY PYRAMID TF Series, Fixed Height Tool-Free Supports (2 pages)
- CADDY ROD LOCK Anchor Screw (2 pages)
- CADDY ROD LOCK Beam Clamp (2 pages)
- CADDY ROD LOCK Channel Nut (2 pages)
- CADDY ROD LOCK L-Bracket (2 pages)
- CADDY ROD LOCK Strut (2 pages)
- CADDY SPEED LINK Riveted Accessories (4 pages)
- CADDY SPEED LINK SLK-Keyless Locking Device and Bulk Cable (2 pages)
- CADDY SPEED LINK SLK-Keyless Locking Devices (2 pages)
- CADDY SPEED LINK-Accessory Cables (1 page)
- CADDY SPEED LINK-SLK Cable End Accessories (4 pages)
- TSGB Series Screw Gun Bracket (2 pages)
- GLIDER Electrical Box Attachment (2 pages)
- H Series-Electrical Box Bracket (2 pages)
- ROD LOCK Plywood Pre-set Anchor (2 pages)
- ROD LOCK Strut End Bracket (2 pages)
- ROD LOCK Strut (2 pages)
- CADDY ROD LOCK Strut Nut (2 pages)
- CER4 Cable from Stud (2 pages)
- High Performance CADDY CAT HP J-Hook Assemblies (6 pages)
- KBT Wire Basket Tray Clip (1 page)
- MPCB1220 (2 pages)
- SBC Series, Beam Clamp, 3/8" and M10 (1 page)
- TSR200 Telescoping Strut Replacement Bracket (2 pages)
- TSRBS1625 Telescoping Box (3 pages)
- Universal Pedestal Clamp (2 pages)
- Branch Line Restraint Device (2 pages)
- Branch Line Restraint Strucural Attachment Fitting for Steel 12 gauge (2 pages)
- Branch Line Restraint, Structural Attachment Fitting for Concrete or Wood (2 pages)
- Branch Line Restraint, Structural Attachment Fitting with 3/8"-16 male thread" (2 pages)
- 510 CADDY EZ RISER (2 pages)
- 429 CADDY MACROFIX PLUS NI (1 page)
- Seismic Hanger Clamps (3 pages)
- CADDY PYRAMID Equipment Supports (3 pages)
- CADDY ROD LOCK Bottom-Mount Duct Bracket (2 pages)
- Bottom-Mount Duct Bracket, Narrow (2 pages)
- Top-Mount Duct Bracket (2 pages)