Configure auto start – Despatch Protocol Plus Controller (Heat Only) User Manual
Page 32
O
PERATION
Protocol Plus Owner’s Manual
32
Version 2
Copyright © 2010 by Despatch Industries.
All rights reserved. No part of the contents of this manual may be reproduced, copied or transmitted in any form or by any
means including graphic, electronic, or mechanical methods or photocopying, recording, or information storage and
retrieval systems without the written permission of Despatch Industries, unless for purchaser's personal use.
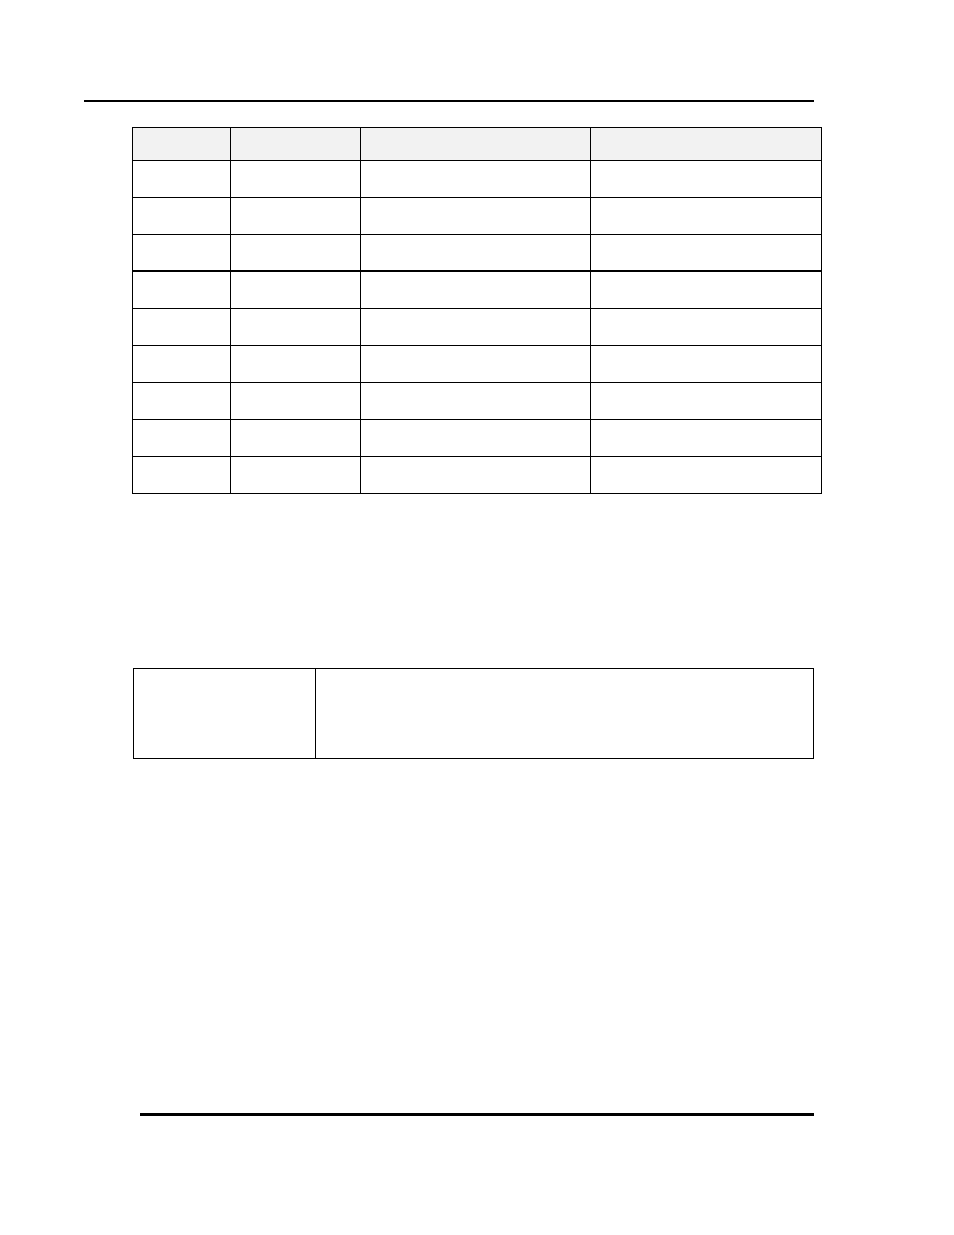
Menu Item
Display
Description
Range
Tuesday
time
Auto Start Tue
Time
Set time on Tuesday for mode
to activate
00:00 to 23:59
Wednesday
mode
Auto Start Wed
Mode
Set mode on Wednesday to
activate
Off, Manual, Timer, Pro-1 to
Pro-8
Wednesday
time
Auto Start Wed
Time
Set time on Wednesday for
mode to activate
00:00 to 23:59
Thursday
mode
Auto Start Thu
Mode
Set mode on Thursday to
activate
Off, Manual, Timer, Pro-1 to
Pro-8
Thursday
time
Auto Start Thu
Time
Set time on Thursday for mode
to activate
00:00 to 23:59
Friday
mode
Auto Start Fri
Mode
Set mode on Friday to activate
Off, Manual, Timer, Pro-1 to
Pro-8
Friday time
Auto Start Fri
Time
Set time on Friday for mode to
activate
00:00 to 23:59
Saturday
mode
Auto Start Sat
Mode
Set mode on Saturday to
activate
Off, Manual, Timer, Pro-1 to
Pro-8
Saturday
time
Auto Start Sat
Time
Set time on Saturday for mode
to activate
00:00 to 23:59
5.6.5.1. Configure Auto Start
1. Access Setup Mode.
2. Press
Page
until
Auto Start
displays.
3. Press
Menu
.
O
If the display does not change, the controller may not have the
realtime clock option.
4. Set
Auto Start Enable
to
Yes
.
5. Using
Menu
, scroll through the options available and press
▲ or ▼ to set the desired
mode for each day of the week. Select from Manual, Timer or Profile 1 through 8.
6. After setting mode, press
Menu
.
7. Enter the time of day you wish the mode to activate.
8. Continue through the week by pressing
Menu
, or press
Page
if changes are complete.
a. One Auto Start mode can be set for each day of the week.
b. Exit Setup by pressing
Page
and holding for three seconds.
c. Press
Select
until
Auto Start
displays.
d. Make sure the correct time and day is displayed. If not correct, set time and
day to the Real Time Clock Page in the Setup mode.