A129, Assembly & installation instructions – Hubbardton Forge 19443010 User Manual
Page 2
Assembly & Installation Instructions
A129
For Tryne Chandelier 19-443010 & 19-443610
Page 2 of 3 _
Hand-Forged,
Vermont-Made Lighting and Accessories
P.O. Box 827, 154 Route 30 South, Castleton, Vermont 05735
20610
4. Attach the other end of the chain to the threaded loop (I) and thread the fixture wires through every other link of
the chain (J) and up through the threaded loop (I) and nipple (D) into the outlet box.
5. Using suitable wire connectors (not provided), connect fixture wires to supply wires (white or ribbed side of
fixture cord to white supply, black or smooth side of fixture cord to black supply, and bare copper to bare copper
or green supply). Push wires back into outlet box.
Caution: Make sure wire connectors are twisted on securely, and no bare wire is exposed.
6. Slide the canopy up the chain and over the threaded loop (I), securing with loop collar (H). Make sure no wires
are pinched between the canopy (G) and the ceiling or crossbar
(C).
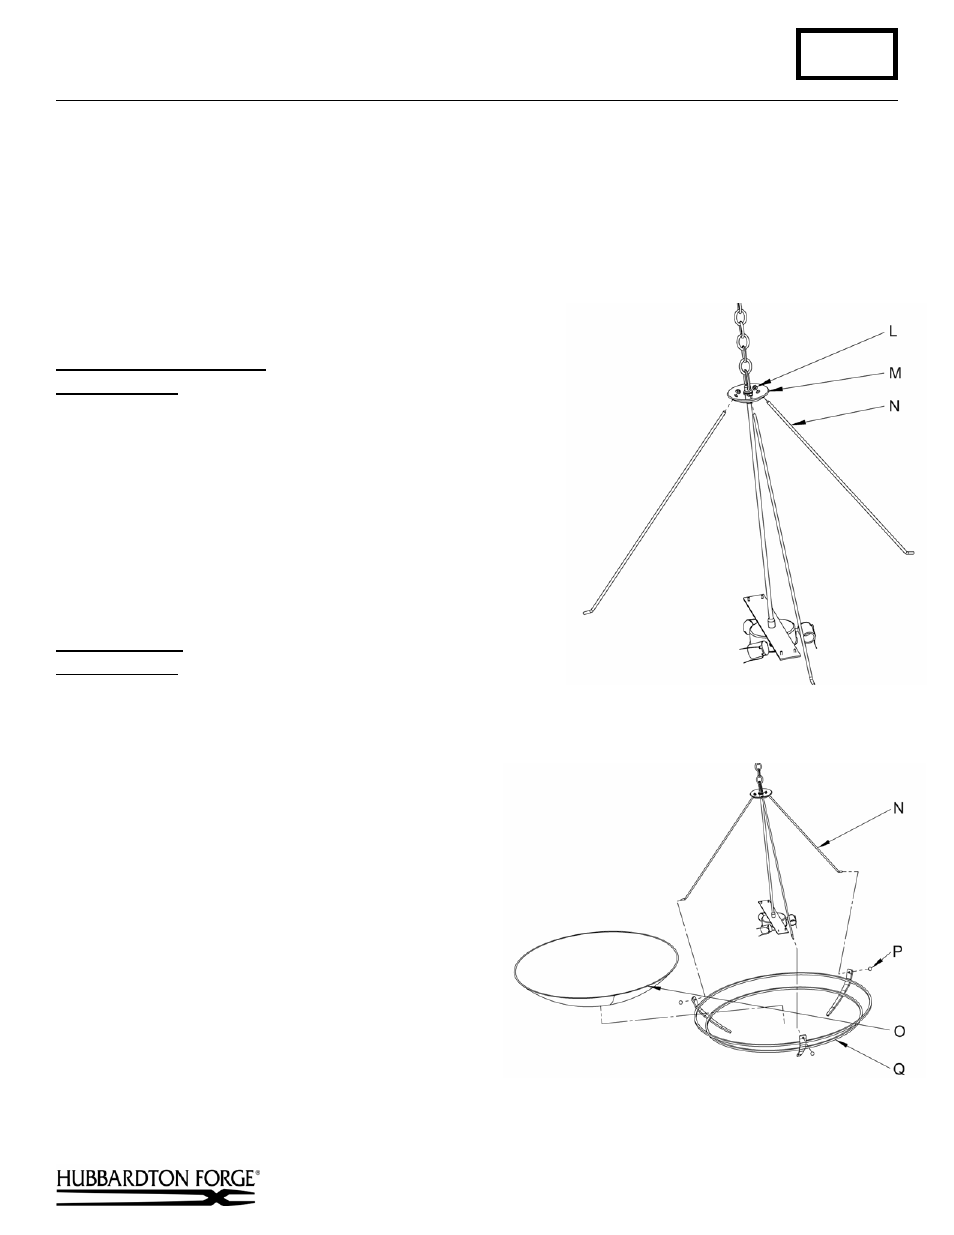
Install the Threaded Rods
(Figure 3)
Component Parts
L Hex Nut (4)
M Bob
N Threaded Rod (4)
1. Slip straight end of threaded rod (N) through holes in bob (M).
2. Thread hex nut (L) onto threaded rod (N) until bottomed out and
snug.
3. Lower threaded rod (N) until hex nut (L) sits flat inside bob (M).
To Install Glass
(Figure 4)
Component Parts
N Threaded Rod (3)
(Figure 3)
O Glass
P Threaded Ball (3)
Q Ring
Assembly
(Figure 4)
1. Install light bulbs prior to installing glass.
2. Insert the ends of two of the threaded rods (N) through
two of the holes in the ring assembly (Q). Secure with
threaded balls (P).
3. Place glass (O) in ring assembly. Insert remaining
support rod, securing with remaining threaded ball.
4. Level glass as needed.
(continued)