Tools required – Reese 37069 MULTI-FIT RECEIVER User Manual
Page 3
TOOLS REQUIRED
3/4”
SOCKET
3/4”
WRENCH
9/16”
SOCKET
9/16”
WRENCH
19MM
WRENCH
19MM
SOCKET
15MM
SOCKET
15MM
WRENCH
1/2”
DRILL
TORQUE WRENCH
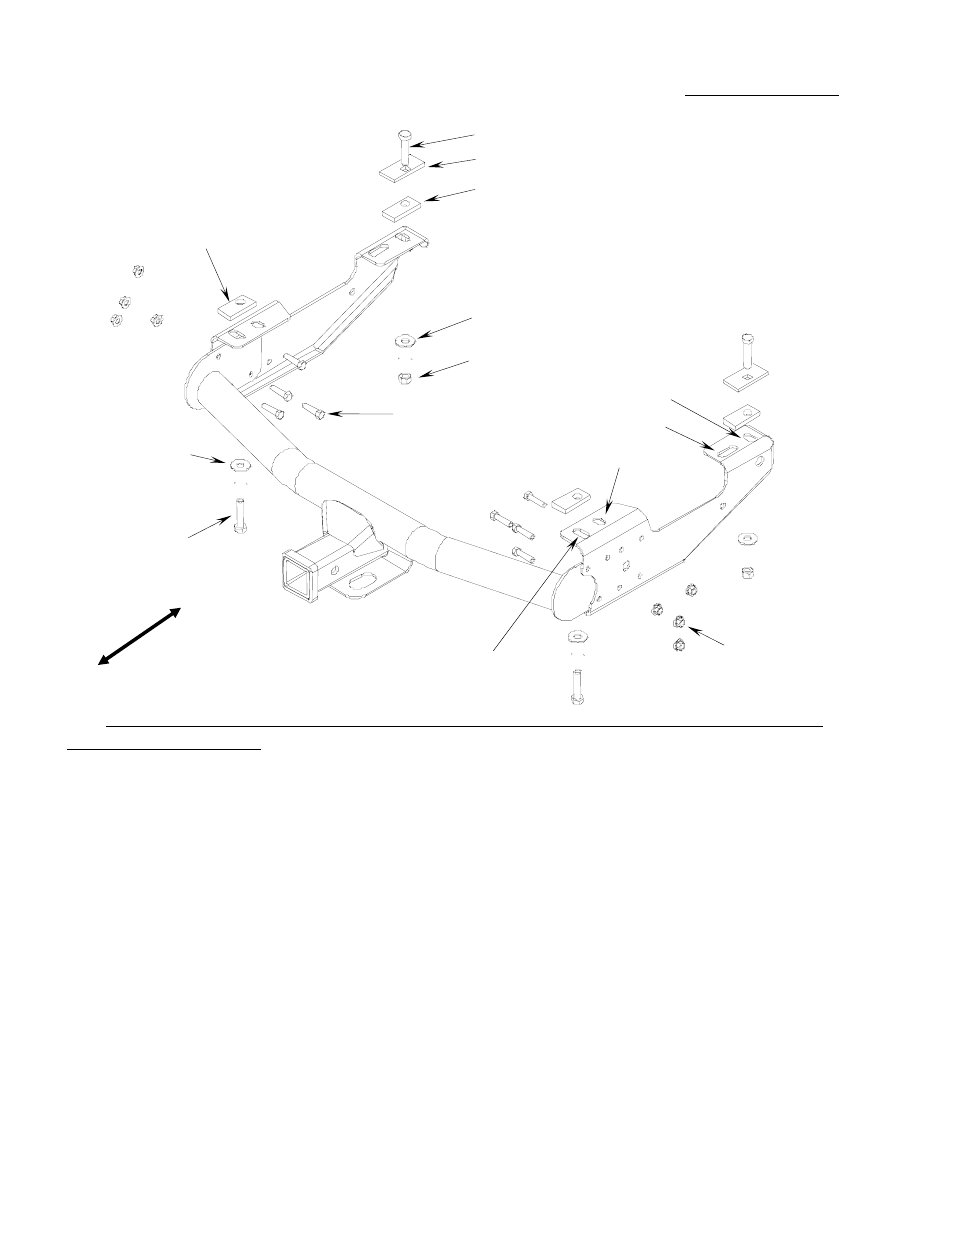
1/2” CARRAIGE BOLT
1/4” BOLT PLATE
3/8” SPACER
1/2” CONICAL WASHER
1/2” NUT
3/8” BOLT
1/2” CONICAL WASHER
12MM HEX BOLT
3/8” FLANGE NUT
3/8” SPACER
FRONT
REAR
HOLE 1
HOLE 2
HOLE 3
HOLE 4
PICTURE ABOVE DOES NOT SHOW INNER MOUNTING BRACKET ON CROSS TUBE FOR CLARITY - SHOWN ON PAGE 9
1988-2000 CHEVY & GMC (CLASSIC):
1. Remove the 12mm diameter bolts at the end of the frame. Some vehicles have an 8mm diameter bolt on the passenger’s side. Remove the bolt and reinstall it with
the head on the bottom of the frame.
2. If your vehicle has rivets on the bottom of the frame, you will need to install one 3/8” thick spacer between the frame and the bracket at each bolting location. These
are needed for clearance between the bracket and the rivet head. The bracket can not be bolted directly against the rivets.
3. Using the supplied 12mm diameter bolt, 1/2” conical washer and fasten the bracket to the frame where the 12mm diameter factory bolt was removed. See the
illustration. For short beds use hole 2. For long beds use hole 1. NOTE: SOME DUAL PIPE EXHAUST SYSTEMS WILL HIT THE BRACKET. THE EXHAUST WILL
NEED TO BE MODIFIED.
4. (Short Beds): Insert 1/2” bolts with bolt plates down through the 1” diameter holes in the frame and into the holes (4) in the bracket. Install a 1/2” flat washer, lock
washer and nut on each bolt. Leave the nuts loose at this time.
5. (Long Beds): Insert 1/2” bolts with bolt plates down through the 1” diameter holes in the frame and into the holes (3) in the bracket. (On some models the forward
hole may be 1/2".) Install a 1/2” conical washer and nut on each bolt. Leave the nuts loose at this time.
6. Place the center section between the brackets as shown. The spare tire may need to be loosened. Bolt through the center section and the bracket with 3/8” bolts,
and 3/8” flange nuts. NOTE: Be sure to use four holes to bolt the brackets to the center section.
7. Tighten the nuts in the following order:
First torque the 3/8" nuts to 35 ft•lb.
Then torque the 1/2" nuts to 70 ft•lb, and the 12mm bolts to 75 ft•lb.
8. Retighten the spare tire if it was loosened.
9. Be sure that the spare tire is not rubbing against the brake hose. If needed, bend the bracket that the hose mounts to a little so that you have clearance between
the tire and the brake hose.
3