8 soft edge setup – Analog Way Orchestra2 User Manual
Page 24
24
4.2 Show settings
3.
The Enable checkbox allows you to activate (default) or de-activate sources. De-activating a source will
result in an inaccessible button on the Orchestra² front panel.
The Edit Soft Edge tab will be available if the connected slave device is being used in Embedded Soft Edge
mode (for example a Di-VentiX II) or if several units has been added to the screen for a multi-univ SEB.
NOTE: For more details on Soft Edge Blending, please refer to the Soft Edge Blending chapter of this manual
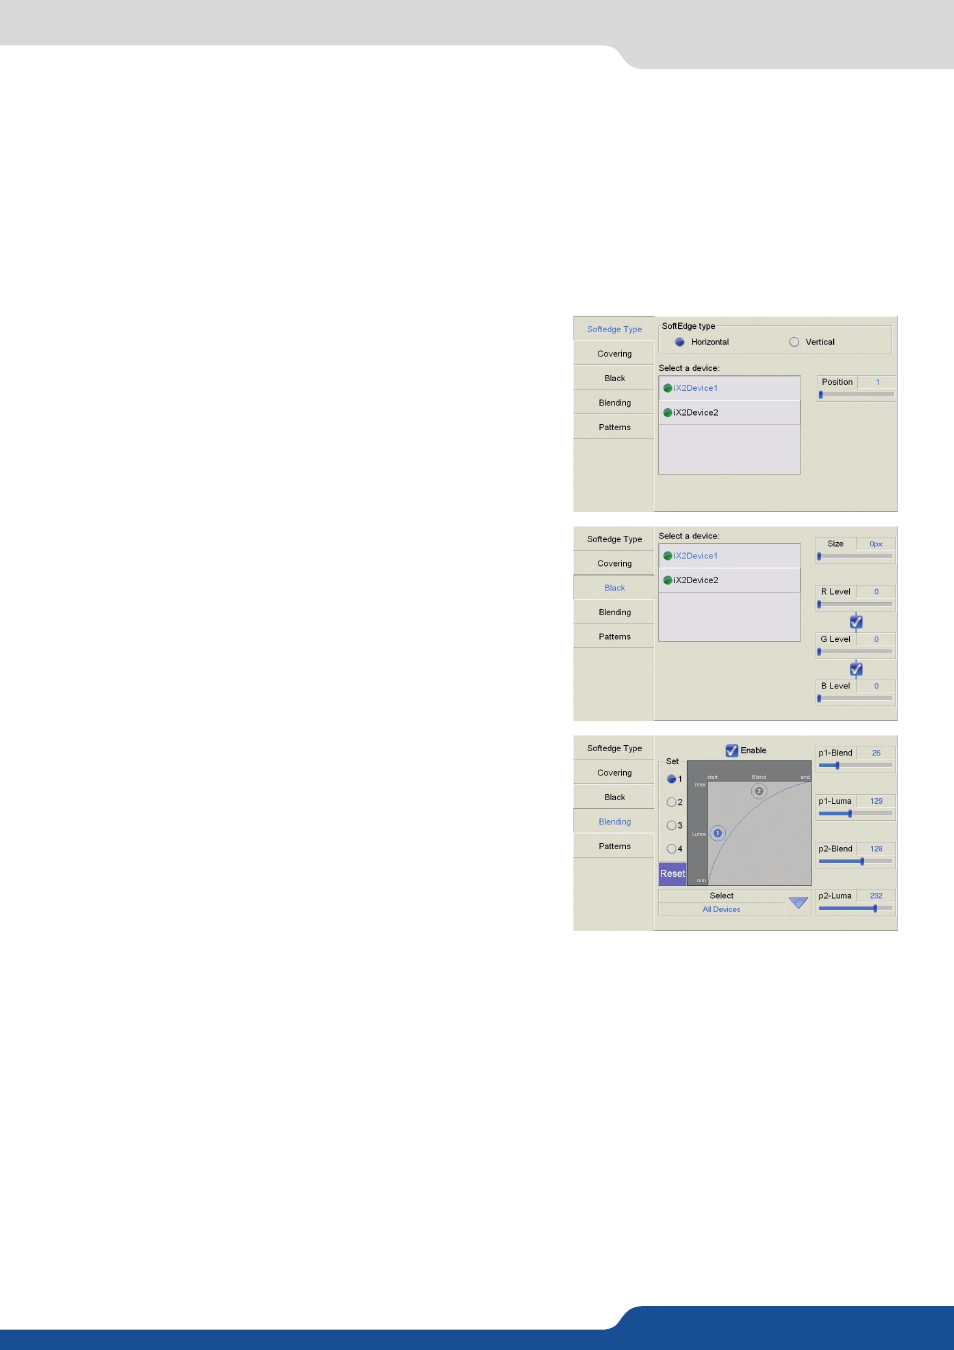
1.
In the Screen Setup page of the Orchestra², press
Edit Soft
Edge
.
2.
On the Soft Edge Setup page, you will find several tabs to
control and adjust your Soft Edge. Press on
Soft Edge Type
to
choose the type of Soft Edge to apply (horizontal or vertical).
You can also position the devices within the screen by scrolling
with the appropriate knob left or right.
3.
Press the
Covering
tab to control the amount of Soft Edge
covering you need (indicated in pixels). By rotating the
corresponding knob, increase (right) or decrease (left) the
amount of image covering on your Soft Edge.
4.
Press
Black
to adjust the levels of black for your Soft Edge. On
the Black tab, select the slave device you wish to work on, and
rotate the corresponding knobs to determine black levels then
the black size for your Soft Edge.
5.
Press the
Blending
tab to fine tune your Soft Edge. Select
a device in the dropdown menu, then, by rotating the
corresponding knobs, position the X and Y points of the
Blending curve, and increase or decrease their values to obtain
the desired onscreen balance for your Soft Edge.
6.
Press
Pattern
to go to the Patterns tab, and select the
appropriate patterns to setup and fine tune your Soft Edge
image. Choose amongst None, V. (vertical) Grey Scale, H.
(horizontal) Grey Scale, V (vertical) Color Bars, H. (horizontal)
Color Bars, Grid, SMPTE, Burst, Centering and Covering.
NOTE: To configure your Soft Edge properly, you will probably need to generate several types of patterns.
Some patterns are dedicated to video projector setup (like Grid or Centering), where others are
designed to adjust image blending (like Burst or Covering). Simply select the pattern you want to use
at any given stage, adjust your settings, and return to the Patterns tab to change pattern for further
adjustments, or to remove it from your screen.
4.2.8 Soft Edge Setup