Series 2000 dryer control panel – Grain Systems PNEG-573 User Manual
Page 19
19
SERIES 2000 DRYER CONTROL PANEL
SERIES 2000 DRYER CONTROL PANEL
SERIES 2000 DRYER CONTROL PANEL
SERIES 2000 DRYER CONTROL PANEL
SERIES 2000 DRYER CONTROL PANEL
SERIES 2000
SERIES 2000
SERIES 2000
SERIES 2000
SERIES 2000
CONTROL SYSTEM
CONTROL SYSTEM
CONTROL SYSTEM
CONTROL SYSTEM
CONTROL SYSTEM
TURNING ON THE SERIES
TURNING ON THE SERIES
TURNING ON THE SERIES
TURNING ON THE SERIES
TURNING ON THE SERIES
2000 CONTROL SYSTEM
2000 CONTROL SYSTEM
2000 CONTROL SYSTEM
2000 CONTROL SYSTEM
2000 CONTROL SYSTEM
The 2000 Control System
2000 Control System
2000 Control System
2000 Control System
2000 Control System controls
all timing functions and safety cir-
cuit checks. It is designed to sim-
plify dryer operation by providing
messages and warnings on its liq-
uid crystal display (LCD).
SETTING THE DRY, COOL,
SETTING THE DRY, COOL,
SETTING THE DRY, COOL,
SETTING THE DRY, COOL,
SETTING THE DRY, COOL,
UNLOAD AND OUT OF
UNLOAD AND OUT OF
UNLOAD AND OUT OF
UNLOAD AND OUT OF
UNLOAD AND OUT OF
GRAIN TIMERS
GRAIN TIMERS
GRAIN TIMERS
GRAIN TIMERS
GRAIN TIMERS
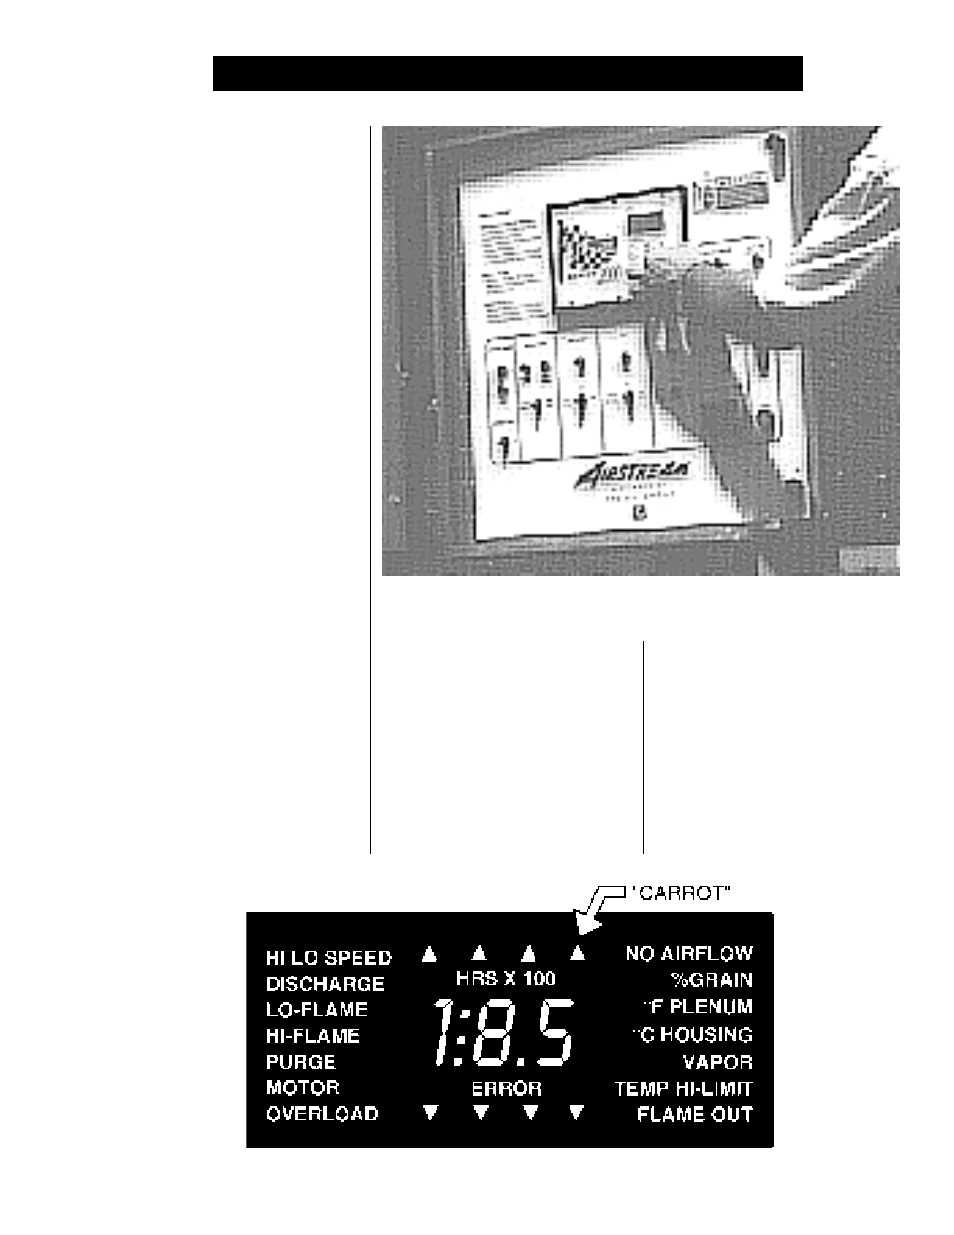
The Airstream Competitor Series 2000 Dryer Control Panel.
The Airstream Competitor Series 2000 Dryer Control Panel.
The Airstream Competitor Series 2000 Dryer Control Panel.
The Airstream Competitor Series 2000 Dryer Control Panel.
The Airstream Competitor Series 2000 Dryer Control Panel.
Figure 4: The dryer LCD display.
Figure 4: The dryer LCD display.
Figure 4: The dryer LCD display.
Figure 4: The dryer LCD display.
Figure 4: The dryer LCD display.
Turn the CONTROL POWER switch
to ON. The monitor will display "GSI"
and the current software version num-
ber.
The DRY, COOL and UNLOAD tim-
ers set cycle times in the STAGED
BATCH drying mode only. The DRY-
ING MODE switch must be in the
STAGED BATCH position. OUT OF
GRAIN sets the length of time the
dryer will run before shutting down
when the LOAD switch is in the AUTO
position. To change the setting of
these timers follow these instructions:
1. Press the PROGRAM (TIMERS)
button until the "carrot" is above
the timer you want to modify.
2. Use the UP and DOWN arrow
keys to change the present time
to the desired setting. The new
time is automatically accepted.
3. Keep pressing the PROGRAM
(TIMERS) button until the carrot
disappears or press the MODE
SELECT button once to exit.
During the operation the remaining
time on each timer is displayed on
the screen. If the power goes out or
if the dryer is stopped, these times
are saved by the controller. When