Initial setup for most devices, Add / remove device keys from netcommand control, Initial netcommand setup for most devices – MITSUBISHI ELECTRIC WD-65736 User Manual
Page 53
6. NetCommand IR Control (736 and 835 Series TVs)
53
To perform this procedure, you need:
The remote controls for both the TV and the
t
device you want to control.
The IR emitter cable supplied with the TV.
t
Note: To set up an A/V receiver, see “Set Up NetCom-
mand Control of an A/V Receiver” later in this
chapter.
Connect and position the IR emitters for the
1.
devices you wish to control. See “IR Emitter Place-
ment” on the opposite page.
Set the
2.
TV’s remote control slide switch to the TV
position and power on the TV if needed.
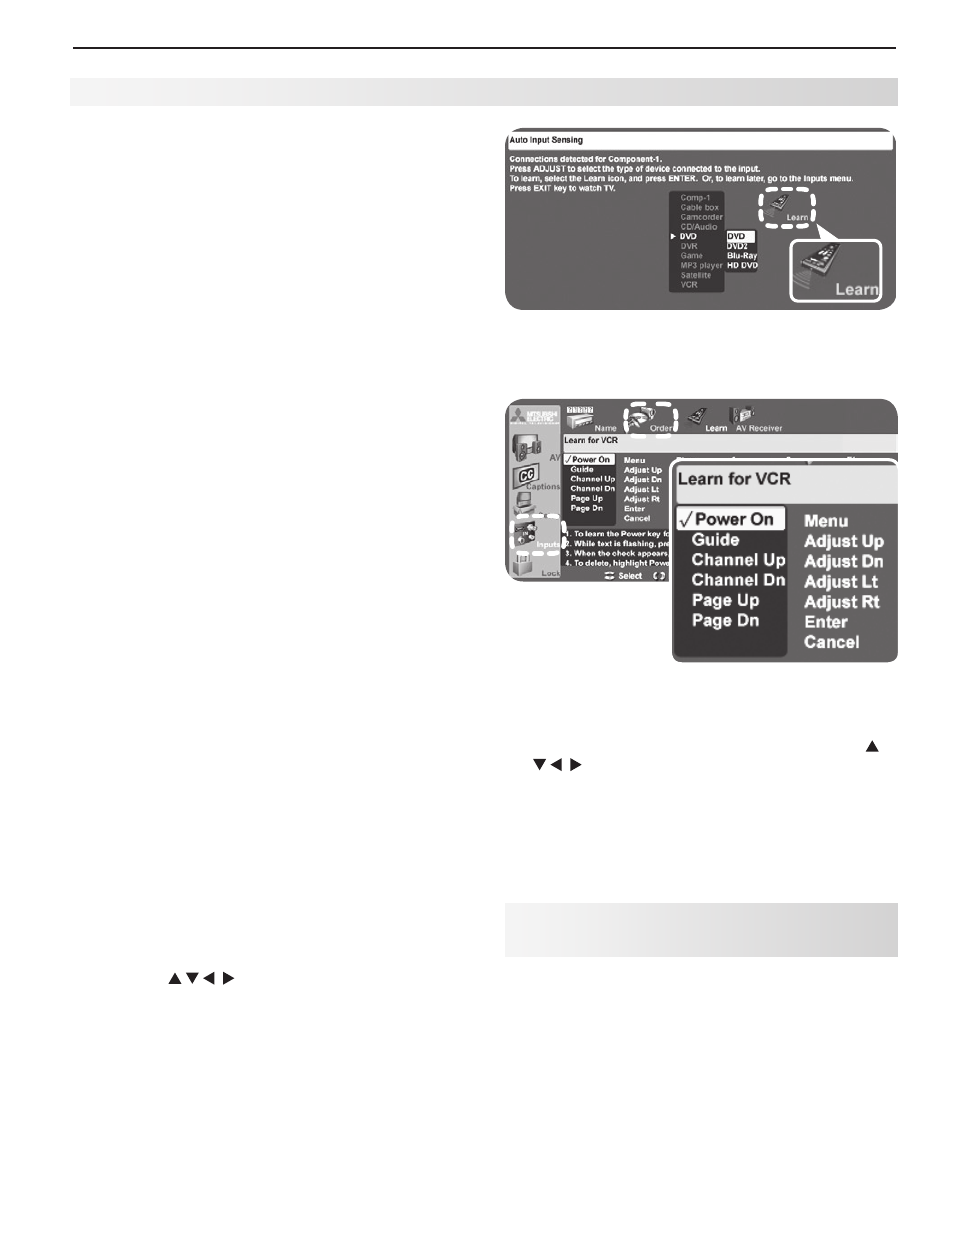
Open the NetCommand
3.
Learn screen in one of two
ways:
If working from the
t
Auto Input Sensing screen
for the device, highlight the Learn icon and
press ENTER to open the Learn screen for the
device.
If performing NetCommand setup at any time
t
after the device has been recognized through
Auto Input Sensing:
a. Press
INPUT to open the Input Selection
menu.
b. Highlight the desired input icon and press
ENTER to switch to that input.
c. Press
MENU, highlight Inputs, and highlight
Learn to open the Inputs > Learn screen
for the device.
The first function highlighted in the
4.
Learn screen
is always Power On. Aim the TV’s remote control
at the TV and press ENTER to begin learning for that
function.
When the
5.
Power On text starts flashing, aim the
device’s remote control at the TV and press and
hold the POWER key until a check mark appears next
to Power On.
If the text stops flashing before the check mark
t
appears, repeat the previous step.
To remove the key from NetCommand control,
t
press the CANCEL key while the key name is
highlighted.
Press the
6.
keys on the TV’s remote control
to highlight other keys on the list. Repeat steps
4 and 5 for each additional function you wish to
control through NetCommand.
If the device’s remote control has keys that are not
7.
in the list, you can associate up to any four keys
with the F1 through F4 keys. Perform NetCommand
setup for the F keys the same way you did for the
named keys. For example, you can:
Assign your DVD player’s
t
CHAPTER SKIP FORWARD and
CHAPTER SKIP BACK keys to F1 and F2.
“Learn” your A/V receiver’s DSP options for the
t
current device.
If the device has a separate
8.
POWER OFF key, press
on the TV’s remote to highlight Power Off.
Repeat the earlier steps to “learn” the POWER OFF key.
If the device has no POWER OFF key, skip this step.
Press
9.
EXIT to finish NetCommand “learning” for the
current device.
From the Auto Input Sensing screen, highlight the Learn
icon and press ENTER to open the NetCommand Learn
screen.
Inputs > Learn screen
Adding or Removing Device Keys
from NetCommand Control
Press
1.
INPUT to open the Input Selection menu, high-
light the device’s icon and press ENTER.
Open the
2.
Inputs menu and highlight the Learn icon.
When the
3.
Learn screen displays:
To add keys: Continue as described earlier
t
under “Initial NetCommand Setup for Most
Devices” on this page.
To delete keys: Highlight the name of the key
t
you wish to delete and press CANCEL on the TV‘s
remote control to clear the check mark.
Initial NetCommand Setup for Most Devices