Discharge line assembly, Caution – Gasboy Hi-Flow Sat Pipng Conversion Kits User Manual
Page 9
MDE-4514 Instructions for Installing Atlas™ Hi-Flow Satellite Piping Conversion Kits M06391K00X • June 2006
Page 9
Installing Atlas Hi-Flow Satellite Conversion Kits M06391K001, K002, K003 and K004
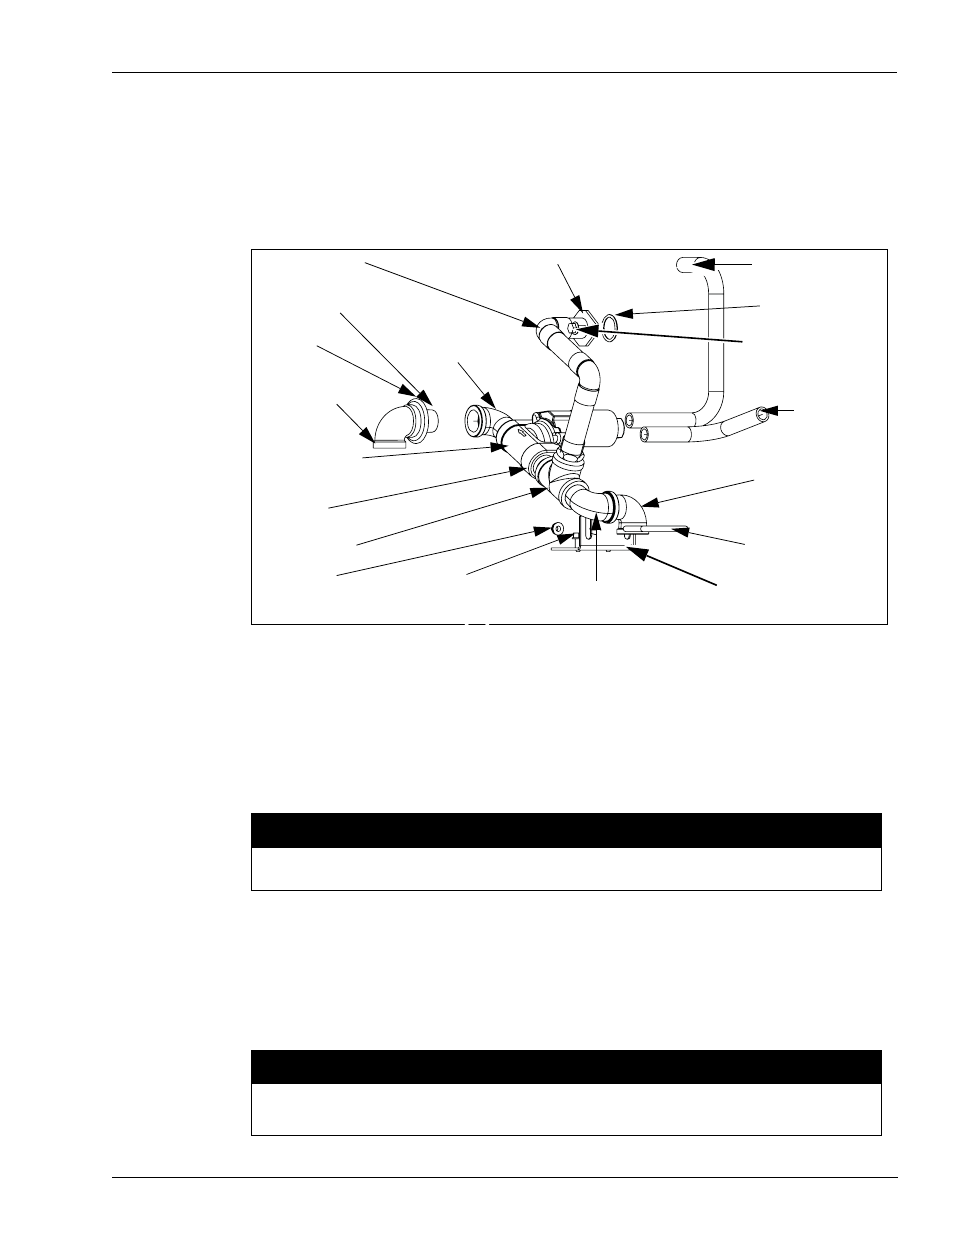
Discharge Line Assembly
See
.
Note: In this assembly, you will assemble all parts in
except the 1 x 1-1/2 Nipple,
Discharge Grommet and Painted elbow.
Figure 4: Discharge Line Assembly
1” Solenoid valve
(067034 or 067036)
Nipple 1 x 2
(R11495-51)
Pipe tee 1 x 1 x 1
(K12630)
Elbow ST 1 x 90
(K02321-20)
Discharge line
assembly
(M05677A001)
Valve conduit
Grade 1
(M05681B001)
Valve conduit Grade 2
(M05680B001)
O-Ring 1.234 x 0.139
(010068-09)
Screw, metric M8 x 16
(M00415B009 - not
thread - forming)
Bracket, Satellite piping
support
(M05690B001)
Screw, metric M8 x 18
(M00417B009 - thread-
forming)
U-Bolt, metric M8
(M00703B002)
Elbow ST 1 x 90
(K02321-20)
Nut, metric M8
serrated
(M00414B003)
Elbow-1” x 90
(painted)
(024895)
Nipple 1x1-1/2
(R11495-20)
Grommet
discharge -1”
(028960)
Elbow ST 1 x 90
(K02321-20)
To Meter discharge casting
!
1
Assemble the following parts as shown in
using pipe sealant on the male threads:
• 1 inch Solenoid valve
• Nipple 1x2
• Pipe tee 1x1x1
• Elbow ST 1x90
• Discharge line assembly
Use a pipe sealant approved for use with fuels. DO NOT USE TEFLON TAPE.
CAUTION
2
Depending on whether you are assembling the discharge for Grade 1 or Grade 2, route
solenoid coil wires through the appropriate conduit (refer to
). Grade 1 is on the left
when facing the junction box.
3
Lightly grease the O-Ring and insert it into the groove on the meter discharge casting (refer to
). Attach the flange on the copper tube assembly (
) to the meter
discharge flange and insert two M8 x 16 screws and tighten them.
Ensure that you select the M00415B009 screws, not the M00417B009 thread formers
or the threads will be damaged.
CAUTION