Ariens 929001 User Manual
Page 18
Attention! The text in this document has been recognized automatically. To view the original document, you can use the "Original mode".
6. Position drive belt over the drive and driven sheaves and
place idler to the inside of the belt as shown in Figure 37.
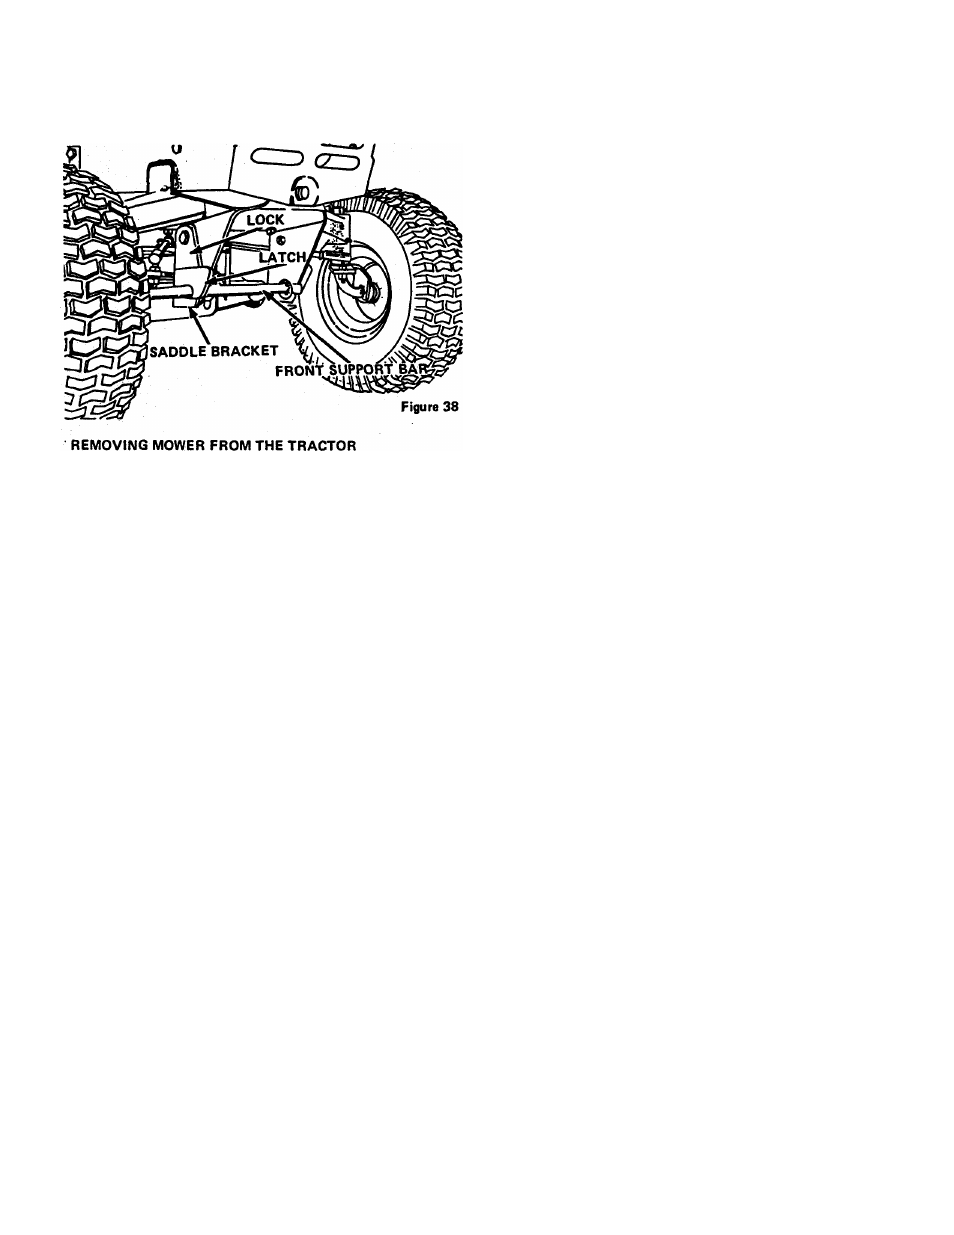
7. Position front support bar in the tractor saddle brackets
and secure with the locks and latches, see Figure 38.
4. Drive tractor to the work area before starting the mower.
5. Slowly engage the implement power clutch with the engine
running at 'A throttle. Increase engine speed to full throttle
after the blades are rotating.
A
CAUTION: KEEP BYSTANDERS AWAY FROM
THE AREA WHILE THE BLADES ARE ROTA TING.
6. The mower blade speed is directly related to the engine
speed. For best mowing results, OPERATE ENGINE
SPEED AT
FULL THROTTLE. Regulate travel speed
on hydrostatic models with the hydrostatic control lever.
Regulate travel speed on gear shift models by selecting an
appropriate gear. The power requirement increases in
dense, high grass conditions. If travel speed of the tractor
is too fast for mowing conditions, the engine and thus
the mower will slow down reducing the cutting efficiency
of the mower. In some conditions, excessive FORWARD
travel speeds may cause the
en^ne
to 'stell and the mower
to plug or a drive belt to slip.
7. For any emergency or "panic" stops, depress the clutch
brake pedal on gear shift, models or the neutralizer and
brake pedal on the hydrostatic models.
NOTE:
KEEP
FOOT
OFF
PEDAL
DURING
NORMAL
OPERATION.
NEVER
USE
PEDAL
AND
HYDROSTATIC
CONTROL
LEVER
SIMULTANEOUSLY
AS
THE
PARTS
ARE
INTER-CONNECTED
AND
THE
LNIKAGE
COULD
BECOME DAMAGED OR MISADJUSTED. ON GEAR SHIFT
MODELS. BELT SLIPPAGE COULD OCCUR.
MOWER ADJUSTMENTS AND MAINTENANCE
A
BE
CAREFUL:
NEVER
ATTEMPT
TO
SERVICE
OR MAKE ANY ADJUSTMENTS TO THE MOWER
WHILE THE ENGINE IS RUNNING. WHEN SER
VICING OR MAKING ADJUSTMENTS, IT IS A
GOOD
PRACTICE
TO
USE
THE
FOLLOWING
PROCEDURE:
Reverse the attaching procedure to remove the mower from
the trwtor.
BEFORE OPERATING THE TRACTOR
Before operating your rotary mower, carefuiiy read this
manual. Become thoroughly familiar with the controls, safety
precautions and proper operating procedures. The more
familiar you become with the tractor and mower the better
results you will have.
Use the following procedure to operate the mower:
1. Move cutting height adjustment lever. Figure 37, to one of
the six positions available to obtain the desired height of
cut.
2. Raise the mower by pulling the attachment lift lever rear
ward until the lock snaps in place.
3. Start the engine as outlined in the TRACTOR OPERATION
section."'
Page 18
1. Disengage implement power clutch.
2. Hydrostatic modeis — Piace hydrostatic control lever in
the "park-start" position and appiy brake lock.
Gear shift models — Place gear shift lever in first gear and
apply brake lock.
' 3. Lower the mower.
'4. Stop engine and remove ignition key.
.5. Disconnect spark plug wire.
f ADJUSTING BLADE LEVEL AND PITCH
Proper leveling of the blades is essential in obtaining a
smooth, evenly cut lawn. Blade pitch is correct when the
front blade tips are slightly lower than the rear blade tips.
Improper pitch adjustment will affect engine power require-i'
ments and can cause uneven cutting.
.r
Use the following procedure to adjust blade level and
pitch:
1. Check tire pressure and adjust as required (front tires -
10 lbs.; rear tires - 6 lbs.)
2. Place tractor on a smooth level surface, preferably a
concrete slab or smooth floor.
3. Place cutting height adjustment lever. Figure 37, in the
highest cutting position.
4. With the attachment lift lever, lower the mower so the
roller assembly firmly rests on the floor.
5. Rotate the blades until they are parallel to the roller
assembly as shown in Figure 39. Measure distances A and
B (from end of blade tips to the floor). These distances
should be equal. If they are not equal, loosen ro ^
assembly adjusting bolt C or D and pivot the mower dk.
up or down until distances A and B are equal with the roller
resting firmly on the floor.