Procedure for measuring charge potential – KEYENCE SK-H Series User Manual
Page 6
6
E SK-H
(Setting procedures)
•
Refer to the correction table shown below to setting the correction value.
z
Initialize
Initialize the measured data or settings.
Procedure for Measuring Charge Potential
1
Turn the power on.
Press the power button. The main unit turns
on and displays the start screen.
2
Press the F1 key to display “MENU.”
Select “Static Meter” from “MODE.”
3
Select the range.
Press the "RANGE" (F3) key to select the
range.
Each time that you press the "RANGE" (F3)
key, the range switches between "Near" and
"Far."
4
Perform the zero-point
adjustment.
Press the "START" (F2) key to switch
the unit to the measurement state.
Point the unit at a grounded target,
and then press the F3 key.
Press the "STOP" (F2) key to stop the
measurement.
This completes the operation.
Initialize
Details
Results
Only the measured data will be initialized.
Factory default
The measured data and all settings other than the date and time will be
reset to their default values.
Near (high-precision mode)
Measurement distance: 25 mm.
Measurement range: 0 to ±2 kV
Far (wide-range mode)
Measurement distance: 100 mm.
Measurement range: 0 to ±50 kV
1. Press the F1 key in “MENU”
and select “Utility.”
2. Select “Area Scaling.”
3. Select “Near mode” or
“Far mode.”
4. Set a value using the T/S keys
and press the “ENTER” key.
Mode
Response
Utility
Initialize
Static Meter
0.8s
>
>
18: 11
BACK
ENTER
MENU
Date
Sound
Backlight
Sleep
Laser Pointer
Area Scaling
>
OFF
AUTO
3min
ON
>
>
18: 11
BACK
ENTER
Utility
Near
Far
1.0
1.0
22: 07
BACK
ENTER
Area Scaling
1.0
19: 14
BACK
ENTER
Near
Near mode
Measurement
area
Measured
value
φ20 mm
0.6
φ40 mm
0.7
φ60 mm
0.8
φ80 mm
0.9
φ120 mm
1.0
Far mode
Measurement
area
Measured
value
φ120 mm
0.7
φ200 mm
0.9
φ300 mm
1.0
φ400 mm
1.1
φ500 mm
1.2
φ660 mm
1.3
No.001
NEAR
8/28 15: 02
15: 18
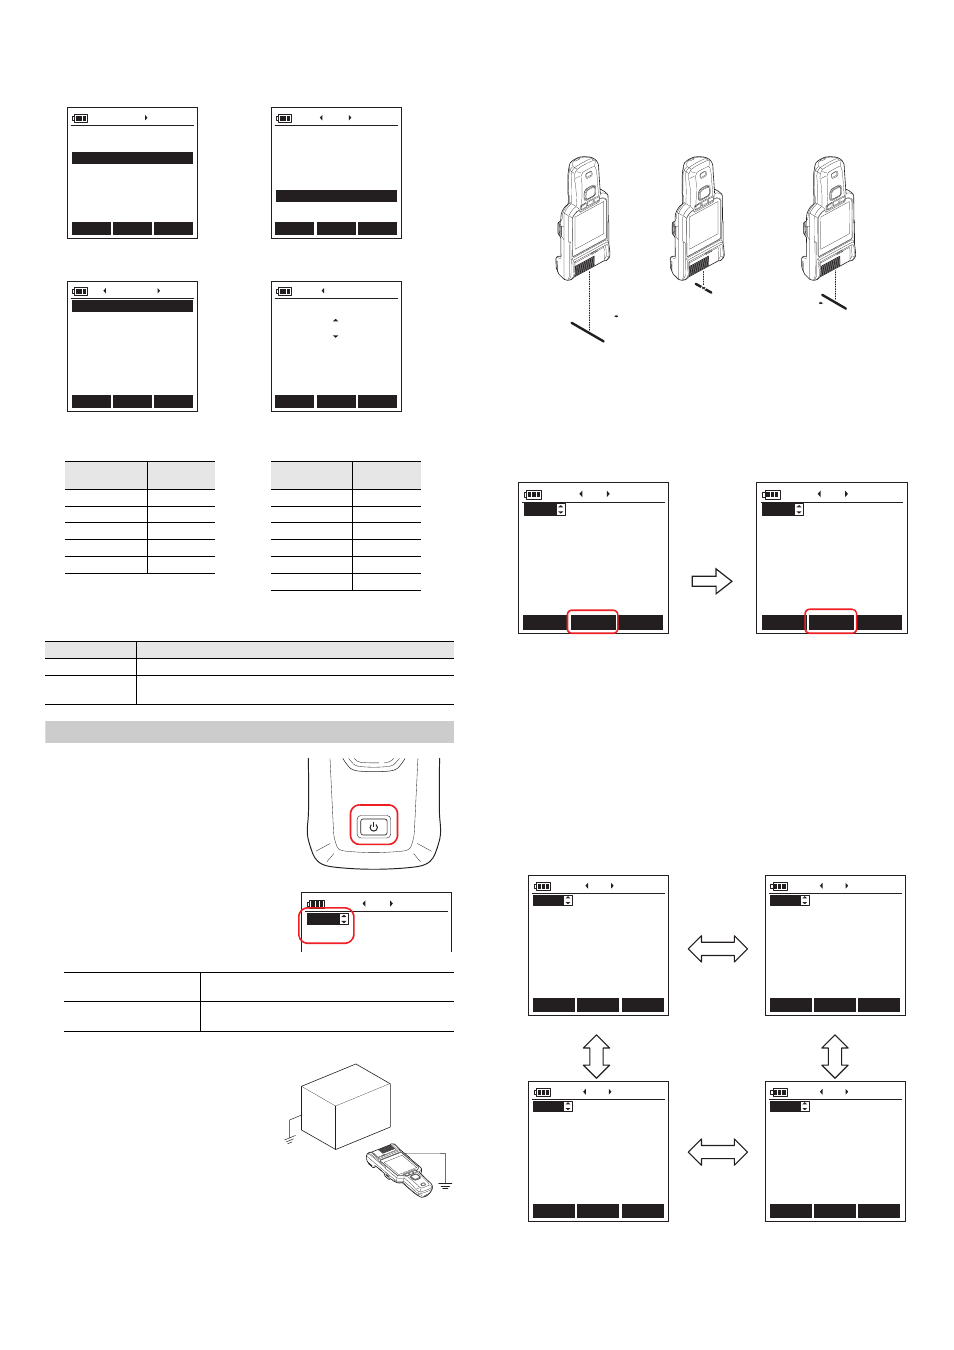
z
Using the laser pointers to align the unit
The laser pointers are used to align the unit with the measurement distance
of the selected range.
Perform the alignment as shown below.
The position at which the laser line and the laser point overlap indicates the
correct measurement distance.
5
Perform the measurement.
Check the laser pointers to confirm that the target is at the correct
measurement distance.
When the measurement stops, the record is automatically saved.
The current value when measurement is stopped (electric charge/humidity/
temperature) and the maximum value/minimum value/absolute value (only for
the electric charge) during measurement are saved.
Records are saved from number 001 to number 100. Note that if a
measurement is performed with a record number in which data has already
been saved, the existing data will be overwritten. If you press the "CANCEL" F1
key to cancel a measurement that has started, the unit will return to the state
that it was in prior to the measurement starting. Switch to the record number
that you will use, and then start the measurement.
Hold down the F2 key when measurement is stopped to delete the data of the
displayed record number.
z
List of screens in charging potential measurement mode
You can use the
W
and
X
arrow keys to switch between displays.
You can switch between displays regardless of whether a measurement is
in progress or not.
OK
Far
Near
No.001
NEAR
V
°C
%
-38
29.0
47
8/28 15: 02
15: 18
MENU
START
RANGE
No.001
NEAR
V
°C
%
-38
29.0
47
8/28 15: 02
15: 18
CANCEL
STOP
ZERO
Press the "START" F2 key to start the
measurement.
Press the "STOP" F2 key again
to stop the measurement.
No.001
NEAR
V
°C
%
-38
29.0
47
8/28 15: 02
15: 18
MENU
START
RANGE
No.001
NEAR
V
°C
%
+
9
29.0
47
8/28 15: 02
15: 19
MENU
START
RANGE
MAX
No.001
NEAR
V
°C
%
-40
29.0
47
8/28 15: 02
15: 20
MENU
START
RANGE
ABS
No.001
NEAR
V
°C
%
-40
29.0
47
8/28 15: 02
15: 20
MENU
START
RANGE
MIN
(1) Current value display
(2) Maximum value display
(4) Absolute value display
(3) Minimum value display
W
/
X
keys
W
/
X
keys
W
/
X
keys
W
/
X
keys