Note, H-3. auto take, Standard auto take – Panasonic WJ-MX50 User Manual
Page 35: Memory auto take, H-4. digital effects, Auto-take, Mosaic-spotlight
Attention! The text in this document has been recognized automatically. To view the original document, you can use the "Original mode".
Note :
When the Square Wipe Button (60) is selected
at this moment, the Mode 6 changes to the
Circle Wipe mode.
(7) Mode 7 - Vibrate ;
Press No.7 button. The Horizontal Shake of
B-bus is obtained.
This can be executed using either the Auto
Take Button (97) or by external controller
equipped with GPI,
Note :
The vibration lasts for 64 video frames.
(8) Mode 8 - Satellite :
Press No.8 button. The compressed satellite
moving of B-bus image can be obtained.
B-bus image orbits within A-bus image.
This can be executed using either the Auto
Take Button (97) or by external controller
equipped with GPI.
Notes :
1. The satellite moving starts and stops using
either the AUTO TAKE Button (97) or by
external controller equipped with GPI.
2. This mode will not be released unless other
mode or function is selected.
To cease special mode, press the MEMORY Button (19)
and SHIFT Button (18) simultaneously again. The unit
returns to the status as it was.
H-3. Auto Take
Instead of the lever controlled Mix and Wipe using
the Mix/Wipe Lever (99), an automatic Mix and Wipe
operation can be made using Auto Take function. Two
kinds of Aufo Take are available.
1. Standard Auto Take
•
Set up the Wipe Pattern and the Digital Effect as
desired.
•
Select the Mix Effect function from NAM Button (72),
MIX Button (73), WIPE Button (74), LUM KEY Button (75)
and CHROMA KEY Button (76),
• Adjust the TRANSITION Control (98) to the desired auto
take time,
•
Press the AUTO TAKE Button (97),
The Auto-Take can be stopped during Auto-taking by
pressing the AUTO TAKE Button (97). The LED's on
both A-bus and B-bus buttons blink while stopping.
The Auto-taking wilt start again by pressing the AUTO
TAKE Button (97) again,
2.
Memory Auto Take
•
Select and recall the programmed memory by pressing
the EVENT NO. Button (14).
•
Press the AUTO TAKE Button (97), The memorized
program will be performed. After this, the next Event
Number is selected automatically.
•
Press the AUTO TAKE Button (97) again. The another
program will be performed.
The memorized program can be recalled and performed
one after another by pressing the AUTO TAKE Button
(97) repeatedly.
The Auto-Take can be stopped during Auto-taking by
pressing the AUTO TAKE Button (97). This button blinks
while stopping. The Auto-taking will start again by
pressing the AUTO TAKE Button (97) again.
H-4. Digital Effects
Many unique Digital Effects are available through this
Digital AV Mixer. By combining specific digital attributes
the experienced user can generates a host of tailored
processes for specific applications. And each can be
stored in a memory location (Event Memory) for instant
recall. Below are a couple of sample combinations.
1.
Auto-Take
Select the same source input for both the A-bus and
B-bus then adjust 2 different Digital Effect versions
which can then be mixed or wiped over each other as
desired. For example.......... ,
Reset the functions to the factory set up mode by
turning off and on the power of the unit.
Press and activate the PAINT Button (36) and STROBE
Button (38) for the A-bus version. The Mix/Wipe Lever
(99) should be turned to A-bus position at this moment.
Turn the Mix/Wipe Lever (99) to the B-bus position.
Press the B-Button (57) on the DIGITAL EFFECT block.
Press the NEGA Button (31).
Adjust the the TRANSITION Control (98) down to "MIN"
position.
Then press the AUTO TAKE Button (97) repeatedly. The
2 different Digital Effect versions instantly overlays the
other set of digital effects for the effected same source
input, as desired.
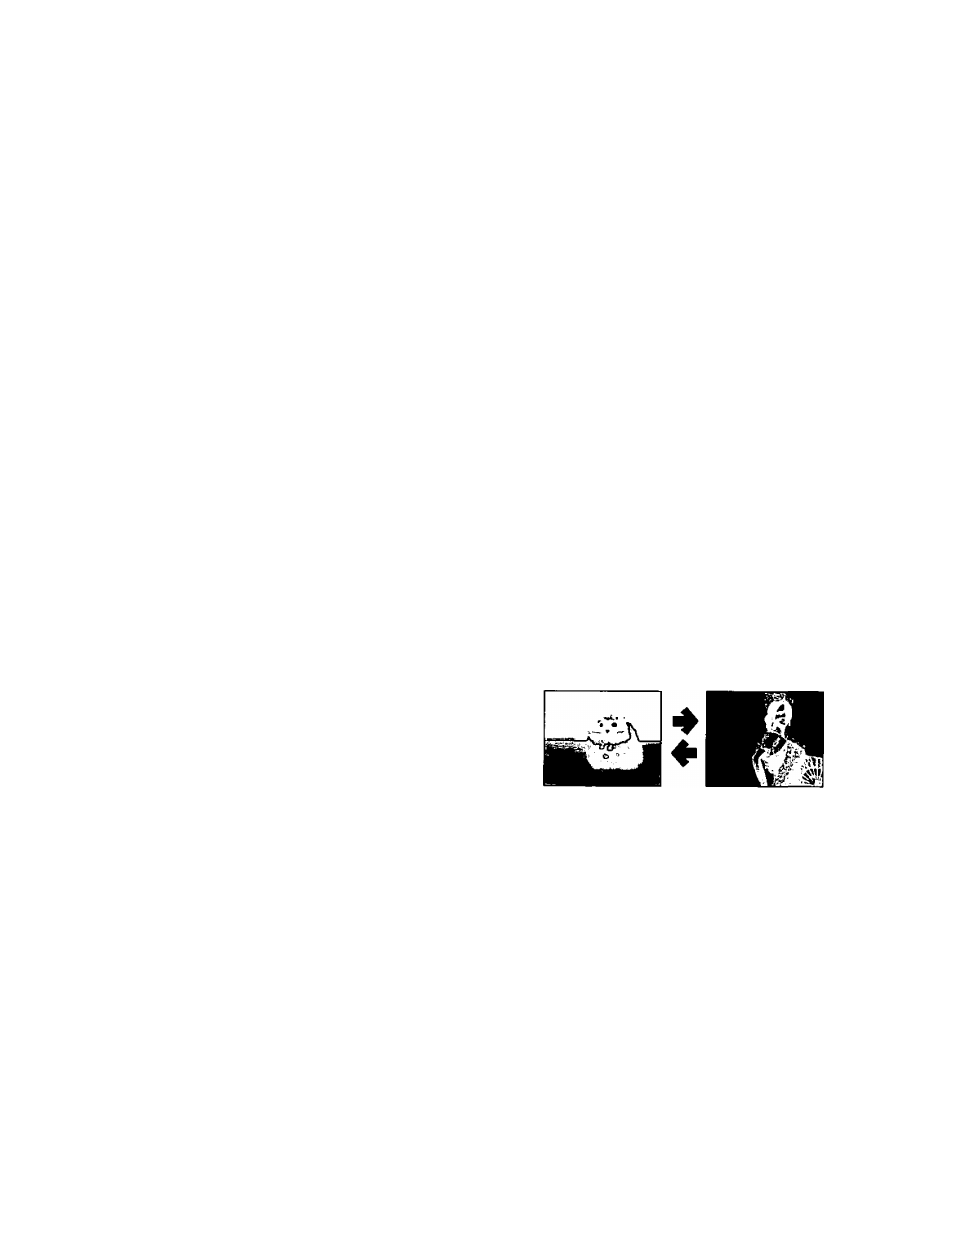
A-bus
B-bus
Paint + Strobe
Negative
2.
Mosaic-Spotlight
Reset the functions to the factory setup mode by
turning off and on the power of the unit.
Select the same source input for both the A-bus and
B-bus.
The A-bus should have no Digital Effects applied to it.
Turn the Mix/Wipe Lever (99) to the B-bus position.
Press the B-Button (57) on the DIGITAL EFFECT block.
Press the MOSAIC Button (33).
Press the Square Button (60) on the WIPE PATTERN
block.
Adjust the Mix/Wipe Lever (99) to obtain the desired
wipe size.
Press the Positioner ON/OFF Button (3).
- 36 -