Pilz PSEN sl-1.0fm 1unit User Manual
Page 13
- 13 -
An Schiebetür montieren
1077138699
1. Montagewinkel für Betätiger an Schiebetür
bündig ausrichten und Schrauben festzie-
hen.
2. Betätiger auf gewünschte Höhe montie-
ren.
3. Montagewinkel für Sensor am Rahmen
bündig ausrichten und mit Schrauben befe-
stigen. (Wichtig: Schrauben nicht fest anzie-
hen)
4. Tür schließen und Montagewinkel zuein-
ander ausrichten. Sensor aufgestellt mit
Montagewinkel an Betätiger drücken (a) und
Schraube (b) festziehen.
5. Sensor entfernen und Schraube (c) festzie-
hen.
6. Sensor zu Betätiger ausrichten und
Schrauben festziehen.
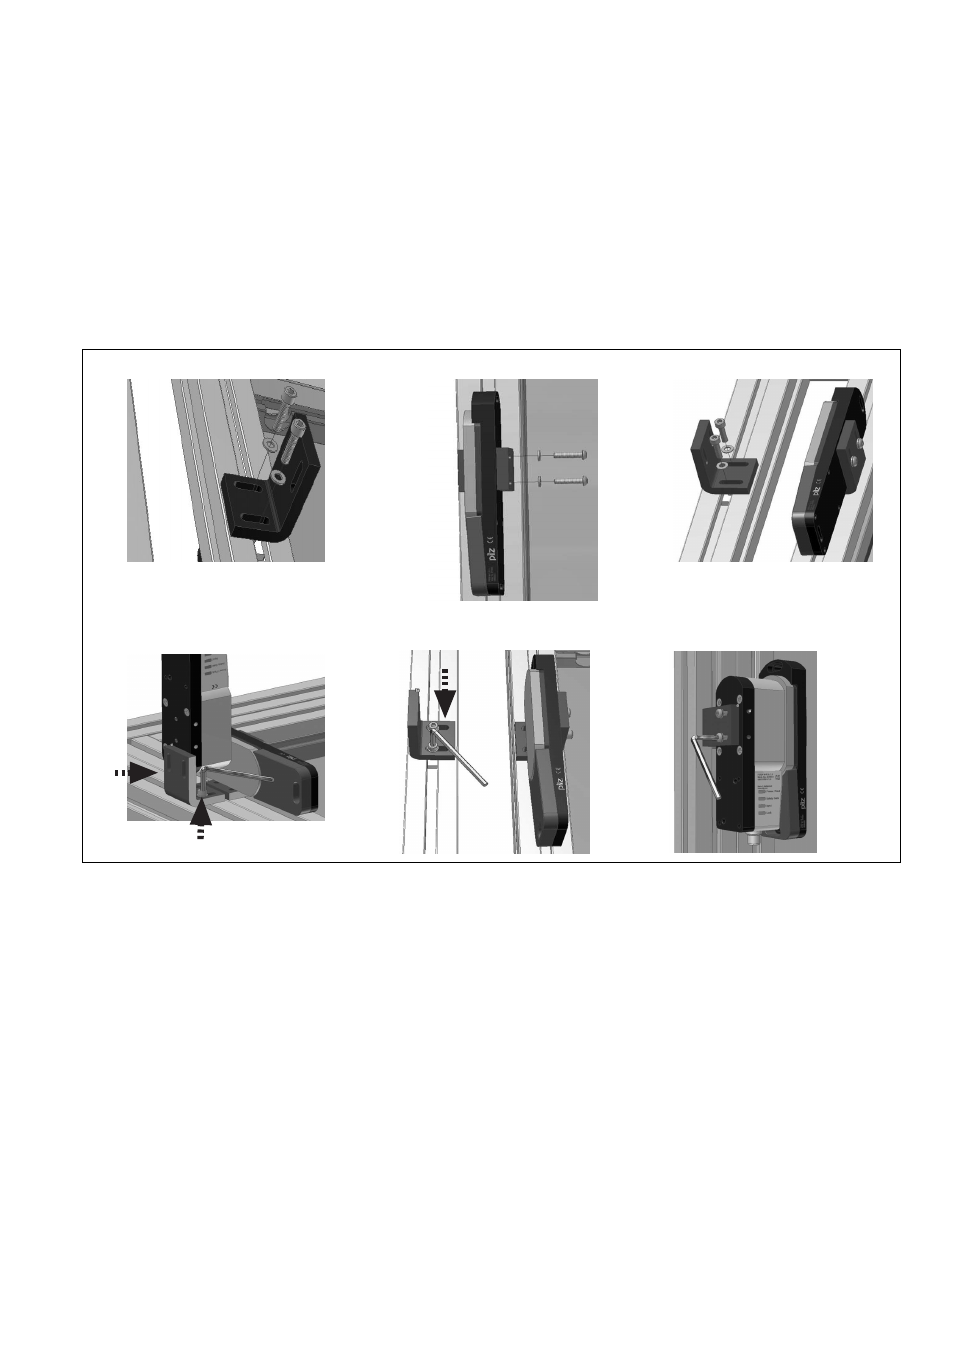
Installing on a sliding gate
1. Align the actuator mounting bracket flush
with the sliding gate and tighten the screws.
2. Install the actuator at the height required.
3. Align the sensor mounting bracket flush
with the frame and fasten with screws. (Im-
portant: do not tighten the screws)
4. Close the gate and align the mounting
plates. Place the sensor on the mounting
bracket, press the assembly against the ac-
tuator (a) and tighten screw (b).
5. Remove the sensor and tighten screw (c).
6. Align the sensor to the actuator and tight-
en the screws.
Montage sur porte coulissante
1. Aligner l'équerre de montage de l'action-
neur sur le bord de la porte coulissante et
serrer les vis à fond.
2. Monter l'actionneur à la hauteur souhaitée.
3. Aligner l'équerre de montage du capteur
sur le bord du cadre et fixer avec des vis.
(Important : ne pas serrer les vis à fond).
4. Fermer le protecteur mobile et l'aligner
avec l'équerre de montage. Appuyer le cap-
teur placé avec l'équerre de montage sur
l'actionneur (a) et serrer la vis (b) à fond.
5. Retirer le capteur et serrer la vis (c) à fond.
6. Aligner le capteur sur l'actionner et serrer
les vis à fond.
Justage
814438667
Die angegebenen Schaltabstände (siehe tech-
nische Daten) gelten nur, wenn Sicherheits-
schalter und Betätiger parallel
gegenüberliegend montiert sind. Andere An-
ordnungen können zu abweichenden Schaltab-
ständen führen. Beachten Sie den maximal
zulässigen Seiten- und Höhenversatz (siehe
„Schaltabstände“ und „Max. Seiten- und Hö-
henversatz“).
Adjustment
The stated operating distances (see Technical
details) only apply when the safety switch and
actuator are installed facing each other in par-
allel. Operating distances may deviate if other
arrangements are used. Note the maximum
permitted lateral and vertical offset (see "Oper-
ating distances" and "Max. lateral and vertical
offset").
Ajustement
Les distances de commutation mentionnées
dans les caractéristiques techniques sont vala-
bles uniquement lorsque le capteur de sécurité
et l'actionneur sont montés l'un en face de
l'autre de manière parallèle. D'autres montages
peuvent conduire à des distances de commu-
tation divergentes. Respectez le décalage laté-
ral et vertical maximal autorisé (voir "Distances
de commutation" et "Décalage latéral et verti-
cal maximum").
1
3
2
5
6
4
(a)
(b)
(c)