Pin 5 pin 3 – Elecraft KAT100 User Manual
Page 28
28
i
During the first two parts of ATU alignment, the transmitted
signal will be fed through the ATU backwards from the normal
direction. That is, the transceiver will be connected to the KAT100's
ANT1 jack, and the dummy load will be connected to the KAT100's
RF IN jack. This provides a more accurate SWR bridge null, and will
also allow direct calibration of the REFL potentiometer (R4).
Connect the KAT100's ANT1 jack (J5) to the appropriate
antenna jack on the K2 or K2/100. There are three possibilities:
• K2/100: use the SO239 jack on the back of the KPA100 module
• Basic (10-watt) K2 without a KAT2 (20-W ATU) installed: use the
K2's normal BNC antenna jack on the lower rear panel
• Basic (10-watt) K2 with a KAT2 installed: use the KAT2's ANT1
jack on the upper rear panel
Connect a 50-ohm dummy load to the KAT100's RF IN jack (J4)
using a short coax cable. The dummy load should have a rating of at
least 5 watts. If you have a K2/100, we recommend that you do all
alignment at higher power (20 watts) to improve calibration accuracy.
In this case you'll need a higher-wattage dummy load.
Turn on the K2, and switch to the 40-meter band.
If you have a KPA100 installed and a dummy load rated at 20
watts or higher, set the POWER control for 20 watts. Otherwise, set
the POWER control for 5 or 10 watts. Use 10 watts if your dummy
load can handle this level, at least for short transmissions.
Set the KAT100's FWD and REFL power potentiometers (R3 and
R4) to about the middle of their range.
SWR Bridge Null Adjustment
Make sure the KAT100 is set up exactly as described on page 27
(Preparing the KAT100 for Alignment). The signal must be routed
backwards through the ATU, and the KAT100 DC and power cables
must be disconnected.
Locate a non-metallic tuning tool suitable for adjusting the SWR
bridge trimmer capacitor, C31.
You can use a DMM or an analog volt meter to null the SWR
bridge. Set the meter for 2 or 3 volts DC full-scale. Connect the (-)
lead to the ground jumper near the front of the KAT100 RF board.
Use an alligator clip so you won't have to hold the lead in place.
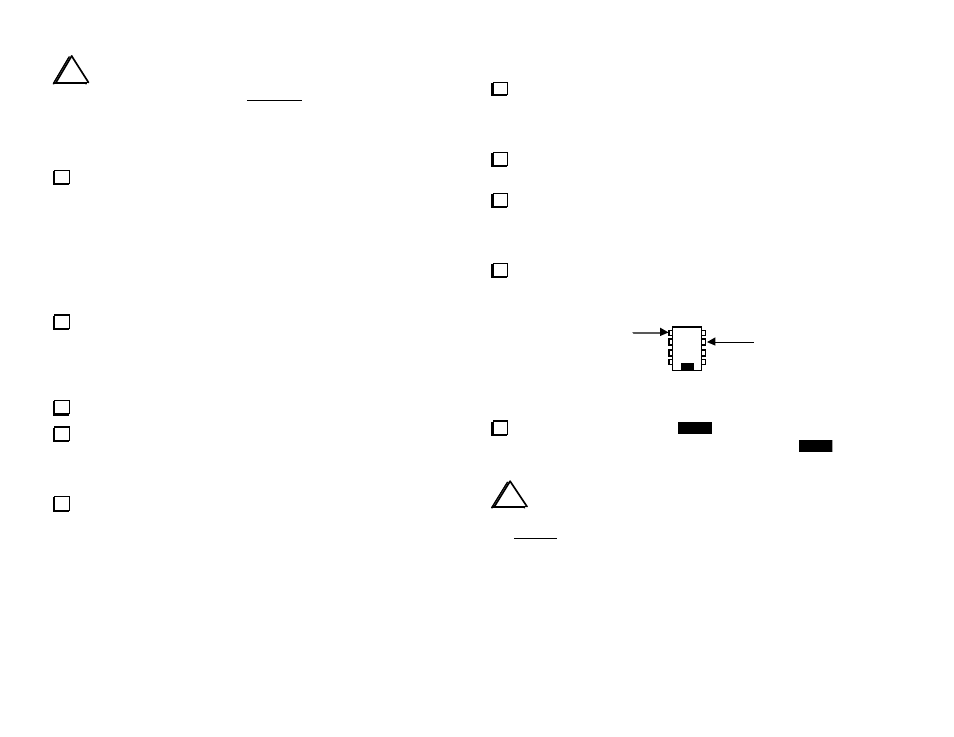
Touch the voltmeter's (+) lead to pin 3 of U5 (see Figure 19).
Note: There will be a DC voltage on this pin during transmit, even
though the KAT100 is not connected to a power supply.
Pin 5
Pin 3
Figure 19
Enter tune mode by holding
TUNE
. Adjust C31 for a minimum
reading on the voltmeter (0 volts, or close to it). Hold
TUNE
again
when finished.
i
You may see an indication near 0 volts over a small
range of C31's rotation. It is very important to position C31 in
the middle of this range. Repeat the null adjustment step until
you're sure that C31 is positioned correctly.