02 position torch head, 03 insert the electrode, N7500 system operation – Tweco N7500 User Manual
Page 38: Torch head
SYSTEM OPERATION
5-2
Manual 89250890
N7500
SYSTEM OPERATION
5.02 Position Torch Head
1. Position the Torch Head above the work piece you want to start gouging.
2. Using the Angle Gauge supplied with the N7500, adjust the Torch Head to the work piece. The angle gauge
sets the torch angle, electrode stick-out and aligns the air nozzle.
3. The air should flow between the electrode and the work piece.
Charts, graphs and other data in this manual are based on a 45° electrode angle, but you can use electrode angles
from 45° to 60°. Users should develop their own standards based on shop conditions and application.
5.03 Insert the Electrode
1. Adjust the Electrode Guide Block for the electrode diameter being used. Loosen thumbscrew, adjust, and
then tighten the thumbscrew again (See “Figure 5-3: Torch Head Parts”).
2. Push the Electrode Release (clamping) Lever down and insert the electrode FEMALE END FIRST into the
rear of the Torch Head until it protrudes through the nozzle. The two-legged spring and protective shield
should rest squarely on top of the electrode. To check their positions, look down the rear of the torch. If
the spring and shield are pushed to either side, withdraw the electrode and insert it again. Release the
clamping lever.
- 5/16 3/8
- 1/2
- 5/8
- 3/4
N7500
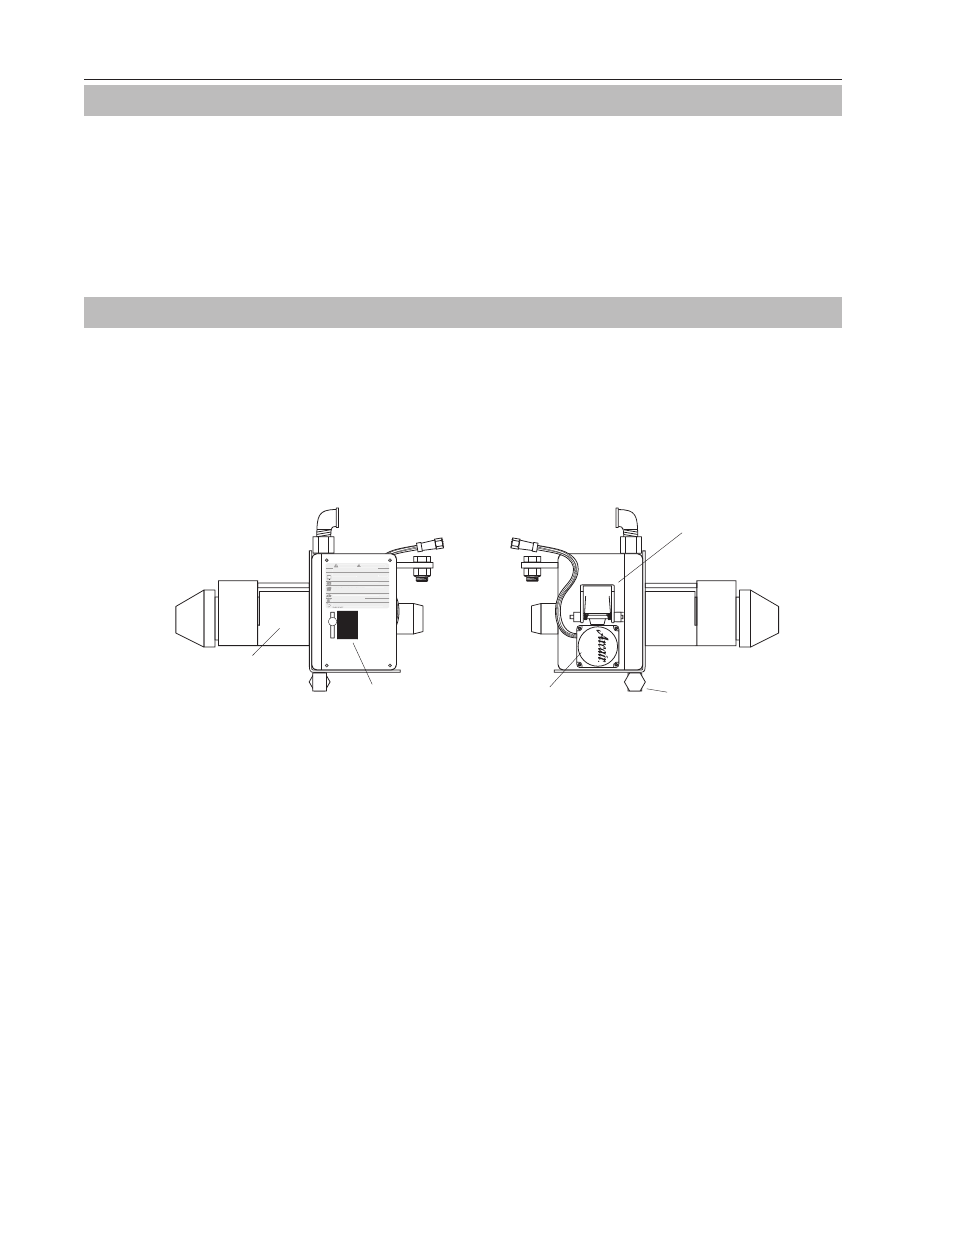
TORCH HEAD
ELECTRODE
GUIDE BLOCK
3/8” NPT AIR INLET
AIR PLENUM HOUSING
MOUNTING
FIXTURE
MOTOR
ELECTRODE
RELEASE
LEVER
MOTOR CABLE
DC POWER
CABLE
BUSBAR
ART# A-10834_AB
WARNING! AVERTISSEMENT!
Insure good ground from power supply to workpiece. Poor ground may cause
damage to any or all components.
g
g
p
g
g
Use only with compressed air.
pp y
p
g
pp y
p
g
See manual.
yy
Smoke, fumes, and gases can be dangerous to your health. Use adequate
ventilation. Keep your head out of the smoke.
g
g
,
,
g
g
Protect yourself and others. Wear ear, eye, and body protection.
Noise can damage hearing.
Electric shock can cause injury or death. Disconnect power before servicing.
A
h t l
d
k
i j
d b
ki
Welding sparks can cause fires and explosions.
Assurez la bonne terre de l'alimentation d'énergie à l'objet. La terre pauvre peut endommager
quelques des ou tous composants. Employez seulement avec l'air comprimé. Voir le manuel.
La fumée, les émanations et les gaz peuvent être dangereux pour votre santé.
Employez à ventilation proportionnée. Gardez votre tête hors de la fumée.
Protégez-vous et d'autres. Portez l'oreille, l'oeil, et la protection de corps.
Le bruit peut endommager l’ouïe.
Un choc électrique peut causer des blessures ou la mort. Déconnectez la puissance
L les rayons de l’arc,
Arc rays, hot slag, and sparks can injure eyes and burn skin.
es scories et les étincelles chauds peuvent blesser les yeux et brûler la peau.
Les étincelles de soudage peuvent causer des incendies et des explosions.
Figure 5-3: Torch Head Parts
3. Flip the power switch located on the side of the Control Box labeled “POWER OFF” & “POWER ON” to the
“ON” position.
4. The electrode will retract for several seconds and stop.
5. The Mode Indicator Display on the Remote Pendant will light up showing the various menu options pre-
programmed in the unit.
“Menu Setting” is the default display whenever the unit is powered up.