Appendix, Trouble shooting guide – SONIQ DVR150 User Manual
Page 52
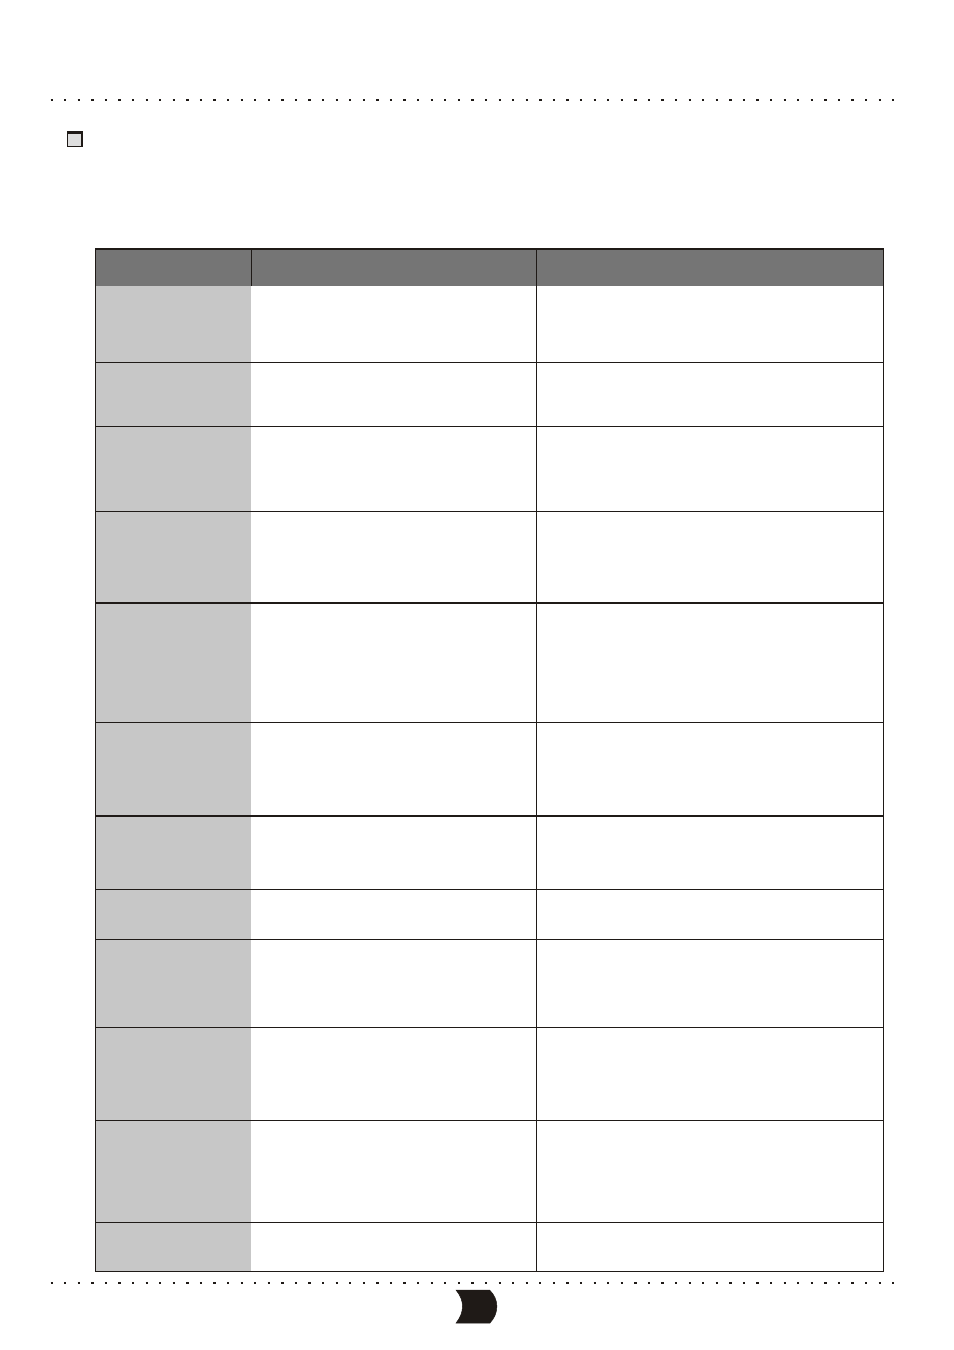
TROUBLE SHOOTING GUIDE
When having problems with this unit, please check the chart below for a possible solution before
requesting servicing.
SYMPTOM
CAUSE
REMEDY
1. The power plug not connected
2. Power plug and socket not contact tightly
3. The power socket not switched on
1.Connect the power plug into the wall outlet securely
2.Plug again or change another socket
3.Switch on the power socket
1.Signals not properly connected
2.Discs wrapped or dirty
3.The unit in the mute status
1.Connect signals securely
2.Clean and process the discs
3.Press the [MUTE] button again
1.Signals not properly connected
2. The TV set not properly adjusted
3.This video output system of this unit not
matching the TV scanning manner
1. Connect signals securely
2. Reset your TV sets AV/TV status
3. Press the [I/P] button
1.TV system not right
2.TV set’s color saturation not properly
adjusted
3.Video output setting not right
1.Press the [I/P] button to reset the system
2.Re-adjust the TV set’s saturation
3.Re-adjust video output settings
1.No disc in the drive
2.Disc not properly placed
3.Condensation on the laser head
4.Not in the playback mode
5.Wrong disc format
6.Disc dirty
1.Load a disc
2.Reload the disc with the playback side facing down
3.Turn on the power for about 1 hour without a disc
before playing
4.Press the [PLAY] button
5.Load the discs
6.Carefully clean the disc with soft cloth outwards from
the center
1.Remote control not pointing to the sensor window
2.Remote control more than 8 meters away from
the TV set
3.Remote control butteries’ voltage become low
4.Obstacles between remote control and the unit
1.Hold the remote control in proper position
2.Use the remote control nearer to the TV set
3.Replace the batteries
4.Remote obstacles
1.Disc information not well stored
2.Wrong buttons pressed
3.Extermal static leakage into the cover
1.Wait for 5-10 seconds and this unit will restore
normal playback.
2.Press the right button
3.Restart playing after unplugging this unit for 1-2 minutes
1.TV system not suitable for the disc
1.Adjust the TV system
1.The system not properly connected
2.No disc or the disc not recordable
3.The disc finalized
4.No space left in the disc
1.Connect the system properly
2.Please a recordable disc
3.Replace the disc
4.Replace the recordable disc
1.The input source is not prepared well
2.The video output system not adequate
3.The actual input source and selected input
source not correspond
1.Reset the signal sourcee
2.Switch video output system
3.Select proper input source
1.The disc not meet the requirements
2.Wrong time settings (system clock or
recording time)
3.The source not work property when
recording
4.Powered off
1.No space left in the recording disc
2.Too bad quality of the recording disc
1.Reload new DVD R,DVD RW disc
2.Reset time recording settings
3.Ensure normal working of the source when recording
4.Switch the unit to the standby mode
±
±
1.Reload a blank disc
2.Use high quality recording disc
No power
No sound
No picture
No color
No disc
reading
Remote control
failure
Instantaneous
function failure
Picture rolling
External signals
record failure
No monitoring
signal
Time recording
failure
Recording
abortion
47
APPENDIX