Powers 430/1430 Series HydroGuard Multi-Valve Hi/Lo Systems User Manual
Page 2
PRIOR TO INSTALLATION
1.
Flush all piping thoroughly.
2.
Make sure all valve handles are rotated fully clockwise
(off).
3.
If you use copper tubing, excessive heat from soldering
will damage the internal parts of the valve. Take care to
protect valve components or remove the internal parts
of the valve and checkstops before soldering.
4.
IMPORTANT
In order to make any temperature adjustments to the
valves, you must open enough showerheads (or end-
of-line fixtures) to ensure you have adequate flow
across the valve. For example, the 431 requires a min-
imum flow of 7 GPM to operate properly. The 420
requires a minimum flow of 2 GPM. Refer to the flow
chart for additional information.
5.
Use a thermometer at the showerhead or install an in-
line thermometer at the point of use..
SET UP PROCEDURE
You MUST FOLLOW THESE PROCEDURES in order to
properly adjust your Hi/Lo System.
You need proper flow across the valves in order to set a
maximum temperature.
Refer to the Individual Setting Procedures as guided in
these directions.
1.
Close the 420 Valve by turning the handle fully clock-
wise.
2.
Open the ball valve at the discharge of the 430 series
valve.
3.
Open one fixture.
4.
Set the PRV for a 15 psi differential. (See Setting the
PRV)
5.
Close the Ball valve at the discharge of the larger valve
and open the smaller valve by rotating the handle fully
counterclockwise.
6.
Open enough fixtures for a flow of at least:
2 GPM if the small valve is a 420
4 GPM if the small valve is a 427
7.5 GPM if the small valve is a 431
7.
Set the maximum temperature for the smaller valve
(Refer to Individual Setting Procedures for the 420,
427 or 430).
8.
When the valve has the correct maximum temperature
setting, close the smaller valve.
9.
Open the ball valve at the discharge of the larger valve.
10. Open additional fixtures so that enough water flows
through the larger valve:
7.5 GPM if the large valve is a 431
15 GPM if the large valve is a 432
24 GPM if the large valve is a 433
40 GPM if the large valve is a 434
11. Set the maximum temperature for the larger valve
(Refer to Individual Setting Procedures for the 430).
12. When water is at desired outlet temperature, shut off all
end of line fixtures (showerheads).
13. Open the smaller valve.
14. Test the Control: Verify temperature control over a wide
range of flow by opening a fixture and monitoring the
discharge temperature. Gradually open additional fix-
tures to verify that flow through both valves is properly
controlled.
15. For any problems, refer to Troubleshooting.
INDIVIDUAL SETTING PROCEDURES
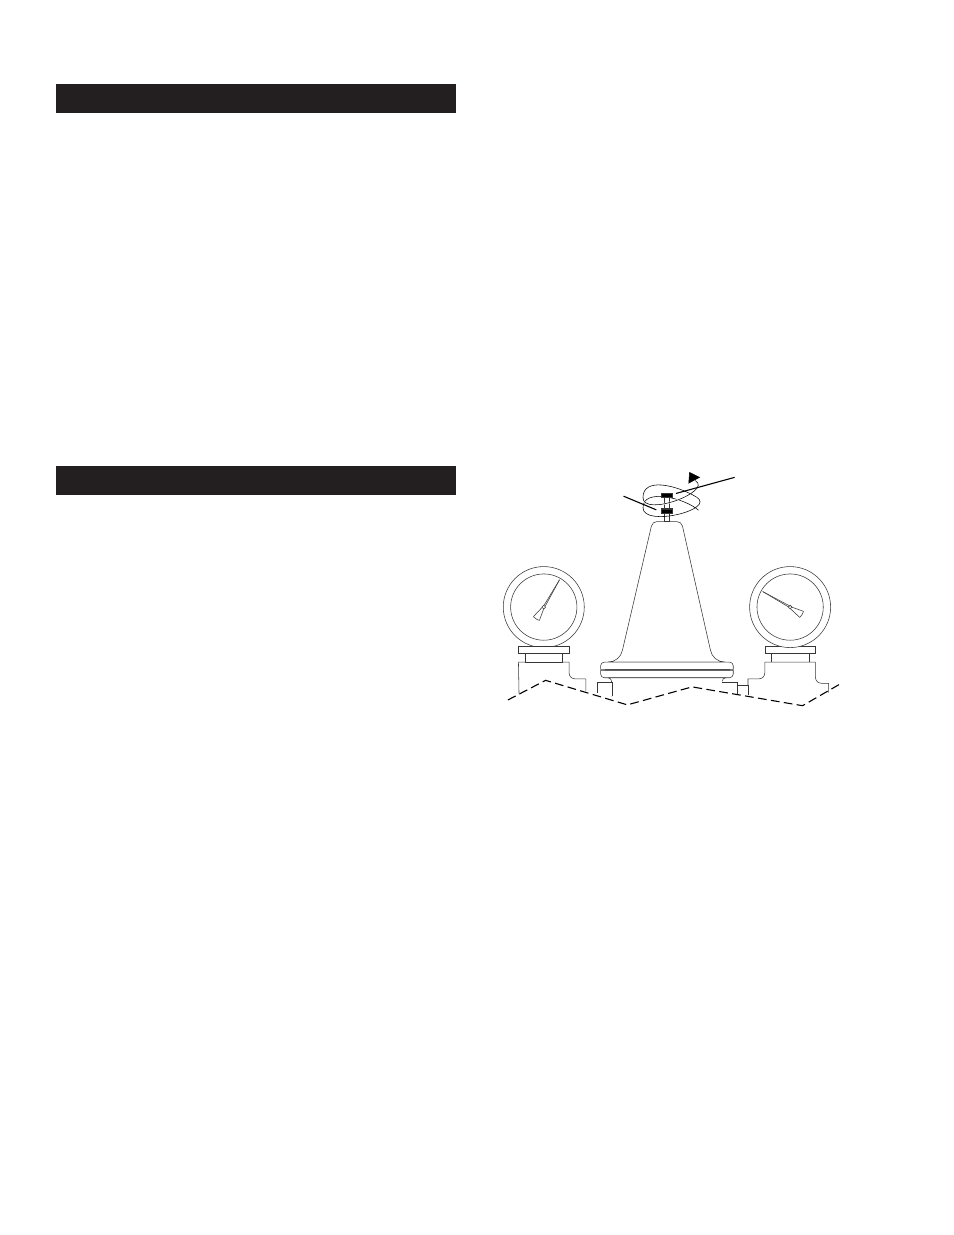
Set the PRV Valve
The Hi/Lo Assembly has one pressure gauge on each side of
the Pressure Reducing Valve. The left measures the supply
pressure, the right measures the output pressure going to
the fixtures. The PRV should be set so that the outlet pres-
sure gauge is approximately 15 psi less than the supply
pressure gauge (a 15 psi differentail across the PRV).
1.
Loosen the lock nut at the top of the PRV Valve. This
must be all the way out or you will be limiting the range
of your adjustments.
2.
Adjust the PRV valve so the outlet pressure gauge (right)
reads approximately 15 psi less than the supply pres-
sure gauge (left).
Turning the adjustment nut clockwise will decrease the
differential across the PRV (allowing the PRV to open
sooner).
Turning the adjustment nut counterclockwise will
increase the differential across the PRV (allowing the
PRV to open later).
Adjust the temperature of the 420 valve
The Standard 420 Hydroguard valve was factory set to deliv-
er 115°F [46°C] tempered water.
1.
Turn the handle fully counterclockwise to deliver water
at the maximum temperature.
2.
Loosen and remove handle retaining screw and handle.
3.
If the measured temperature exceeds the desired maxi-
mum outlet temperature, move the limit stop one spline
Supply Pressure Gauge
Outlet Pressure Gauge
2.
Adjustment Nut
CW: decrease differential
CCW: increase differential
1.
Lock Nut
Turn fully CCW
before setting PRV
TI430-420
Page 2